Reference diagram
LETTER · Download PDF (1 page)
Free original resources
Learn to draw a chair using clean contour lines only. Define edges, keep proportions, and avoid shading while building a printable practice plate.
Original reference diagrams, four practice exercises and separate worked answers. All files are free. No signup required.
LETTER · Download PDF (1 page)
LETTER · Download PDF (1 page)
LETTER · Download PDF (4 pages)
Choose A4 or US Letter for your printer. The reference and answer illustrations are not physical rulers; follow the scale instruction printed on the practice worksheet.
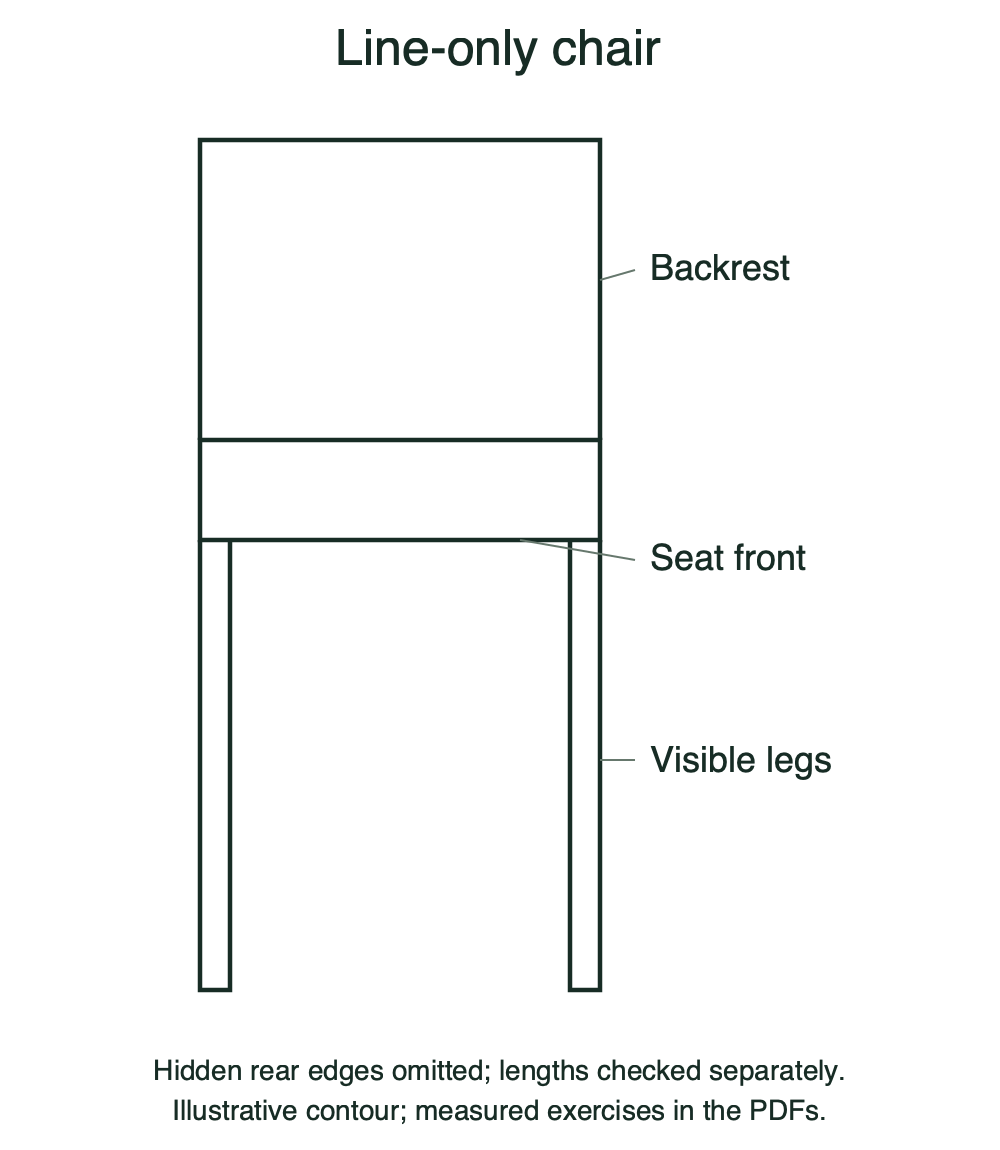
This lesson teaches a line-only chair drawing: every visible edge is described by a contour line, and no shading, hatching, or tonal fill is used. You will learn a simple convention for line weight, a proportion check for legs and backrest, and a method for keeping the drawing readable without tone. The free kit below includes a contour edge guide, a proportion reference, a one-page worksheet with four questions and a blank practice box, and separate worked answers. All numerical examples are hypothetical and should be replaced by measurements of your own paper and reference chair.
A contour edge is the line where two surfaces meet or where the silhouette turns away from view. In a line-only chair drawing, each visible edge gets one clear line. Do not add shading, cross-hatching, or filled areas. If two edges overlap, draw the nearer edge continuously and stop the farther edge at the overlap. Use a simple front-facing drawing convention. A rear leg hidden behind a front leg is left out of the contour view. Keep a separate four-leg length list so hidden parts can still be checked. In this lesson, the stated seat depth means the seat shape's second dimension on the page, not a measured furniture specification.
Use a simple convention: outline edges at medium weight, interior contour edges at light weight, and no line at all where an edge is hidden. This convention is a choice, not a universal standard; any consistent weight scheme is valid if it keeps edges readable.
Proportion means the relative size of parts. For a simple chair, compare leg length to seat height and backrest height to seat width. Use a pencil or paper strip to mark one dimension, then compare it to another. Label any numbers you choose as hypothetical examples: for instance, if the seat front is 40 units wide and the leg is 45 units long, the leg is slightly longer than the seat width.
Keep units consistent. If you measure in centimeters, record all comparisons in centimeters. A proportion check is not a manufacturing standard; it is a drawing aid that helps you keep the chair believable.
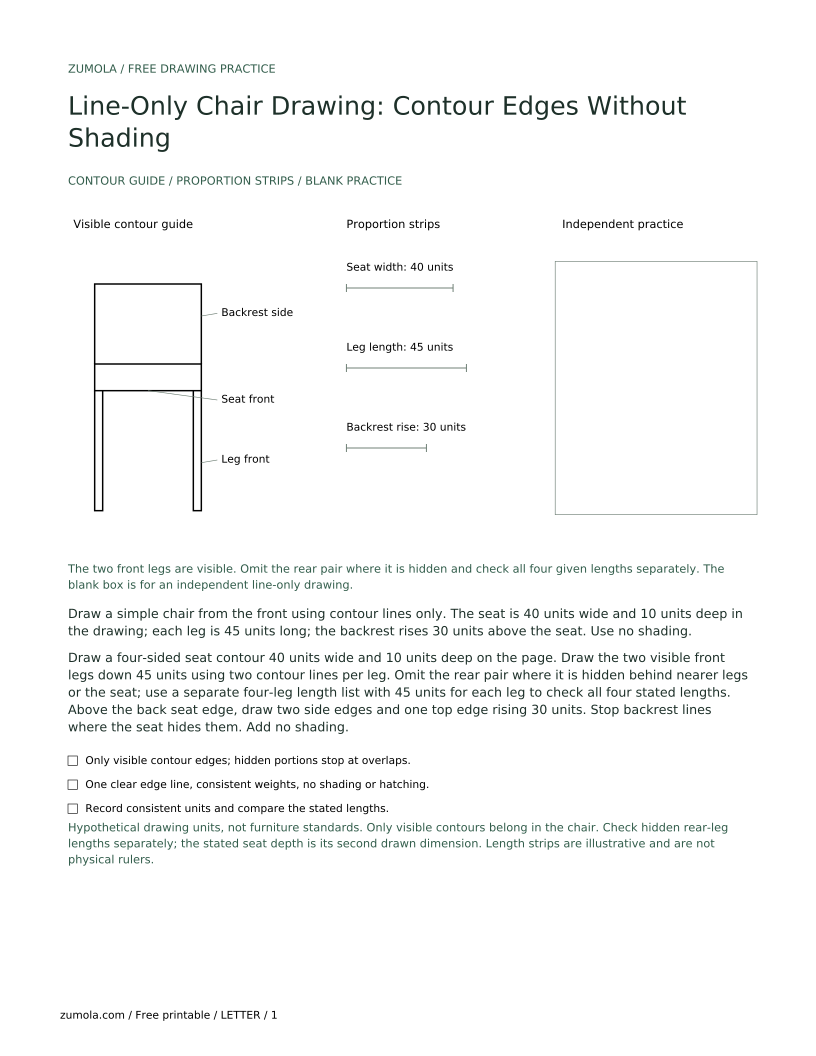
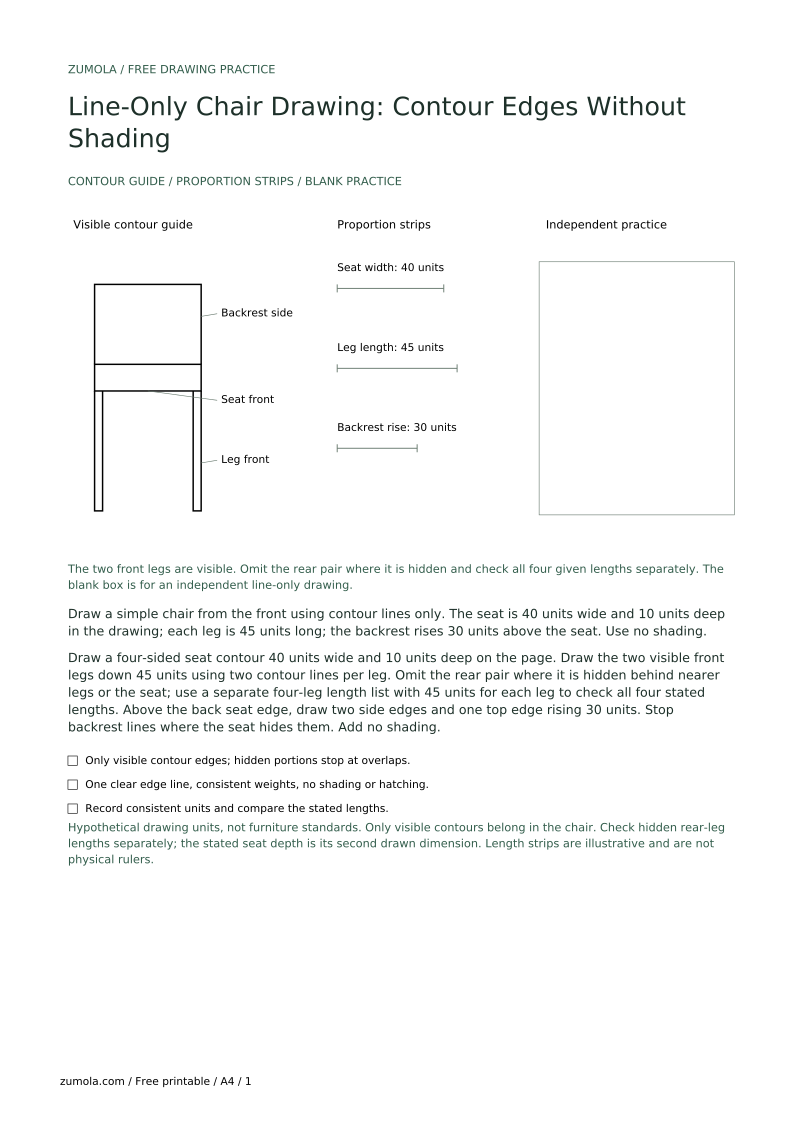
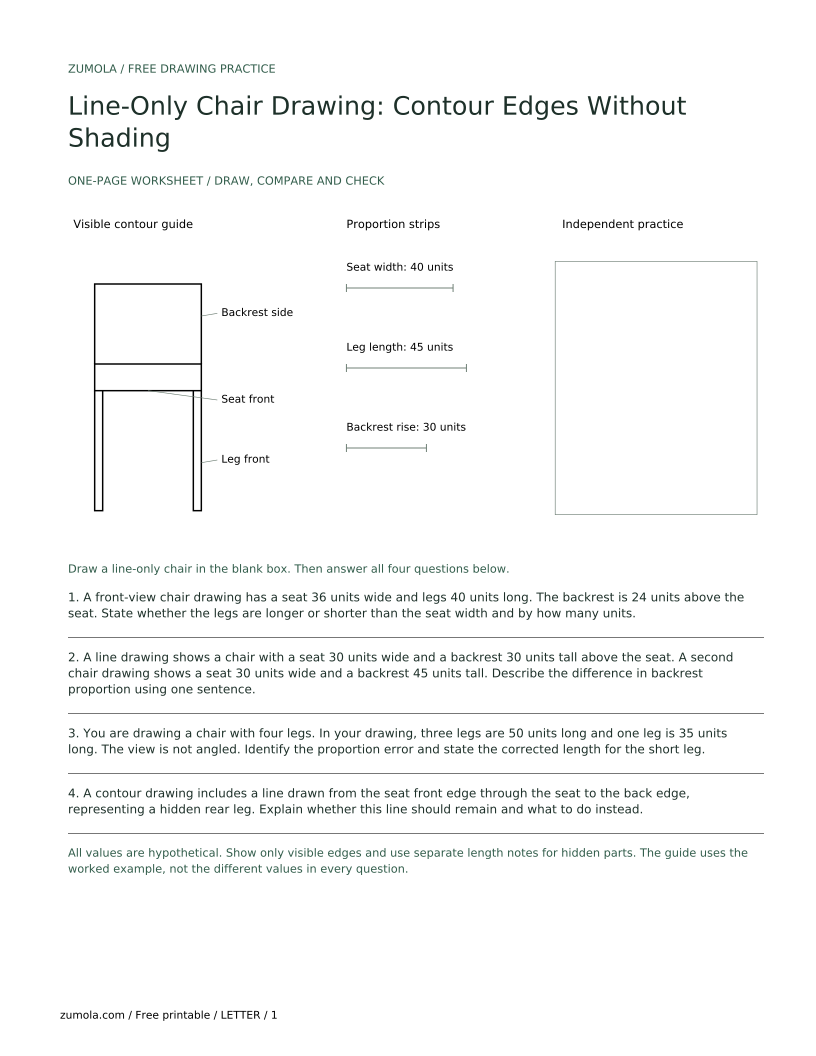
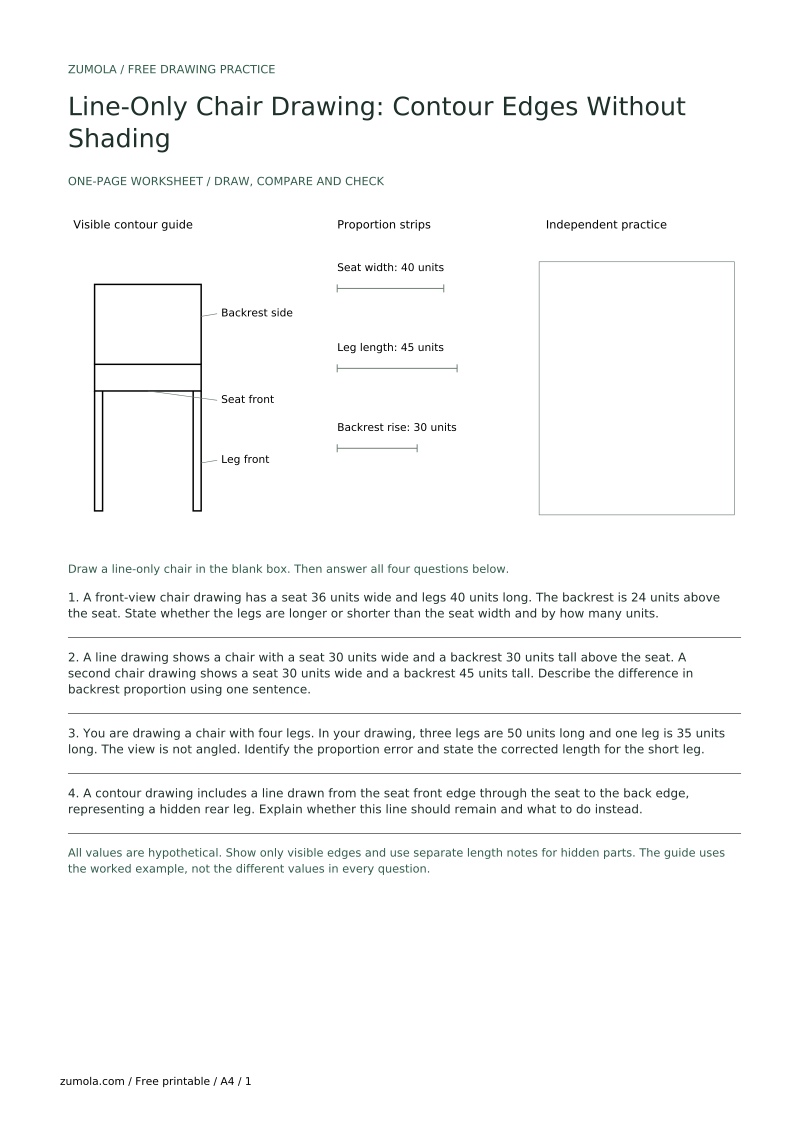
The downloadable plate has three zones: a labeled contour edge guide, a proportion reference, and a blank practice box. The one-page worksheet adds all four questions, and separate answer PDFs include the worked checks. You can also copy this layout onto your own paper.
In the contour guide, each edge is drawn once. In the proportion reference, show seat width, leg length, and backrest height as simple line segments with labels. In the blank box, leave enough space to draw a chair at roughly the same size as the guide.
A line-only drawing succeeds when a viewer can identify the chair without tone. Check that every visible edge is present, that hidden edges are omitted, and that overlapping lines stop cleanly. Line quality matters: avoid fuzzy repeated strokes and use one deliberate line per edge.
Because letter styles and handwriting vary, do not judge labels by a single style. Judge them by legibility: a label is valid if another person can read it and match it to the correct edge.
Draw a simple chair from the front using contour lines only. The seat is 40 units wide and 10 units deep in the drawing; each leg is 45 units long; the backrest rises 30 units above the seat. Use no shading.
Draw a four-sided seat contour 40 units wide and 10 units deep on the page. Draw the two visible front legs down 45 units using two contour lines per leg. Omit the rear pair where it is hidden behind nearer legs or the seat; use a separate four-leg length list with 45 units for each leg to check all four stated lengths. Above the back seat edge, draw two side edges and one top edge rising 30 units. Stop backrest lines where the seat hides them. Add no shading.
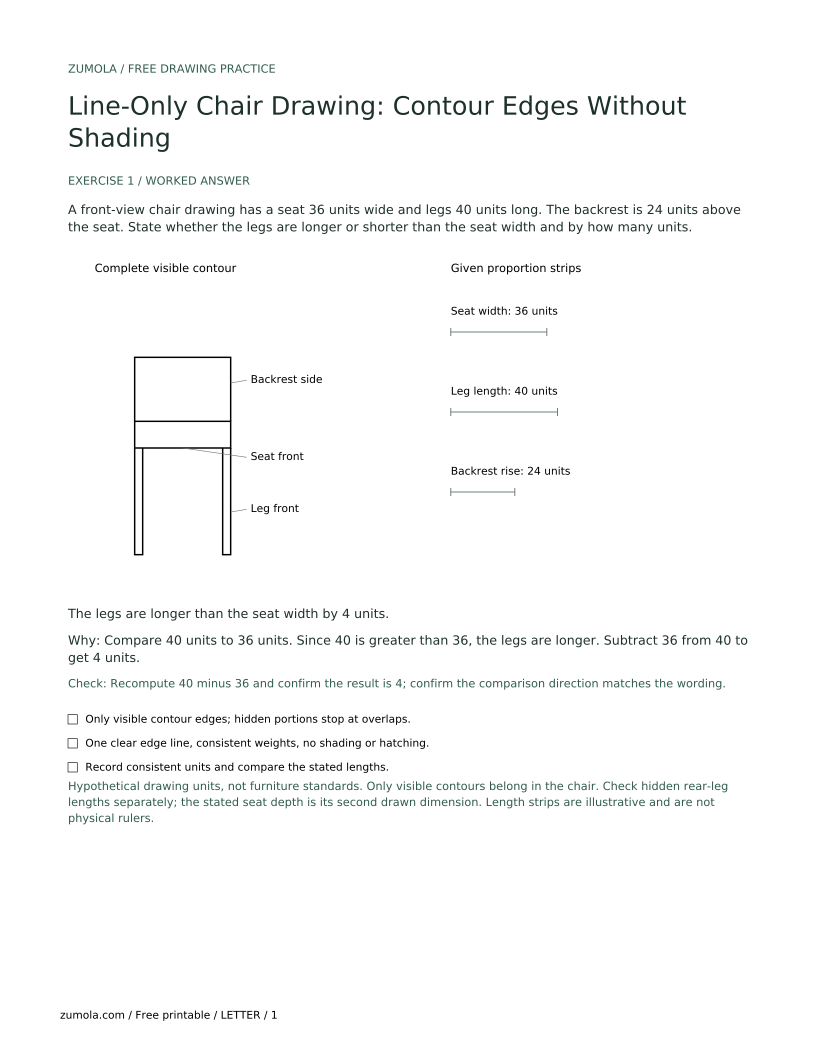
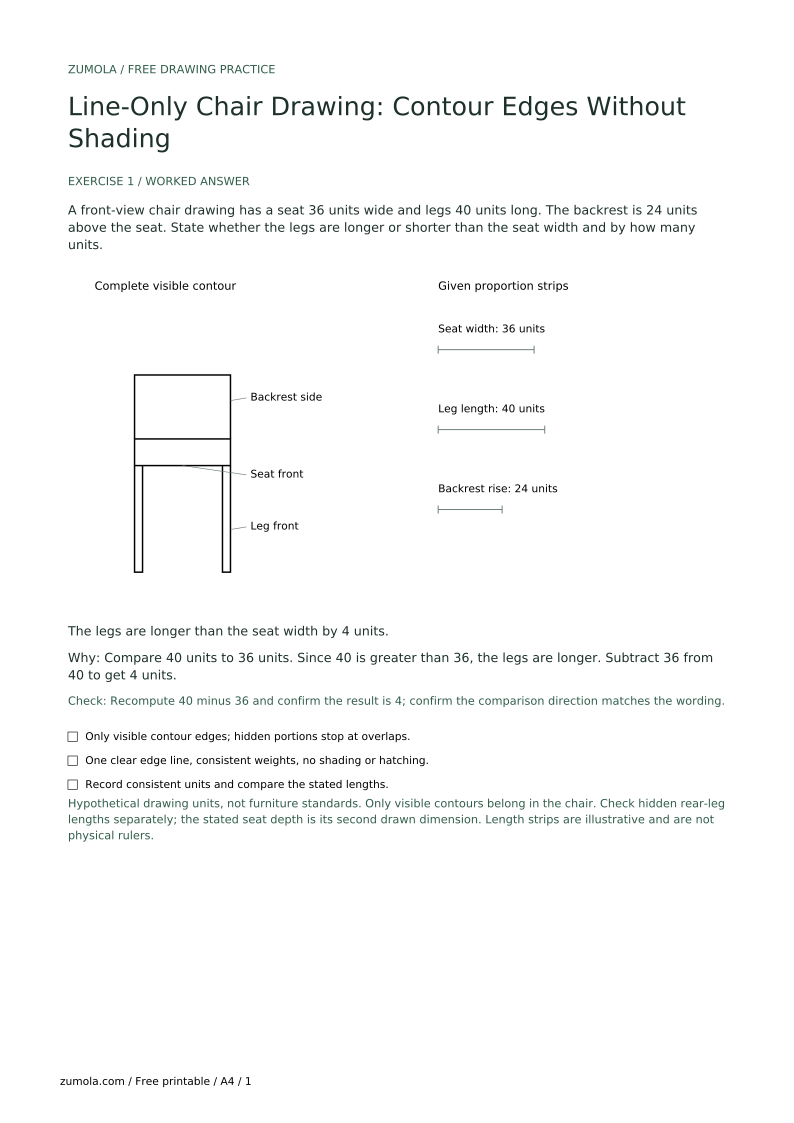
A front-view chair drawing has a seat 36 units wide and legs 40 units long. The backrest is 24 units above the seat. State whether the legs are longer or shorter than the seat width and by how many units.
The legs are longer than the seat width by 4 units.
Compare 40 units to 36 units. Since 40 is greater than 36, the legs are longer. Subtract 36 from 40 to get 4 units.
Check: Recompute 40 minus 36 and confirm the result is 4; confirm the comparison direction matches the wording.
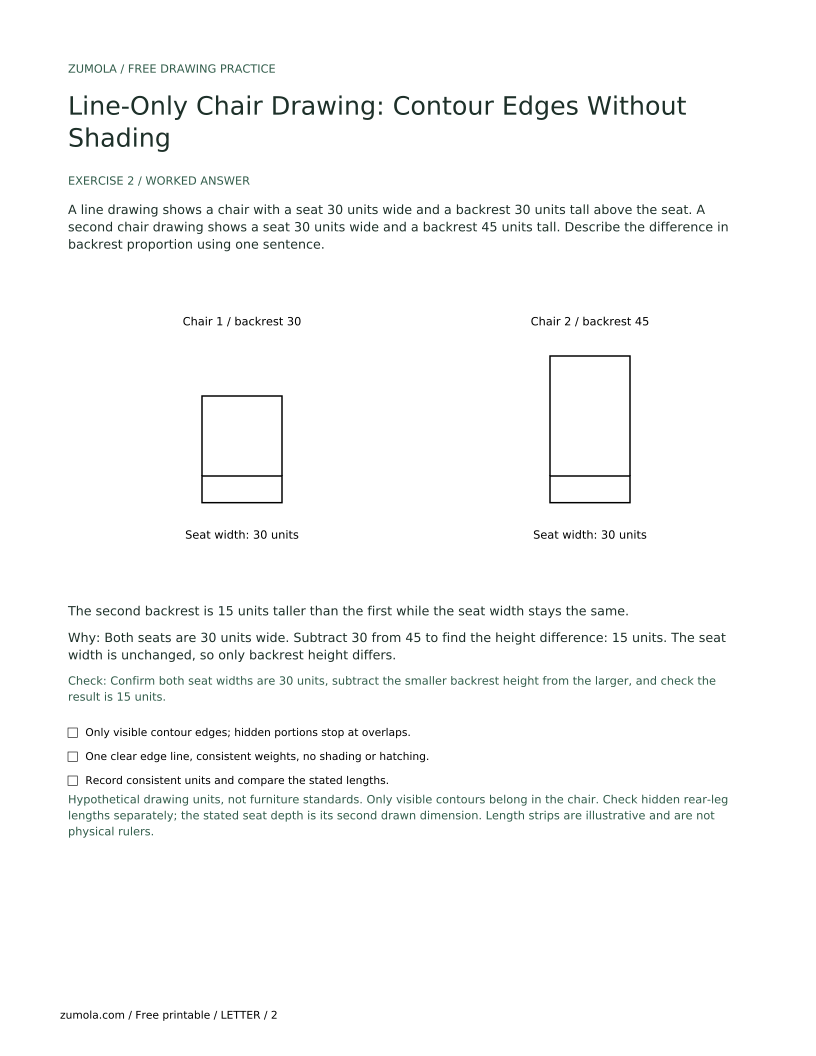
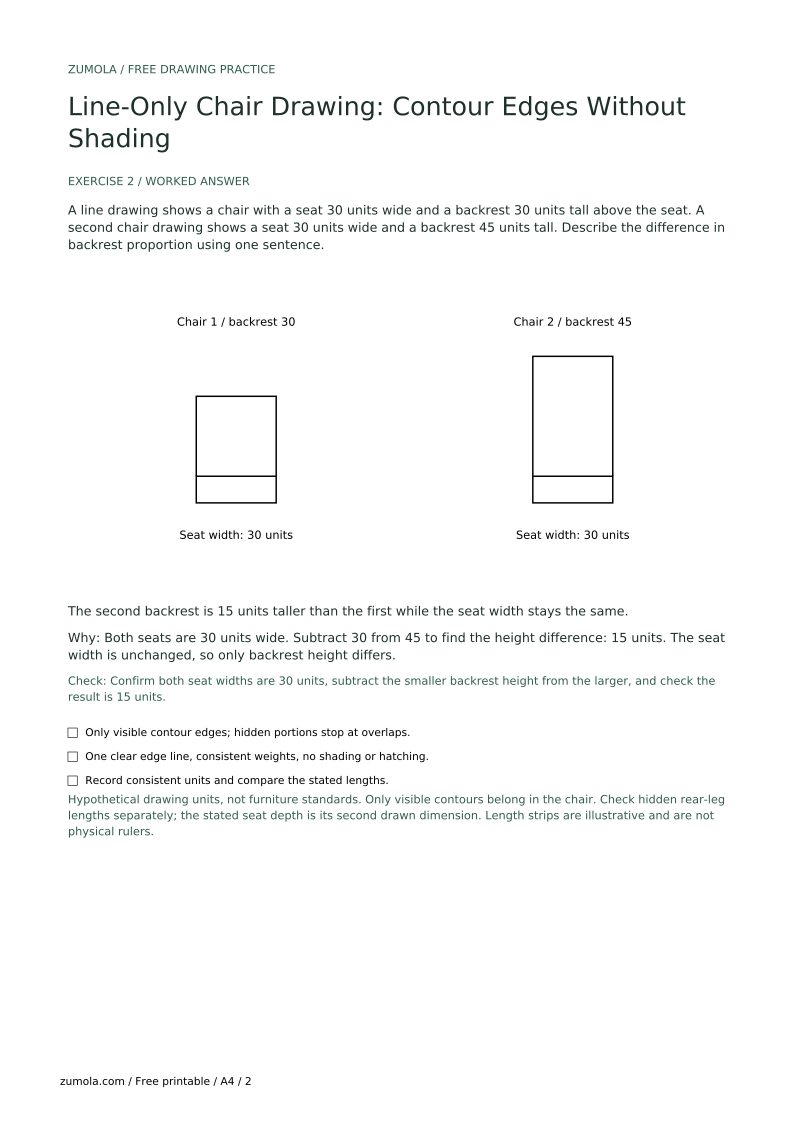
A line drawing shows a chair with a seat 30 units wide and a backrest 30 units tall above the seat. A second chair drawing shows a seat 30 units wide and a backrest 45 units tall. Describe the difference in backrest proportion using one sentence.
The second backrest is 15 units taller than the first while the seat width stays the same.
Both seats are 30 units wide. Subtract 30 from 45 to find the height difference: 15 units. The seat width is unchanged, so only backrest height differs.
Check: Confirm both seat widths are 30 units, subtract the smaller backrest height from the larger, and check the result is 15 units.
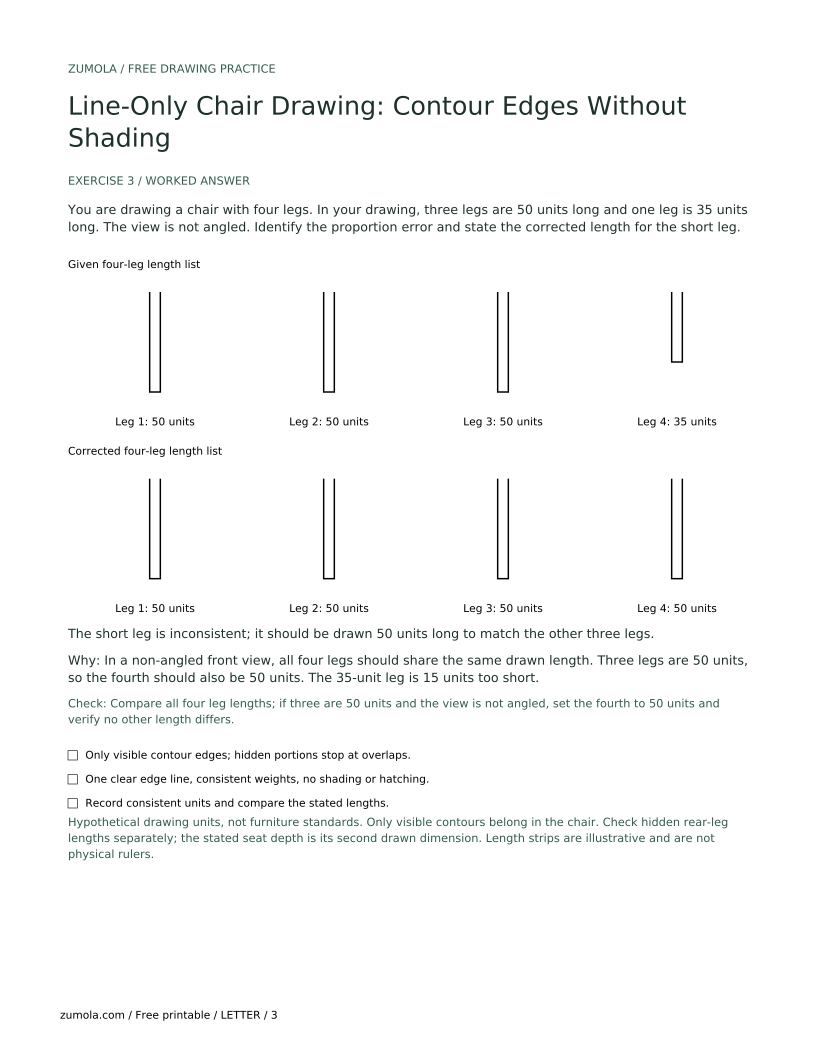
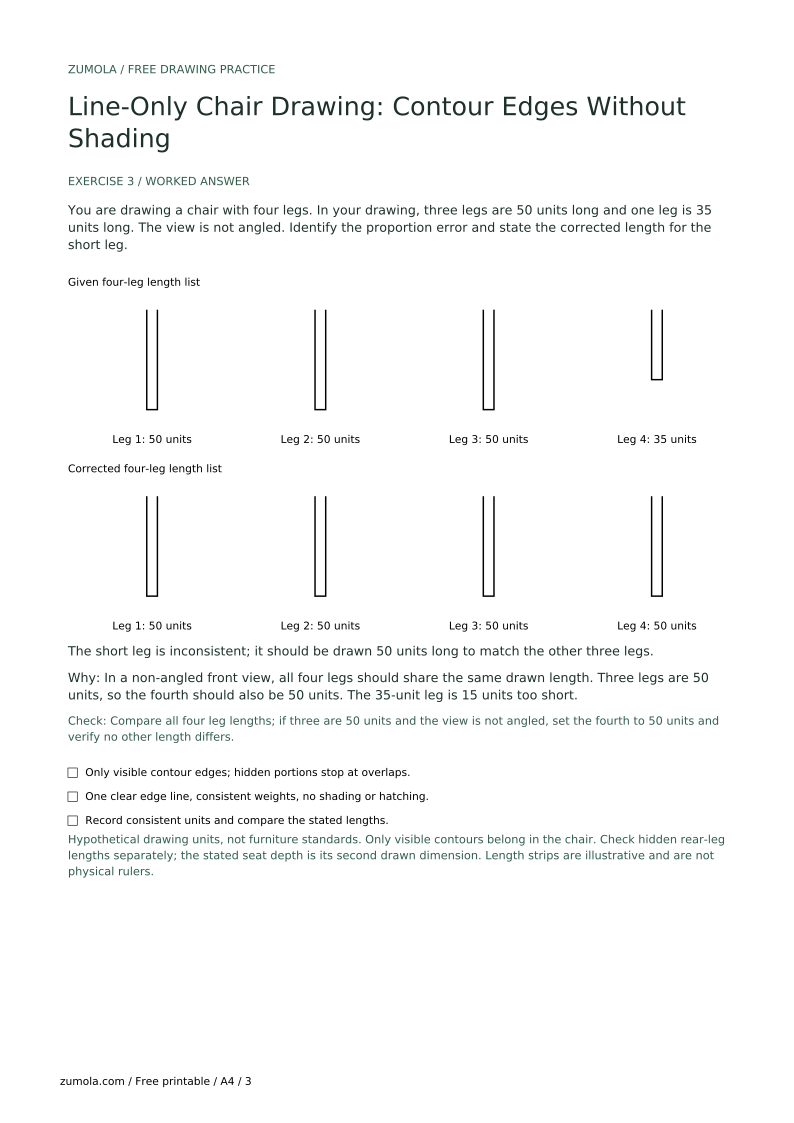
You are drawing a chair with four legs. In your drawing, three legs are 50 units long and one leg is 35 units long. The view is not angled. Identify the proportion error and state the corrected length for the short leg.
The short leg is inconsistent; it should be drawn 50 units long to match the other three legs.
In a non-angled front view, all four legs should share the same drawn length. Three legs are 50 units, so the fourth should also be 50 units. The 35-unit leg is 15 units too short.
Check: Compare all four leg lengths; if three are 50 units and the view is not angled, set the fourth to 50 units and verify no other length differs.
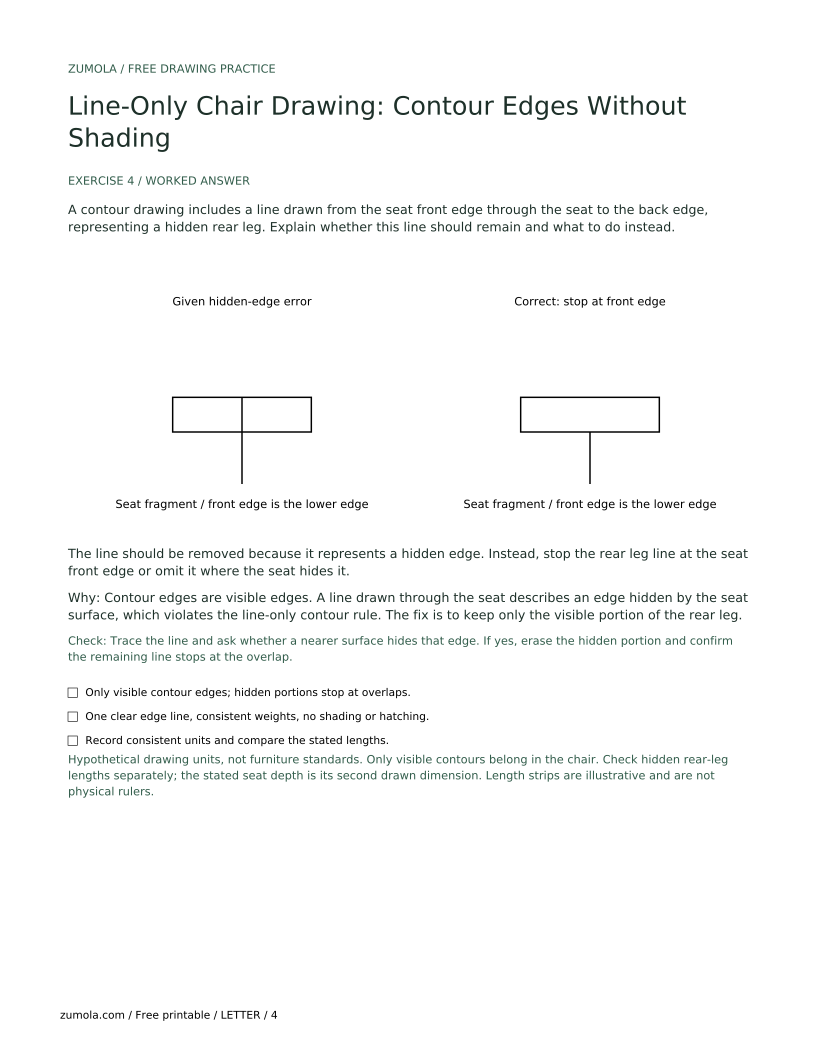
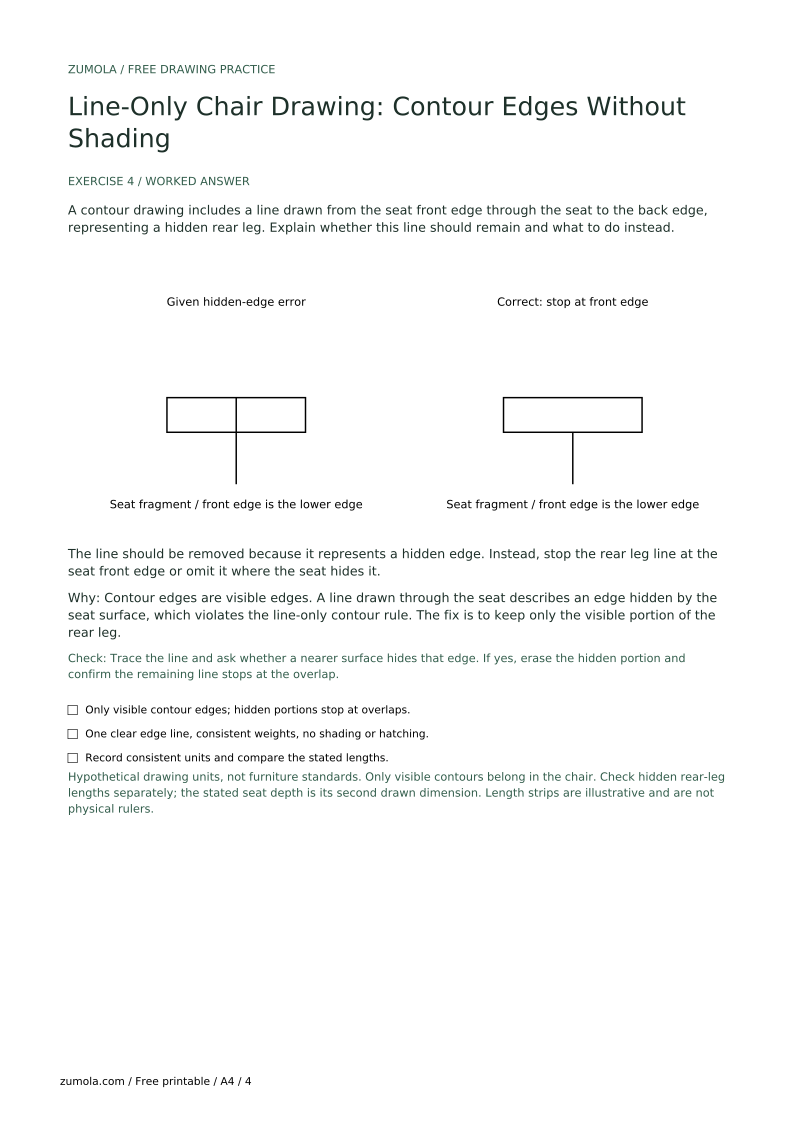
A contour drawing includes a line drawn from the seat front edge through the seat to the back edge, representing a hidden rear leg. Explain whether this line should remain and what to do instead.
The line should be removed because it represents a hidden edge. Instead, stop the rear leg line at the seat front edge or omit it where the seat hides it.
Contour edges are visible edges. A line drawn through the seat describes an edge hidden by the seat surface, which violates the line-only contour rule. The fix is to keep only the visible portion of the rear leg.
Check: Trace the line and ask whether a nearer surface hides that edge. If yes, erase the hidden portion and confirm the remaining line stops at the overlap.
Remove the shading and instead separate overlapping edges by stopping the farther line at the nearer edge.
Compare leg lengths with a paper strip and redraw them equal in the drawing.
Erase any line that would be hidden by a nearer surface and keep only visible contour edges.
Replace repeated strokes with one deliberate contour line and keep line weight consistent.
Yes. Any consistent weight scheme is valid if it keeps edges readable. The medium-outline and light-interior convention is only one option.
Still use contour edges only. Stop hidden lines at overlaps and compare proportions with a paper strip rather than assuming equal drawn lengths.
No. Use simple comparisons and label any numerical values as hypothetical examples. Measure your own reference if you want real proportions.
It is finished when every visible edge appears once, no hidden edge is drawn through a nearer surface, and no shading remains.