Reference diagram
LETTER · Download PDF (2 pages)
Free original resources
Learn to draw a hard hat resting upside down on the floor, with a clear inverted brim ellipse, visible ridge lines, and a believable interior view.
Original reference diagrams, four practice exercises and separate worked answers. All files are free. No signup required.
LETTER · Download PDF (2 pages)
LETTER · Download PDF (4 pages)
LETTER · Download PDF (6 pages)
Choose A4 or US Letter for your printer. The reference and answer illustrations are not physical rulers; follow the scale instruction printed on the practice worksheet.
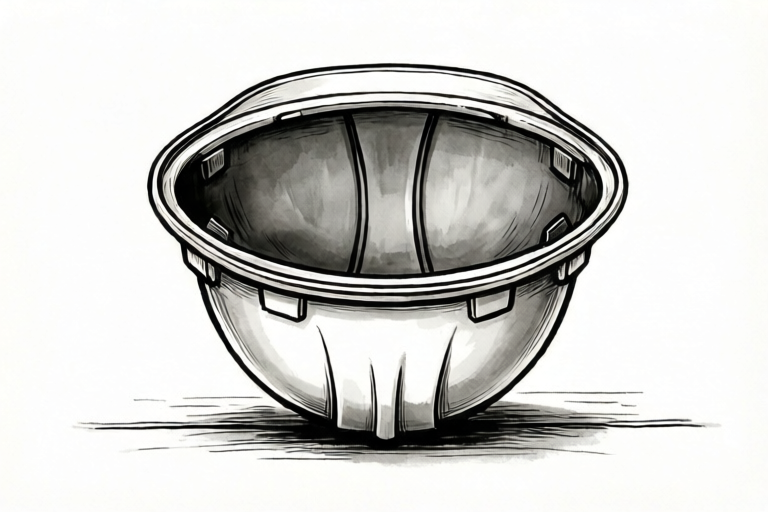
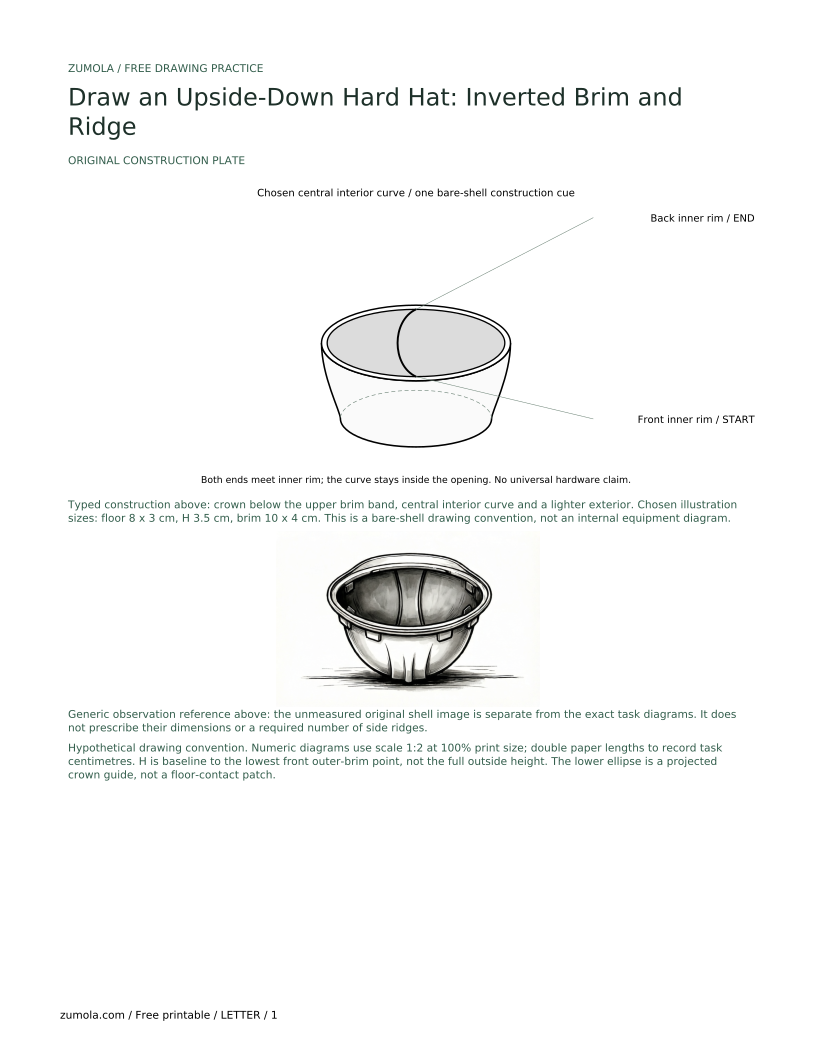
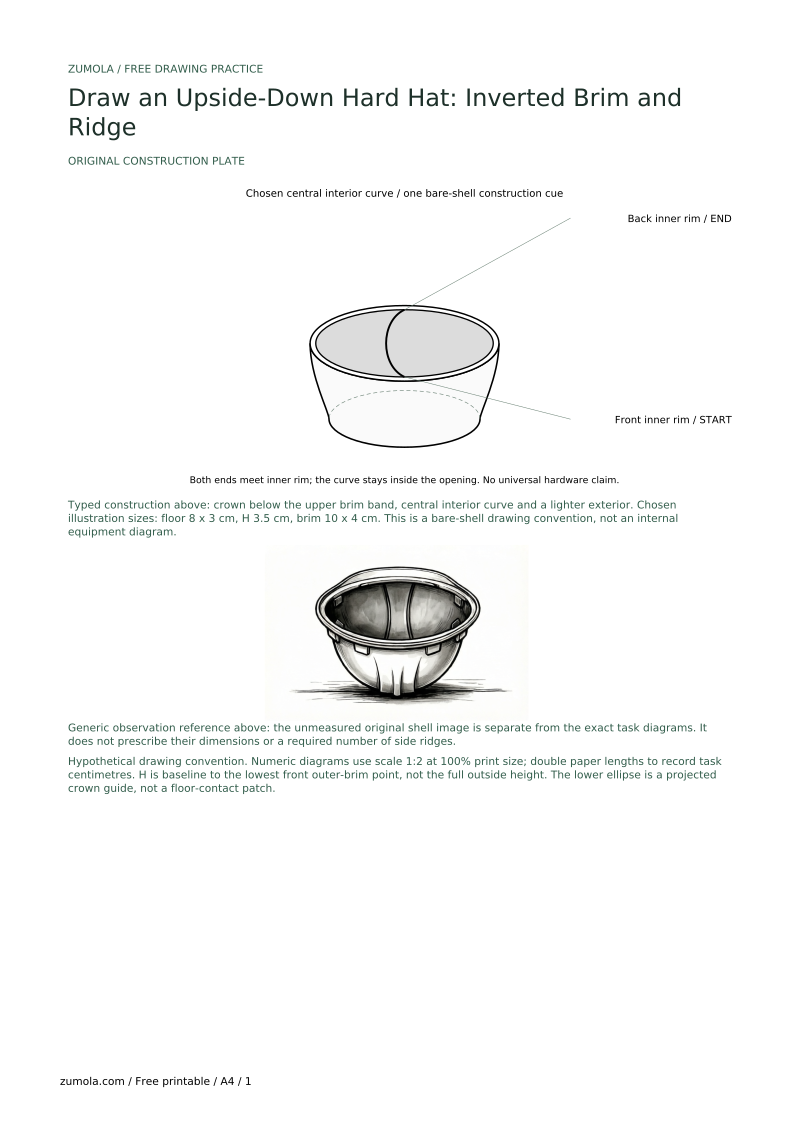
Draw a simplified hard-hat shell resting on its crown: the crown is low and the open brim is above it. This lesson uses a bare-shell diagram with a continuous brim and a chosen curved interior ridge cue. It omits the suspension, liner and fittings of an assembled helmet; it does not claim that an outside ridge must be visible inside every real hat. All dimensions are hypothetical drawing values. The squat proportion, ridge curve and value contrast below are explicit illustration conventions, not equipment specifications. Observe your own reference before adding optional details.
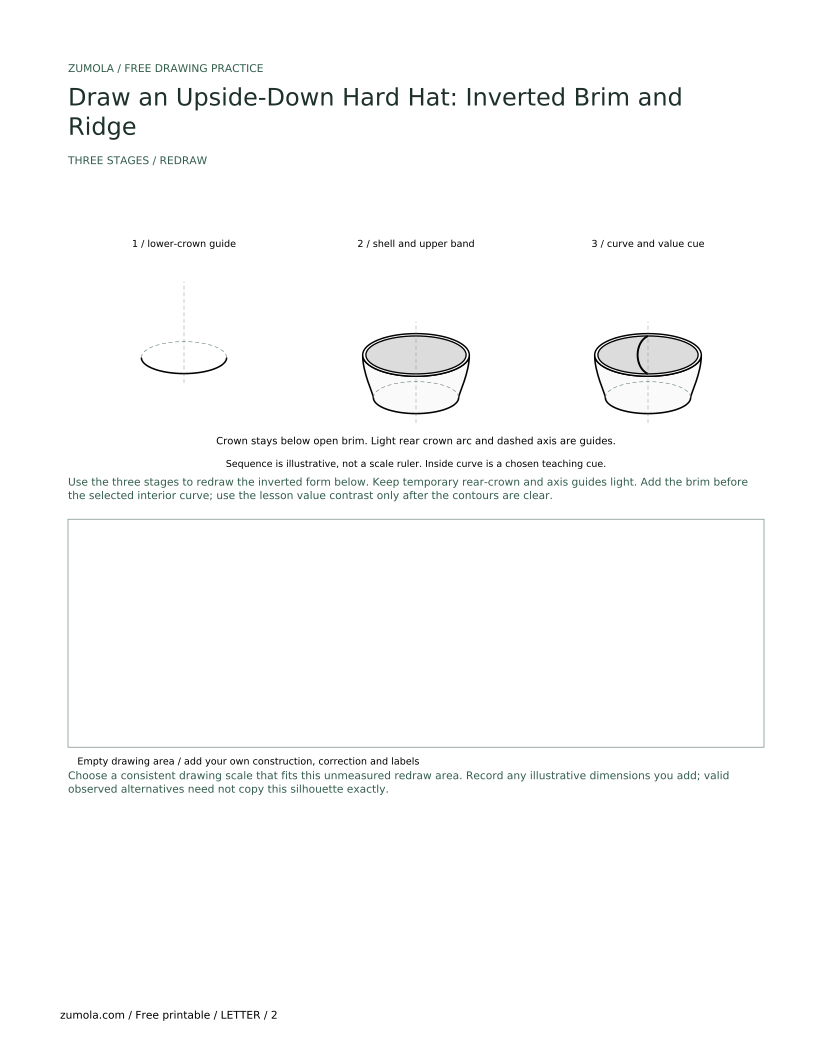
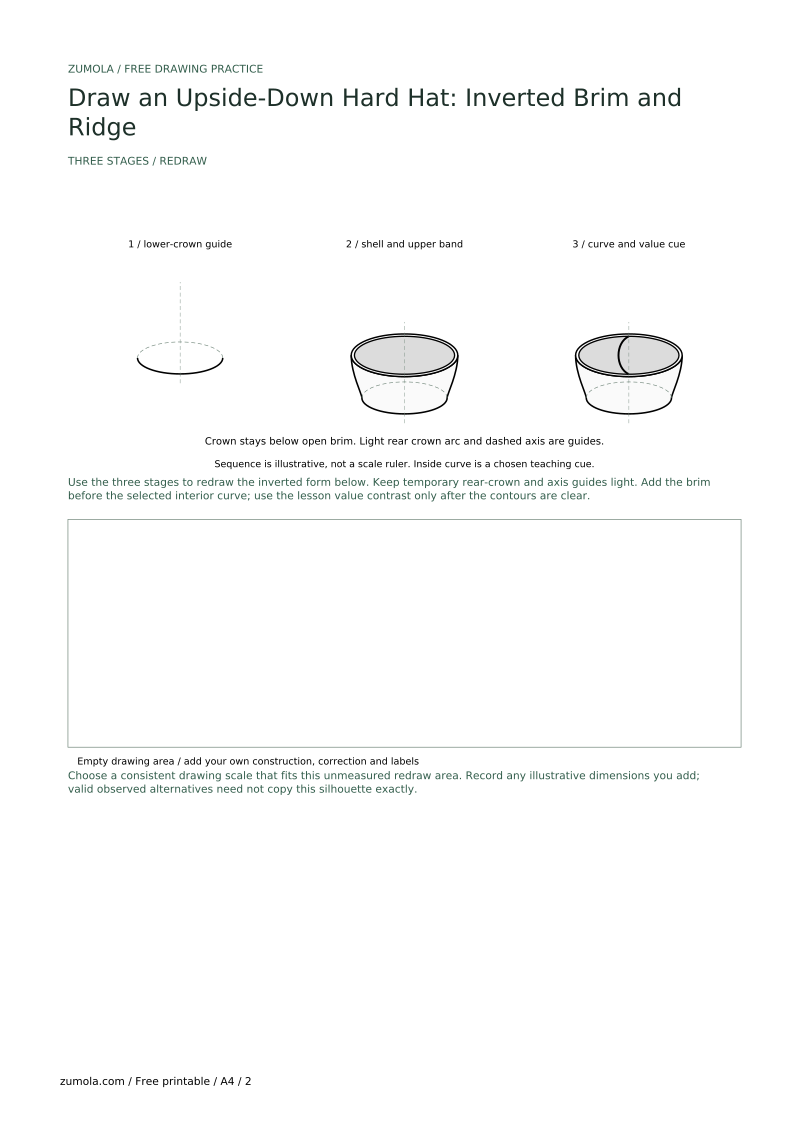
Begin with a wide, shallow floor ellipse and a vertical midline. Here floor ellipse means a construction outline for the projected lower crown, not an ellipse-shaped patch all touching the floor. Its lowest point touches the baseline; its upper half may remain a light guide. Build the shell upward and outward to an upper open rim. Keep both ellipse centers on the same vertical axis in this chosen symmetric view.
The lesson's bowl height H is the vertical span from the lowest crown point on the baseline to the lowest front point of the outer brim ellipse. It is not the full top-to-bottom extent of the open-rim ellipse. The floor-ellipse width W is measured across its widest horizontal span. For a deliberately squat practice silhouette, choose H no greater than W/2. This is a worksheet proportion rule, not a measurement of actual protective equipment.
Draw the brim as two close, closed ellipses sharing a center and axis: the larger outside edge and the smaller opening. Their visible gap describes the drawn band, not a specified material thickness. The brim wraps the upper opening; it is not the lower floor ellipse and is not a separate ring shifted upward. Keep final edges clear and construction guides light.
For this simplified drawing, choose one central interior ridge cue: a smooth curve from the front edge of the inner opening to its back edge, passing near the center. Keep the whole curve inside the opening and make its endpoints meet the rim. Do not extend an outside ridge through an opaque shell as a factual claim. Add side curves only if your chosen reference supports them; one central curve is sufficient for these exercises.
Use a slightly darker interior and a lighter exterior and brim as this lesson's chosen depth cue. This is an illustrative value scheme, not a universal statement about lighting. A small curved mark may suggest the deepest interior point. Keep the upper opening visible and the crown low. The floor ellipse remains a construction guide, while the brim ring and curved interior cue establish the selected view.
Compare H with W using the same measurement convention throughout. If H is greater than W/2, lower H, increase W enough, or change both. For example, H = 7 cm requires W at least 14 cm if height is unchanged; widening only to 10 cm still gives 7/10 = 0.7, above 0.5. These choices evaluate this lesson's squat silhouette, not the validity of a real hat design. Check that the brim ellipses share a center and attach to the shell.
Verify the part arrangement: crown at the bottom, open brim above, and the selected curve inside the opening. Turning a flat page through 180 degrees reverses up and down but does not reveal a hidden outside surface or turn an interior curve into an external ridge. Compare the arrangement with the observed object rather than treating page rotation as a new physical viewpoint. Keep the line quality clear and the value contrast restrained.
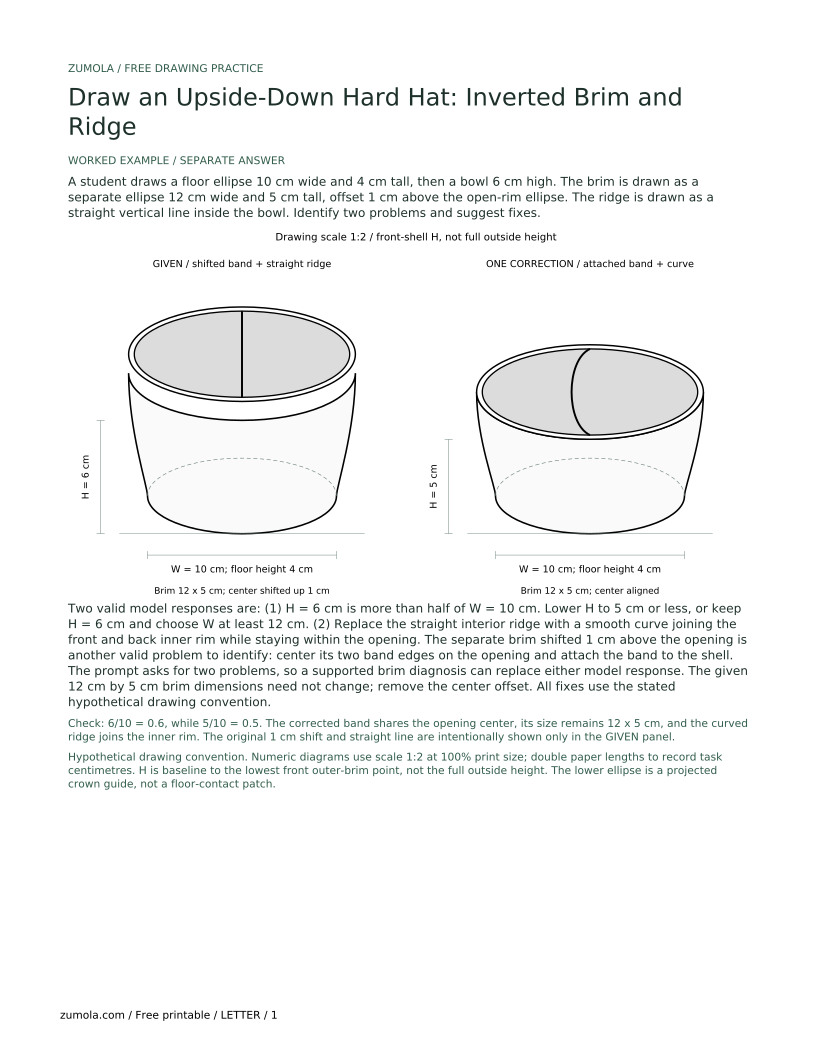
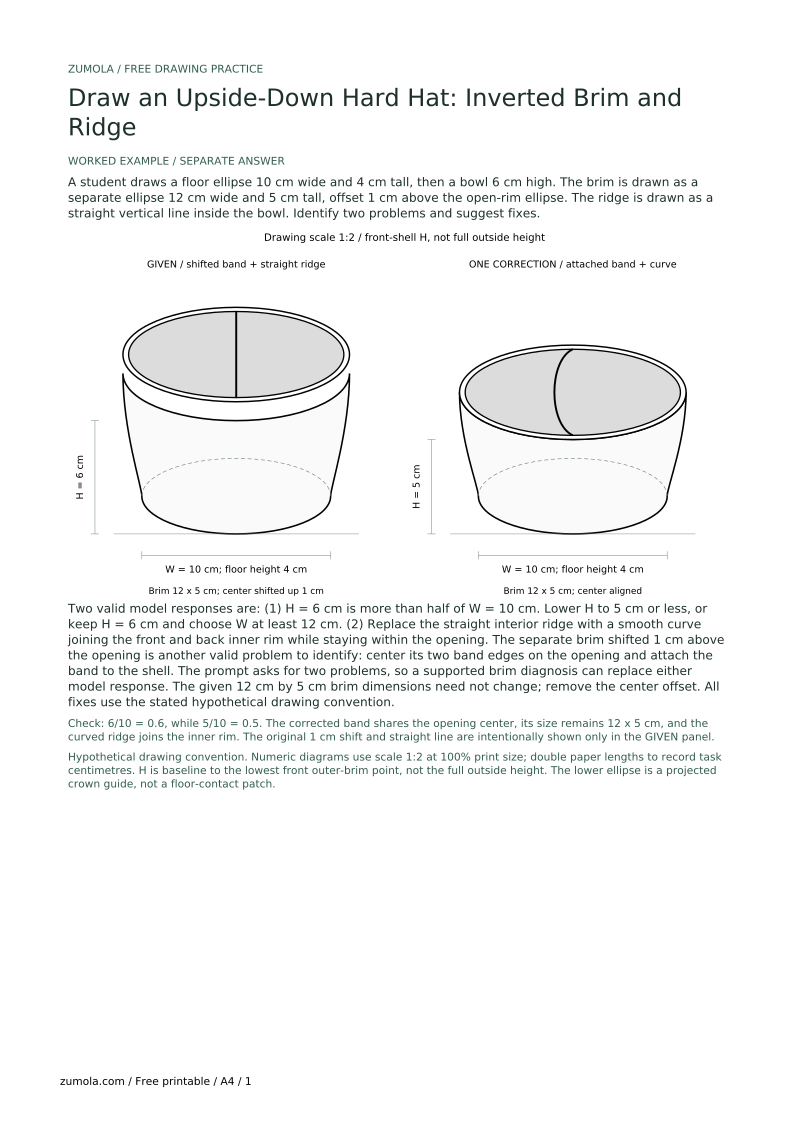
A student draws a floor ellipse 10 cm wide and 4 cm tall, then a bowl 6 cm high. The brim is drawn as a separate ellipse 12 cm wide and 5 cm tall, offset 1 cm above the open-rim ellipse. The ridge is drawn as a straight vertical line inside the bowl. Identify two problems and suggest fixes.
Two valid model responses are: (1) H = 6 cm is more than half of W = 10 cm. Lower H to 5 cm or less, or keep H = 6 cm and choose W at least 12 cm. (2) Replace the straight interior ridge with a smooth curve joining the front and back inner rim while staying within the opening. The separate brim shifted 1 cm above the opening is another valid problem to identify: center its two band edges on the opening and attach the band to the shell. The prompt asks for two problems, so a supported brim diagnosis can replace either model response. The given 12 cm by 5 cm brim dimensions need not change; remove the center offset. All fixes use the stated hypothetical drawing convention.
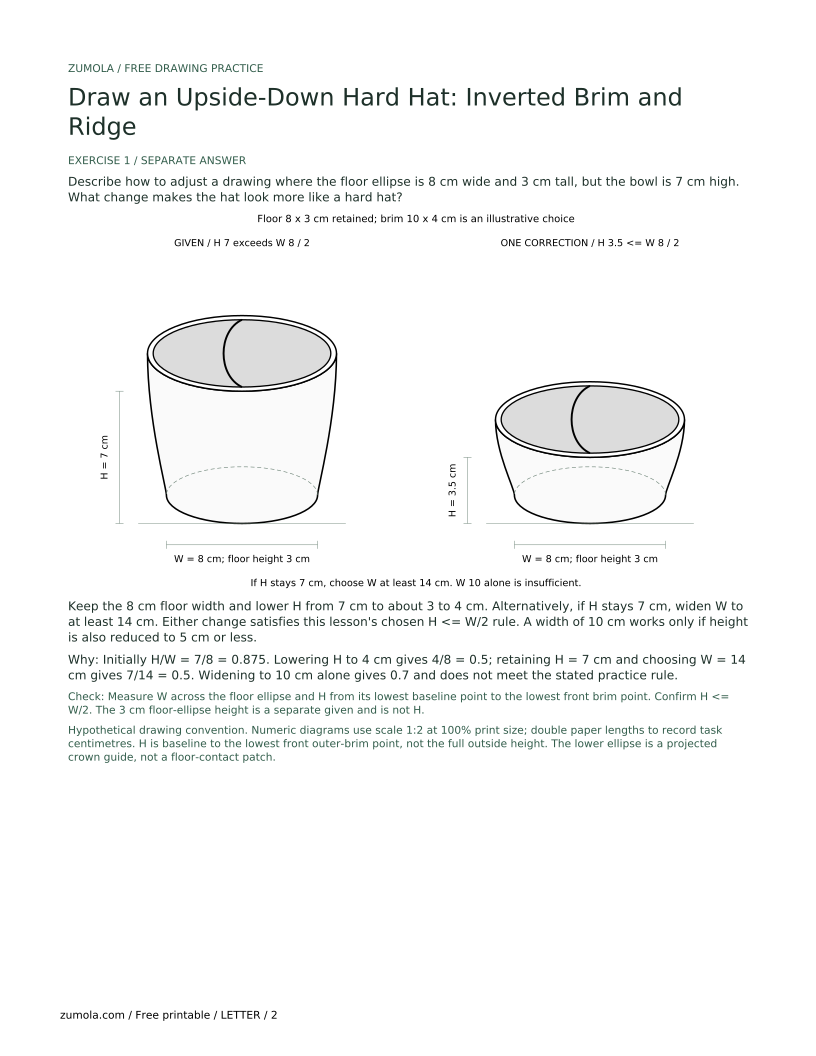
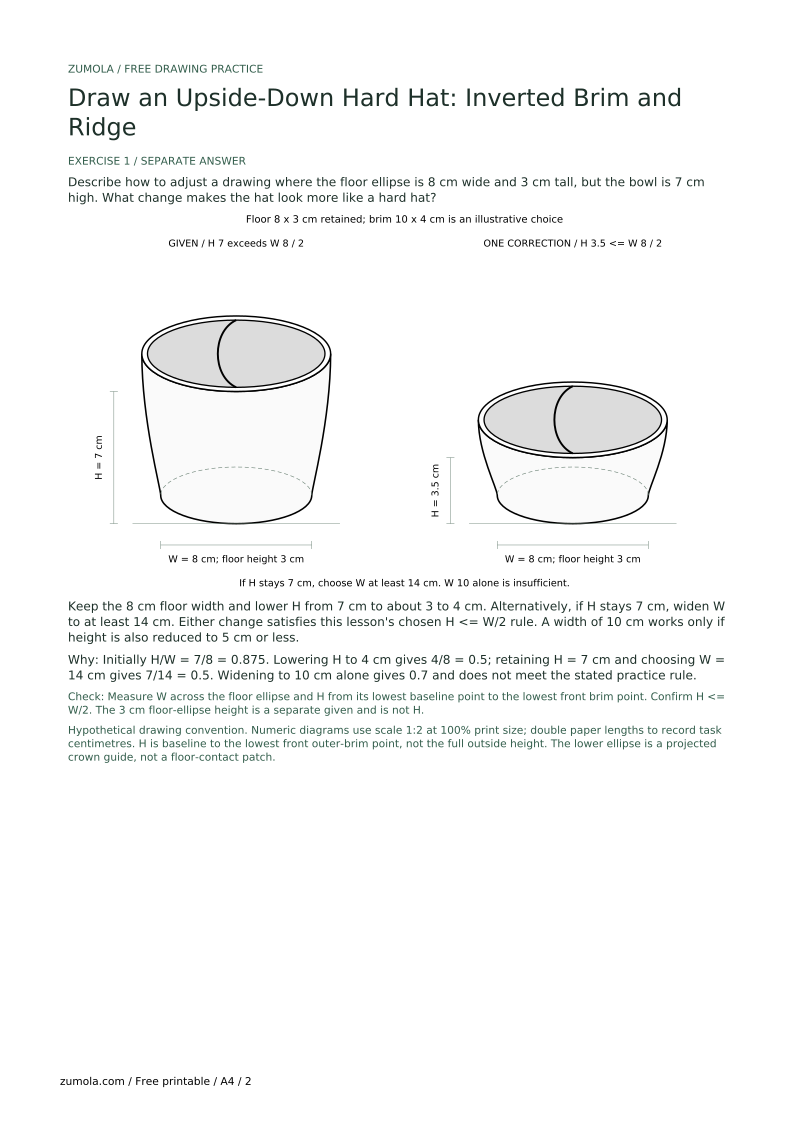
Describe how to adjust a drawing where the floor ellipse is 8 cm wide and 3 cm tall, but the bowl is 7 cm high. What change makes the hat look more like a hard hat?
Keep the 8 cm floor width and lower H from 7 cm to about 3 to 4 cm. Alternatively, if H stays 7 cm, widen W to at least 14 cm. Either change satisfies this lesson's chosen H <= W/2 rule. A width of 10 cm works only if height is also reduced to 5 cm or less.
Initially H/W = 7/8 = 0.875. Lowering H to 4 cm gives 4/8 = 0.5; retaining H = 7 cm and choosing W = 14 cm gives 7/14 = 0.5. Widening to 10 cm alone gives 0.7 and does not meet the stated practice rule.
Check: Measure W across the floor ellipse and H from its lowest baseline point to the lowest front brim point. Confirm H <= W/2. The 3 cm floor-ellipse height is a separate given and is not H.
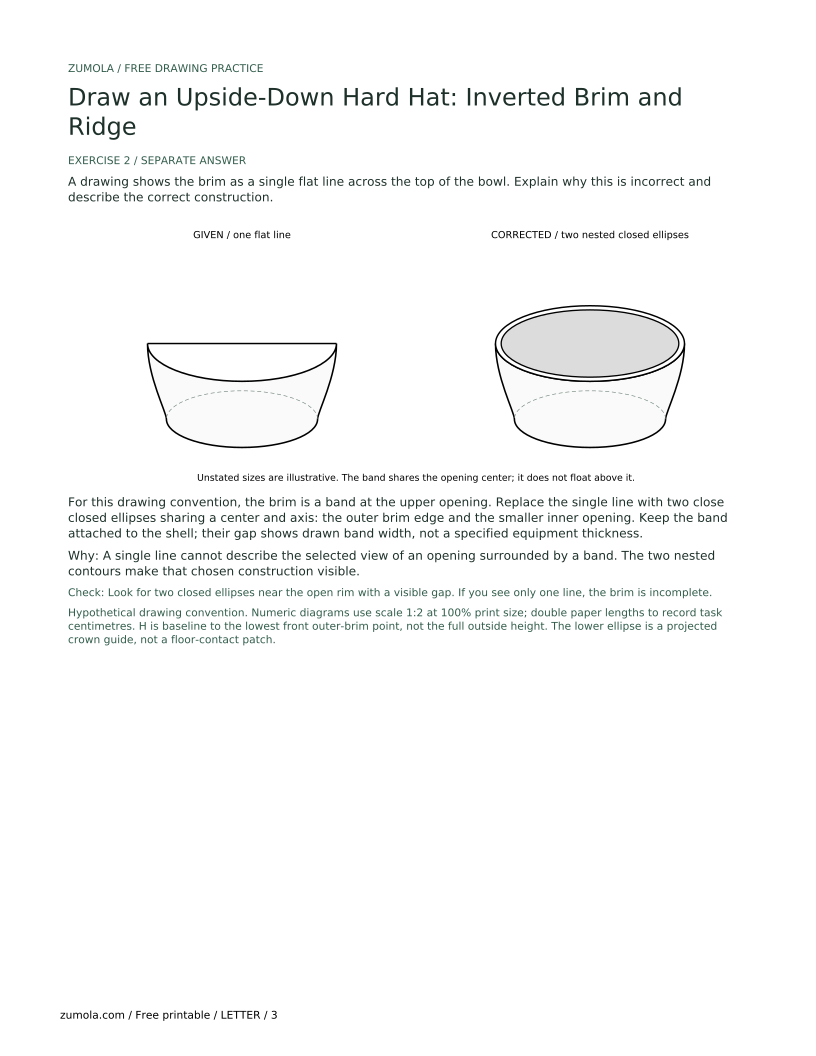
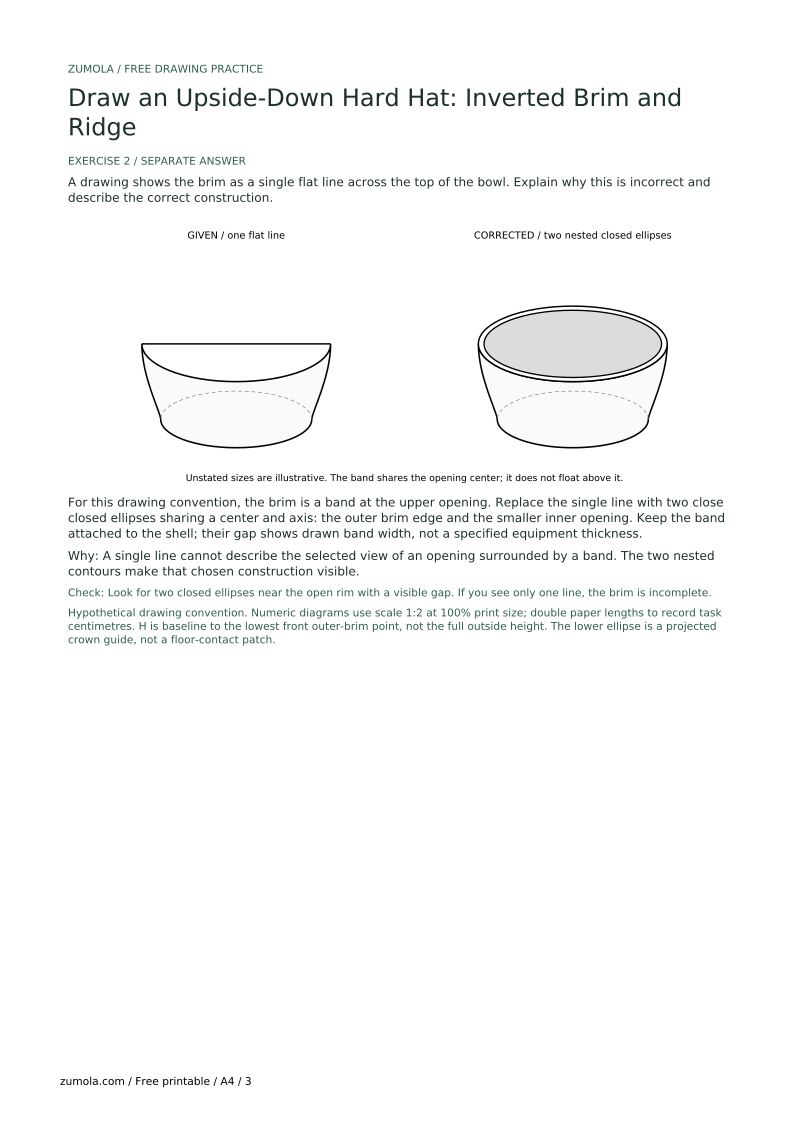
A drawing shows the brim as a single flat line across the top of the bowl. Explain why this is incorrect and describe the correct construction.
For this drawing convention, the brim is a band at the upper opening. Replace the single line with two close closed ellipses sharing a center and axis: the outer brim edge and the smaller inner opening. Keep the band attached to the shell; their gap shows drawn band width, not a specified equipment thickness.
A single line cannot describe the selected view of an opening surrounded by a band. The two nested contours make that chosen construction visible.
Check: Look for two closed ellipses near the open rim with a visible gap. If you see only one line, the brim is incomplete.
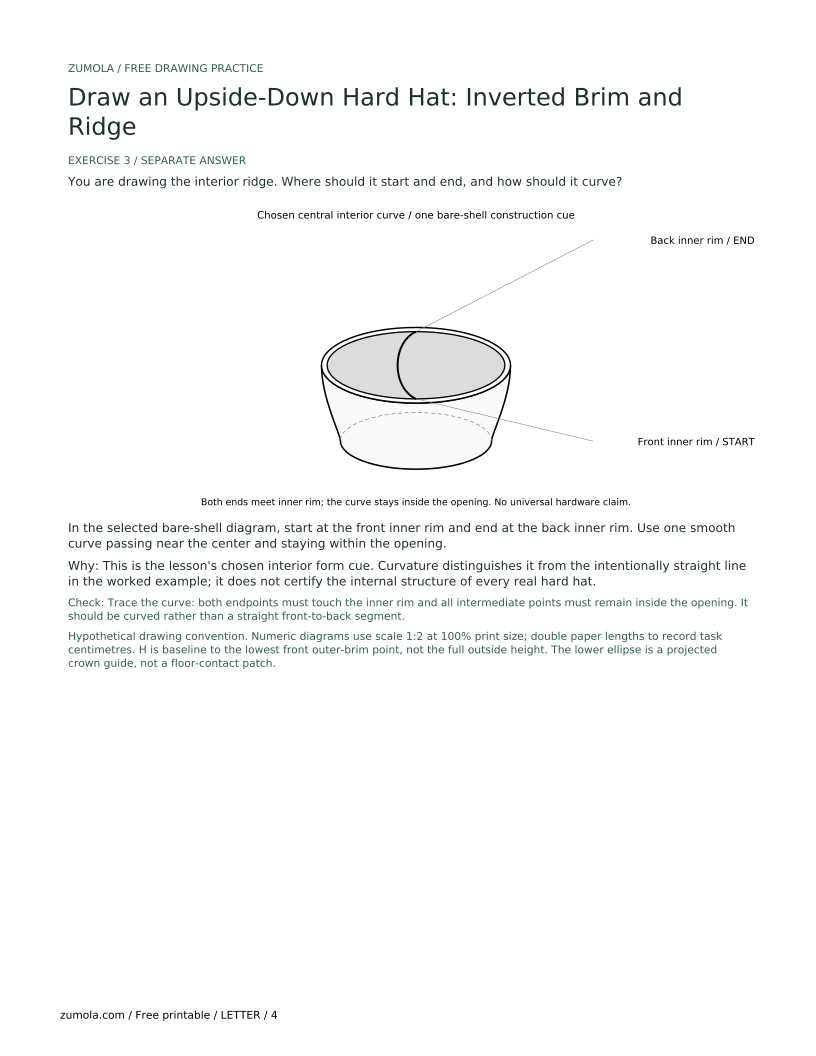
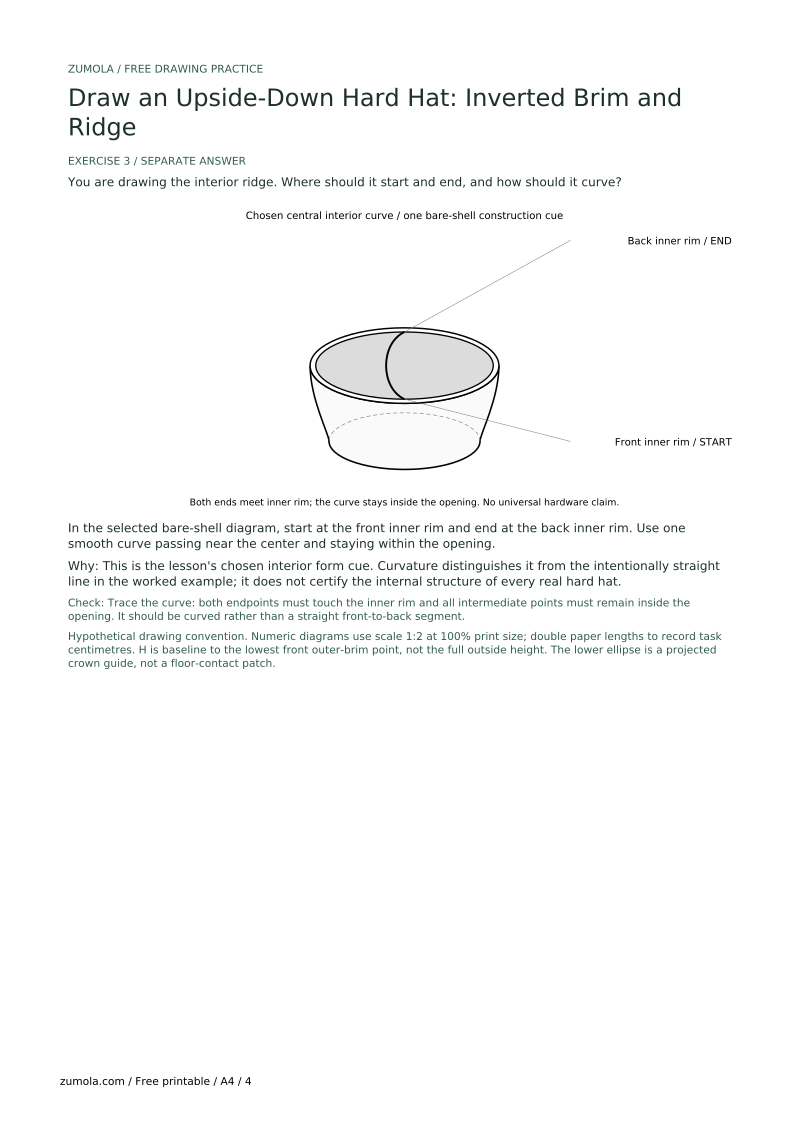
You are drawing the interior ridge. Where should it start and end, and how should it curve?
In the selected bare-shell diagram, start at the front inner rim and end at the back inner rim. Use one smooth curve passing near the center and staying within the opening.
This is the lesson's chosen interior form cue. Curvature distinguishes it from the intentionally straight line in the worked example; it does not certify the internal structure of every real hard hat.
Check: Trace the curve: both endpoints must touch the inner rim and all intermediate points must remain inside the opening. It should be curved rather than a straight front-to-back segment.
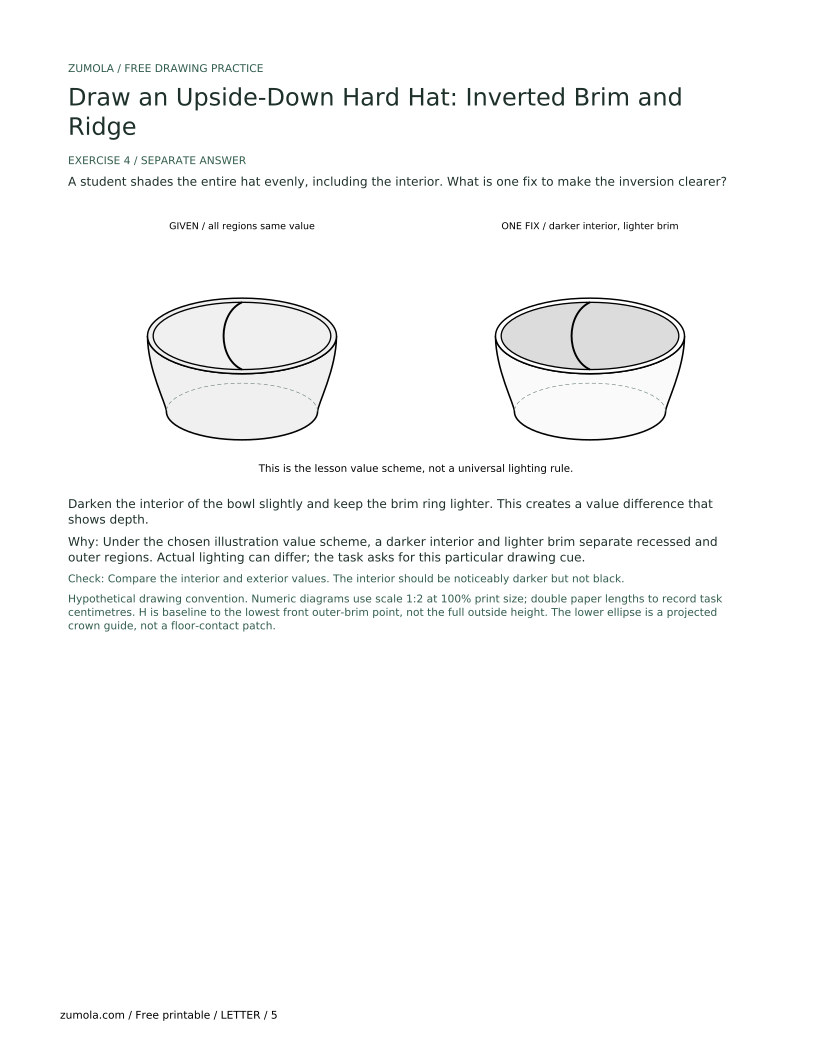
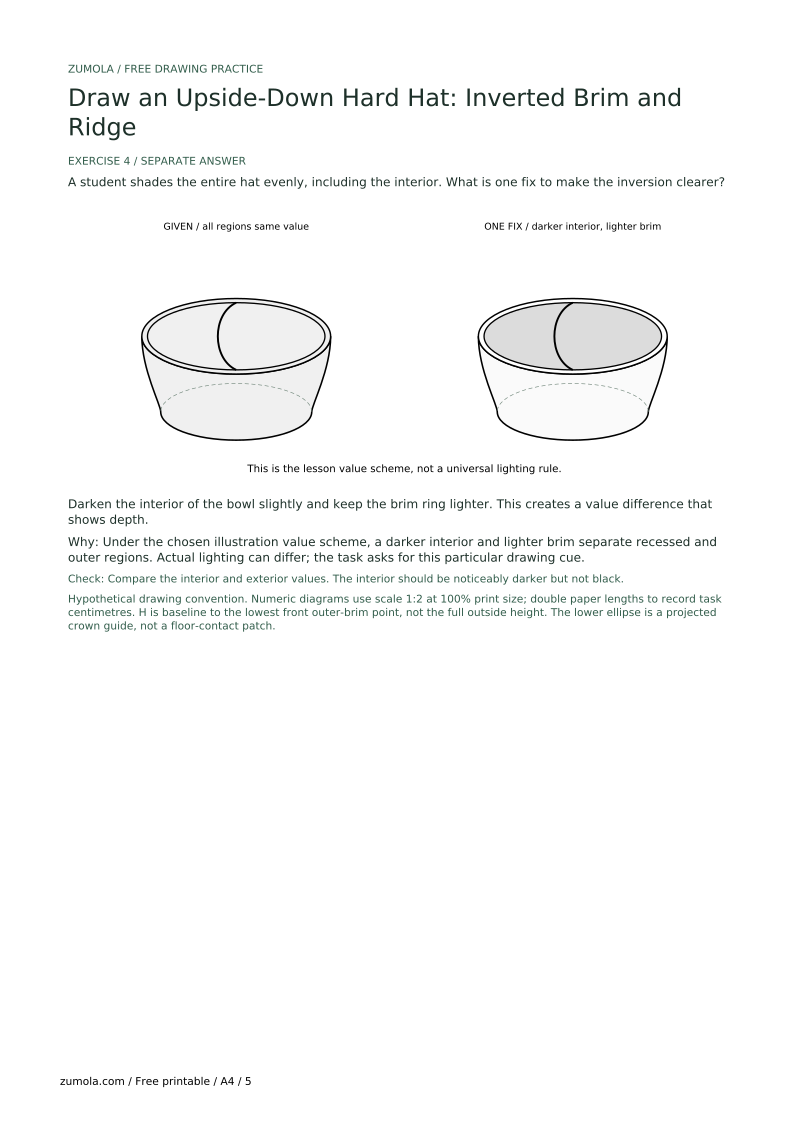
A student shades the entire hat evenly, including the interior. What is one fix to make the inversion clearer?
Darken the interior of the bowl slightly and keep the brim ring lighter. This creates a value difference that shows depth.
Under the chosen illustration value scheme, a darker interior and lighter brim separate recessed and outer regions. Actual lighting can differ; the task asks for this particular drawing cue.
Check: Compare the interior and exterior values. The interior should be noticeably darker but not black.
Draw the brim as a closed ring near the open rim that wraps around the shell, with visible thickness between two close ellipses.
For this lesson, choose H <= W/2 by lowering the front-shell height, widening the floor construction ellipse enough, or doing both. This is a practice choice, not a hard-hat specification.
In this simplified bare-shell exercise, keep the chosen ridge cue inside the opening and curve it from front inner rim to back inner rim.
Use the lesson value scheme: a slightly darker interior and a lighter exterior and brim. Other observed lighting may differ.
The exact geometric samples use a symmetric front view with shared ellipse centers. A three-quarter observation is also valid if its perspective is consistent; do not apply the front-view symmetry test unchanged to it.
One central interior curve is the chosen cue for the basic exercise. Add side ridges only if visible in your reference. An assembled helmet may include separate internal components; this simplified shell drawing does not depict them.
Yes, as long as it is a hard hat with a brim and a ridge. The lesson excludes upright hats and other safety gear, but valid alternatives within that boundary are acceptable.
For the chosen symmetric view, check matching left and right halves and a midline through each ellipse center. A three-quarter reference can require a different projection.