Free original lessons
Mustache Drawing: Curl, Taper, and Bilateral Symmetry
Learn to draw a mustache with a defined curl, smooth taper, and mirror symmetry using a simple axis, checkpoints, and a repeatable drawing sequence.
Free lesson
Four exercises
Worked answers
Object Drawing Lessons
This lesson teaches a reliable way to draw a mustache shape that has a deliberate curl at each end, a taper from thick center to thin tip, and bilateral symmetry about a vertical axis. You will use a centerline, paired checkpoints, and a simple measuring convention so the result can be checked rather than guessed. The focus is the shape itself, not a face or hair texture. All measurements are hypothetical examples; measure your own paper and tools before relying on any number.
Practice materials: Printable downloads are not available for this lesson yet. Use the instructions and four exercises below.
Reference illustration
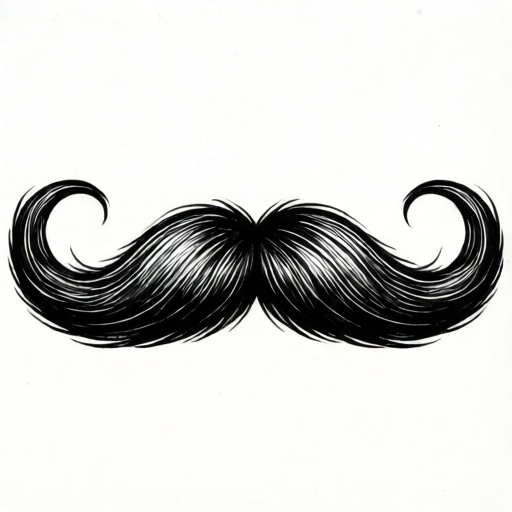
Use the stated measurements and conventions for each exercise.
Set the axis and the symmetry convention
Draw a light vertical line on your paper. This is the symmetry axis. Every feature you place on the left must have a matching feature at the same height and the same distance from the axis on the right. Use a ruler to mark equal distances; do not rely on visual estimation alone.
Define the mustache envelope before drawing curves. Mark a top line and a bottom line for the thickest part of the mustache, then mark the left and right outer limits. For a hypothetical example on a 15 cm wide practice area, place the axis at the center, set the thick center band about 2 cm tall, and set each outer tip about 5 cm from the axis. These numbers are examples only; choose values that fit your paper and record them.
- Draw a faint vertical axis and label it A.
- Mark a top reference line and a bottom reference line for the center band.
- Mark equal left and right outer limits from the axis.
- Label the four envelope marks so you can compare pairs later.
Build the taper from center to tip
Taper means the shape is widest near the center and narrows gradually toward each tip. Draw the upper edge first as a gentle curve that starts near the top reference line at the center and descends toward the outer limit. Then draw the lower edge as a curve that starts near the bottom reference line and rises toward the same outer limit. The two edges should converge at the tip without crossing.
Keep the taper smooth. Avoid sudden steps or bulges. A useful check is to place three evenly spaced marks along each half and confirm that the vertical gap between upper and lower edges decreases steadily from center to tip. If a gap increases, adjust that segment before continuing.
- Mark three checkpoints on the left half at equal horizontal spacing.
- At each checkpoint, measure the vertical gap between upper and lower edges.
- Confirm the gaps decrease from center to tip; adjust any segment that does not.
- Repeat the same checkpoint pattern on the right half.
Add the curl and verify symmetry
The curl is a small hook at each tip. Decide the curl direction once, then mirror it. For example, both tips may curl upward and inward, or both may curl downward and outward. The convention for this lesson is that the left and right curls are mirror images about the axis: same size, same rotation direction relative to the axis, and same distance from the tip.
Draw the curl as a short arc that continues from the tapered tip. Keep the arc radius small and consistent on both sides. After drawing, fold the paper along the axis if the paper is thin enough, or hold a mirror on the axis, and compare the two halves. Valid alternatives include different curl sizes or directions, provided the left and right sides match under the chosen convention.
- Choose one curl direction and state it before drawing.
- Draw the left curl as a short arc from the left tip.
- Draw the right curl as the mirror image of the left curl.
- Check symmetry by folding or mirroring along the axis.
Refine edges and final check
Refine the outline by smoothing any flat spots and confirming that the center band is not wider on one side of the axis than the other. Erase construction marks only after the symmetry check. Keep the drawing free of face features; this task is the mustache shape alone.
Use a simple rubric: axis present, paired checkpoints equal, taper gaps decreasing, curls mirrored, and outline smooth. A drawing can pass with different proportions or curl styles as long as the stated convention is followed and the symmetry check succeeds.
- Compare left and right center-band widths.
- Smooth any flat or jagged segments.
- Remove construction marks after the symmetry check.
- Record which convention you used for the curls.
Worked example
On a practice area 12 cm wide, draw a mustache with a vertical axis at the center, a center band 1.5 cm tall, outer tips 4 cm from the axis, and both curls pointing upward and inward. Describe the checkpoints and the symmetry check.
Worked answer
Place the axis at 6 cm from the left edge. Mark the center band 0.75 cm above and 0.75 cm below the horizontal midline, giving a 1.5 cm total height centered on the midline. Mark left and right tips at 4 cm from the axis, so at 2 cm and 10 cm from the left edge. Draw upper and lower edges that converge at each tip. Add three checkpoints per half at equal spacing and confirm the vertical gap decreases from center to tip. Draw upward-inward curls as mirror arcs. Check by folding or mirroring: paired checkpoints should match in distance from the axis and height.
Four practice exercises
Exercise 1
A practice area is 10 cm wide with the axis at the center. The left tip is 3 cm from the axis. Where is the right tip, and what is the distance between the tips?
Show answer and check
The right tip is 3 cm from the axis on the opposite side. The distance between tips is 6 cm.
Why: Bilateral symmetry requires equal distances from the axis. Left tip at 3 cm means right tip at 3 cm on the other side. Total tip-to-tip distance is 3 cm + 3 cm = 6 cm.
Check: Measure from the axis to each tip with a ruler; both should read 3 cm, and the full span should read 6 cm.
Exercise 2
At three checkpoints from center to tip, the vertical gaps on the left half are 2.0 cm, 1.4 cm, and 0.8 cm. Is the taper acceptable under the steady-decrease rule? Explain.
Show answer and check
Yes. The gaps decrease by 0.6 cm each step: 2.0 to 1.4 and 1.4 to 0.8. The taper is steady.
Why: Subtract consecutive gaps: 2.0 - 1.4 = 0.6 and 1.4 - 0.8 = 0.6. Equal decreases indicate a smooth taper.
Check: Re-measure each gap at the marked checkpoints and confirm the differences are equal or close enough for your stated tolerance.
Exercise 3
A drawing has a left curl that arcs upward and inward with a 0.5 cm radius. The right curl arcs downward and outward with a 0.5 cm radius. Does this satisfy mirror symmetry? What fix is needed?
Show answer and check
No. The curls are not mirror images. Fix by making the right curl arc upward and inward with the same 0.5 cm radius, or restate the convention and redraw both curls to match it.
Why: Mirror symmetry requires the same size and mirrored direction about the axis. Upward-inward on the left must correspond to upward-inward on the right under this convention.
Check: Fold or mirror along the axis; the curl arcs should overlap. Measure both radii to confirm they match.
Exercise 4
On a 14 cm wide practice area, the axis is at 7 cm. A center band is marked 1.2 cm above the midline and 1.8 cm below it. Is the band symmetric about the midline? If not, what equal values would make it symmetric while keeping the same total height?
Show answer and check
No, it is not symmetric: 1.2 cm above and 1.8 cm below are unequal. The total height is 3.0 cm, so equal values would be 1.5 cm above and 1.5 cm below the midline.
Why: Symmetry about the midline requires equal distances above and below. Add the two distances: 1.2 + 1.8 = 3.0 cm. Half of 3.0 cm is 1.5 cm, so use 1.5 cm above and 1.5 cm below.
Check: Measure from the midline to the top and bottom of the band; both should read 1.5 cm, and the total should read 3.0 cm.
Common mistakes
- Drawing one side completely before the other, causing drift. Draw paired features in the same order on both sides, checking distance from the axis after each pair.
- Making the taper too abrupt near the tip. Add intermediate checkpoints and confirm the vertical gap decreases steadily rather than collapsing at the end.
- Using different curl directions on left and right. State the curl convention first and mirror the arc size and rotation about the axis.
- Relying on visual estimation for symmetry. Measure equal distances from the axis with a ruler or use a fold or mirror check.
Self-check rubric
- A vertical symmetry axis is present and used.
- Paired checkpoints are equal in distance from the axis and at matching heights.
- The taper shows a steady decrease in vertical gap from center to tip.
- Curls follow the stated convention and are mirror images about the axis.
- The outline is smooth and free of face features or hair rendering.
- Valid alternatives are accepted when the stated convention and symmetry check are satisfied.
Questions and answers
Do both curls have to point the same way?
No. The convention is mirror symmetry about the axis. Both curls may point up, down, inward, or outward, but the left and right must match as mirror images. State your convention before drawing.
How thick should the center be?
There is no universal thickness. Choose a center band that fits your paper, record the measurement, and keep it equal on both sides of the axis. Any numerical value in this lesson is a hypothetical example.
Can I use a different curl size on each side?
Only if your stated convention allows it. For bilateral symmetry, the curl size should match on both sides. If you intentionally vary it, label the drawing as asymmetric and do not claim symmetry.
What if my paper is too thick to fold?
Hold a small mirror on the axis and compare the reflected half with the drawn half. Alternatively, measure paired checkpoints with a ruler.