Free original lessons
Draw a Muscular Male Torso: Mass Shapes and Proportion Landmarks
Learn to construct a muscular male torso using simple mass shapes and checkable proportion landmarks, with practice tasks and a clear rubric.
Free lesson
Four exercises
Worked answers
Object Drawing Lessons
This lesson teaches a repeatable method for drawing a muscular male torso by building it from large mass shapes and checking proportions against landmarks you can measure on your own paper. You will not copy a single ideal body; instead you will use a defined convention: the torso is divided into a rib-cage mass, a pelvis mass, and connecting muscle masses, with landmarks placed by simple ratios. All numerical values are hypothetical examples for practice, not standards. Work on plain paper with a pencil and eraser, and measure with a ruler or by counting grid squares if you use a grid.
Practice materials: Printable downloads are not available for this lesson yet. Use the instructions and four exercises below.
Reference illustration
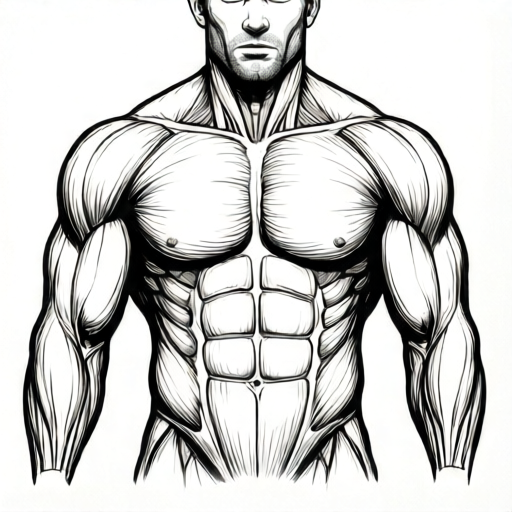
Use the stated measurements and conventions for each exercise.
Build the torso from three mass shapes
Start with the rib-cage mass as an oval that is wider at the top than at the bottom. Next add the pelvis mass as a smaller trapezoid below it, leaving a gap for the waist. Finally connect them with a central column that represents the abdominal mass. These three shapes carry the main weight of the torso and let you adjust proportion before adding muscle detail.
Keep the masses light and loose. Do not commit to outlines until the three shapes look balanced. A common error is making the pelvis as wide as the rib cage; in most muscular male torsos the pelvis mass is narrower, and the waist gap is where the abdominal muscles will sit.
- Draw a vertical centre line for the torso.
- Place the rib-cage oval so its widest point is about one third down from the top of the torso.
- Draw the pelvis trapezoid below, leaving a waist gap of about one quarter of the rib-cage height.
- Add a narrow central column between the two masses for the abdominal wall.
- Check that the three masses share the centre line and that the pelvis is narrower than the rib cage.
Place proportion landmarks with simple ratios
Use landmarks you can measure: the top of the rib cage, the bottom of the rib cage, the waist gap, and the top of the pelvis. A practical convention is to divide the torso height into four equal bands. The top band holds the upper chest, the second band holds the lower chest and upper abdomen, the third band holds the waist gap, and the fourth band holds the pelvis. These are hypothetical example ratios for practice; measure your own drawing and adjust.
Mark the shoulder line as a horizontal line across the top of the rib-cage mass. Mark the nipple line about one third down the rib cage, and the bottom of the rib cage as a gentle curve. These landmarks let you check that the muscle masses sit in believable places.
- Measure the total torso height on your paper and divide it into four equal bands with light lines.
- Mark the shoulder line at the top of the rib-cage mass.
- Mark the nipple line about one third down the rib cage.
- Mark the bottom of the rib cage as a shallow curve.
- Mark the top of the pelvis at the boundary between the third and fourth bands.
Add muscle masses without losing the structure
With the masses and landmarks in place, add the pectoral masses as two rounded shapes above the nipple line, the abdominal masses as a stack of small rounded blocks in the central column, and the latissimus masses as curved shapes sweeping from the rib cage toward the pelvis. Keep each muscle mass attached to a landmark so the drawing stays checkable.
Use the convention that muscle masses are drawn as soft rounded forms, not sharp outlines. Letter styles and line weight vary, so the rubric rewards clear mass placement and landmark accuracy rather than a single perfect line style.
- Draw two pectoral masses above the nipple line, leaving a small gap at the centre.
- Stack three to four abdominal blocks in the central column between the rib cage and the pelvis.
- Add latissimus curves from the sides of the rib cage toward the top of the pelvis.
- Check that every muscle mass touches or aligns with a landmark line.
- Erase construction lines only after the masses look balanced.
Worked example
A student draws a torso 16 cm tall. They divide it into four equal bands. Where should the top of the pelvis sit, and how tall is each band?
Worked answer
Each band is 16 ÷ 4 = 4 cm tall. The top of the pelvis sits at the boundary between the third and fourth bands, which is 12 cm down from the top of the torso.
Four practice exercises
Exercise 1
A torso is 20 cm tall. Divide it into four equal bands. How tall is each band, and at what distance from the top does the top of the pelvis sit?
Show answer and check
Each band is 5 cm tall. The top of the pelvis sits 15 cm down from the top of the torso.
Why: 20 ÷ 4 = 5 cm per band. The pelvis top is at the boundary between the third and fourth bands, so 3 × 5 = 15 cm.
Check: Measure the total height, divide by four, and count three bands down from the top.
Exercise 2
A rib-cage mass is 9 cm tall. The nipple line is placed one third down from the top of the rib cage. How far down from the top of the rib cage is the nipple line?
Show answer and check
The nipple line is 3 cm down from the top of the rib cage.
Why: One third of 9 cm is 9 ÷ 3 = 3 cm.
Check: Measure the rib-cage height, divide by three, and compare the marked line to that distance.
Exercise 3
A student draws a waist gap of 2 cm and a rib-cage height of 10 cm. Using the convention that the waist gap is about one quarter of the rib-cage height, is the gap too large, too small, or about right?
Show answer and check
The gap is too small. One quarter of 10 cm is 2.5 cm, so a 2 cm gap is slightly under the convention.
Why: 10 ÷ 4 = 2.5 cm. The drawn gap of 2 cm is less than 2.5 cm.
Check: Divide the rib-cage height by four and compare the result to the measured waist gap.
Exercise 4
A torso drawing has a rib-cage mass 12 cm tall and a pelvis mass 5 cm tall. The student claims the pelvis is about half the rib-cage height. Is that claim correct, and by how much does it differ from half?
Show answer and check
The claim is not correct. Half of 12 cm is 6 cm, so the 5 cm pelvis is 1 cm shorter than half the rib-cage height.
Why: 12 ÷ 2 = 6 cm. The pelvis is 5 cm, which is 6 − 5 = 1 cm less than half.
Check: Halve the rib-cage height and subtract the pelvis height to find the difference.
Common mistakes
- Making the pelvis mass as wide as the rib-cage mass. Narrow the pelvis trapezoid so it is visibly smaller than the rib cage, and keep the waist gap clear.
- Placing the nipple line too low on the rib cage. Measure about one third down the rib-cage mass and move the line up if it sits lower.
- Drawing muscle masses that float away from the landmark lines. Attach each pectoral, abdominal, and latissimus mass to a marked landmark and redraw any that do not touch.
- Skipping the four-band height check. Divide the torso height into four equal bands before adding muscle detail, and compare the masses to those bands.
Self-check rubric
- Three mass shapes are present and share a centre line.
- The pelvis mass is narrower than the rib-cage mass.
- The waist gap is visible and roughly one quarter of the rib-cage height.
- Four equal height bands are marked or implied.
- The nipple line sits about one third down the rib cage.
- Pectoral, abdominal, and latissimus masses each align with a landmark.
- Construction lines are light and do not obscure the masses.
- Valid alternative line styles are accepted if mass placement and landmarks are clear.
Questions and answers
Do I need a grid to use this method?
No. A ruler or a folded paper strip works for measuring the four bands. A grid is optional and only helps keep the bands equal.
Are the ratios in this lesson fixed standards?
No. The four-band division and one-third nipple line are hypothetical examples for practice. Measure your own drawing and adjust the ratios to suit the torso you are constructing.
How do I know when the masses are balanced?
Check that the three masses share the centre line, that the pelvis is narrower than the rib cage, and that the waist gap is about one quarter of the rib-cage height.
Can I use different line styles?
Yes. The rubric rewards clear mass placement and landmark accuracy, not a single line style. Soft rounded masses and light construction lines are the convention, but valid alternatives are accepted if the structure is checkable.