Free original lessons
Running Drawing: Build Stride and Arm-Swing with Simple Construction
Learn a repeatable running drawing method: set a stride line, place torso and limbs, then refine arm-swing. Includes checks, practice tasks, and a marking rubric.
Free lesson
Four exercises
Worked answers
Object Drawing Lessons
This lesson teaches a construction-first approach to running drawing. You will not copy a finished figure or chase portrait likeness. Instead you will build a running pose from a stride line, a torso block, and two arm-swing arcs, then test the result with simple alignment checks. The convention is deliberately explicit: the figure is drawn on a vertical page, the stride line runs from the rear foot contact to the front foot contact, and the torso leans forward from the hip line. Arm-swing is described as two arcs that cross the torso midline in opposite phases. Because drawing conventions vary, the rubric rewards consistent construction and readable motion rather than a single correct silhouette. All measurements below are hypothetical examples chosen for teaching; measure your own paper and tools if you adapt them.
Practice materials: Printable downloads are not available for this lesson yet. Use the instructions and four exercises below.
Reference illustration
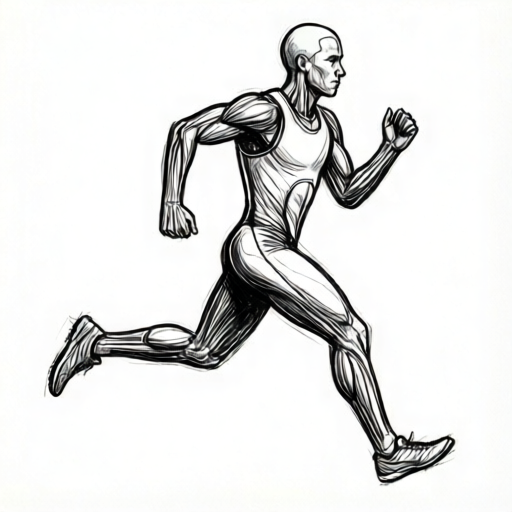
Use the stated measurements and conventions for each exercise.
Set the stride line and body landmarks
Begin with a light stride line: a single straight line from the rear foot contact point to the front foot contact point. On a portrait page, this line usually slopes slightly upward toward the front foot. Mark three landmarks on it: rear contact, hip projection, and front contact. The hip projection is the point on the stride line directly below the pelvis center.
Next place the torso block. Draw a rounded rectangle whose bottom edge sits at the hip projection and whose top edge is the shoulder line. Lean the block forward by tilting its long axis toward the front foot. A hypothetical lean of 10 to 15 degrees from vertical reads as running without looking like falling. Keep the block narrow enough that the arms can swing past it without merging.
- Draw a light stride line from rear contact to front contact.
- Mark rear contact, hip projection, and front contact on the line.
- Draw a forward-leaning torso block with its base at the hip projection.
- Mark shoulder line, neck point, and head center above the block.
Place legs for a readable stride
The rear leg pushes back and the front leg reaches forward. Draw the rear leg first: from the hip, a thigh line angled back and down to a knee, then a lower-leg line angled down to the rear contact. The front leg runs from the hip forward and down to a knee, then down to the front contact. Keep knee bends visible: a straight rear leg can read as standing, while a slightly bent front knee reads as absorption.
Check leg length consistency by measuring from hip to contact along each leg with a scrap of paper. The two measurements should be close; small differences are acceptable because the stride line is a construction aid, not a measured skeleton. If one leg is much longer, adjust the knee position rather than the contact point.
- Draw the rear thigh from hip to knee, angled back.
- Add the rear lower leg to the rear contact.
- Draw the front thigh from hip to knee, angled forward.
- Add the front lower leg to the front contact and compare leg lengths.
Build arm-swing with two opposing arcs
Arm-swing is the clearest motion cue. Draw two arcs from the shoulder line: one arm swings forward across the torso midline, the other swings back behind the hip line. The forward arm bends more at the elbow; the rear arm opens slightly. The hands should not overlap the torso block, and the forward hand should sit near the front hip level rather than at the chin.
Use the opposite-phase rule: when the front leg is forward, the opposite arm is forward. Mark this with a small letter F near the forward hand and R near the rear hand, then check that the forward hand is on the side opposite the front foot. This single check catches most arm-swing errors.
- Draw the forward arm arc from shoulder to elbow to hand.
- Draw the rear arm arc from shoulder to elbow to hand.
- Mark forward hand F and rear hand R.
- Verify F is opposite the front foot; adjust shoulder or elbow angle if not.
Refine silhouette and motion cues
Once the construction holds, thicken the silhouette: add a slight forward head tilt, a compact neck, and simple shoe shapes at the contact points. Keep details minimal so the stride and arm-swing remain readable. A common refinement is to shorten the rear foot shape so it does not compete with the front contact.
Test readability by viewing the drawing from a short distance. If the stride line, torso lean, and opposing arms are visible at a glance, the running drawing works. If the figure looks like it is standing, recheck the rear leg angle and the forward arm height before adding detail.
- Add head tilt and neck without changing the torso lean.
- Draw simple shoe shapes at both contacts.
- Step back and check stride, lean, and arm opposition at a glance.
- Erase construction lines only after the silhouette reads clearly.
Worked example
Construct a running figure facing right on a portrait page. Use a stride line from rear contact at lower left to front contact at lower right. Place a torso block leaning forward, then add legs and opposing arms. State one check you would use.
Worked answer
Draw the stride line sloping slightly upward to the right. Mark rear contact, hip projection, and front contact. Draw a torso block leaning about 12 degrees toward the front foot, with its base at the hip projection. Add the rear leg angled back to rear contact and the front leg angled forward to front contact, with visible knee bends. Draw the forward arm on the side opposite the front foot, crossing the torso midline, and the rear arm swinging back. Check: mark F on the forward hand and R on the rear hand; confirm F is opposite the front foot.
Four practice exercises
Exercise 1
A figure faces right. The front foot is at lower right and the rear foot at lower left. The forward hand is drawn on the same side as the front foot. Using the opposite-phase rule, describe the correction and state one check.
Show answer and check
Move the forward hand to the side opposite the front foot, so it crosses the torso midline. Keep the rear hand swinging back. Check by marking F on the forward hand and confirming it is opposite the front foot.
Why: The opposite-phase rule links the forward leg to the opposite arm. If both are on the same side, the arm-swing reads as a mistake rather than motion.
Check: Mark F and R on the hands, then compare F with the front foot side. If they match, adjust the shoulder or elbow angle.
Exercise 2
A torso block is drawn vertically with its base at the hip projection. The stride line slopes upward to the right. Describe how to adjust the torso for a running read, and give a hypothetical lean value.
Show answer and check
Tilt the torso block toward the front foot, keeping its base at the hip projection. A hypothetical lean of 10 to 15 degrees from vertical is a useful teaching example. Then recheck that the shoulder line stays above the hip projection.
Why: A vertical torso reads as standing. A forward lean aligned with the stride direction signals motion without changing the contact points.
Check: Draw a light vertical reference through the hip projection and compare the torso axis to it. The torso should tilt toward the front foot.
Exercise 3
The rear leg is perfectly straight and the front knee is locked. The stride line is correct. Describe two changes that make the stride read as running, and state how to check leg length consistency.
Show answer and check
Add a visible bend to the front knee and a slight bend to the rear knee, keeping both contact points fixed. Check leg length by measuring hip-to-contact along each leg with a scrap of paper; the two measurements should be close, and small differences are acceptable.
Why: Locked knees make the figure look like it is standing or stretching. Knee bends absorb the stride and make the pose dynamic.
Check: Measure each leg from hip to contact with a scrap of paper. If one leg is much longer, adjust the knee position rather than the contact point.
Exercise 4
A running figure faces left. The stride line runs from rear contact at lower right to front contact at lower left. The forward arm is drawn at chin height and overlaps the head. Describe the correction and one readability check.
Show answer and check
Lower the forward hand to near the front hip level and keep it clear of the head and torso block. Keep the rear arm swinging back. Check readability by stepping back: the stride line, torso lean, and opposing arms should be visible at a glance.
Why: A hand at chin height crowds the head and weakens the arm-swing arc. Lowering it restores the arc and keeps the silhouette readable.
Check: View the drawing from a short distance. If the arm-swing and stride are not obvious, adjust the forward hand height before adding detail.
Common mistakes
- Both arms swing forward or both swing back. Apply the opposite-phase rule: mark F and R, then move one hand across the torso midline so the arms oppose.
- The torso is vertical, so the figure looks like it is standing. Tilt the torso block 10 to 15 degrees toward the front foot, keeping the base at the hip projection.
- The rear leg is perfectly straight and the front knee is locked. Add a visible knee bend to the front leg and a slight bend to the rear leg so the stride reads as motion.
- The forward hand is drawn at chin height, crowding the head. Lower the forward hand to near the front hip level and keep it clear of the torso block.
Self-check rubric
- Stride line is present and connects rear contact to front contact.
- Torso block leans forward from the hip projection.
- Legs show visible knee bends and reach their contact points.
- Arms swing in opposite phase, with the forward hand opposite the front foot.
- Silhouette reads as running from a short distance without extra detail.
- Construction lines are light and do not obscure the final figure.
Questions and answers
Do I need to draw realistic anatomy?
No. This lesson uses a construction convention: stride line, torso block, and two arm arcs. Simple shapes are enough if the motion cues are consistent.
How long should the stride line be?
Use a hypothetical example of about one third of the page height. Measure your own page and choose a length that leaves room for the head and feet.
Can the figure face left instead of right?
Yes. Mirror the construction: the stride line, torso lean, and arm arcs all reverse. The opposite-phase rule still applies.
What if my leg lengths differ?
Adjust the knee position rather than the contact points. Small differences are acceptable because the stride line is a construction aid.