Free original lessons
Draw an Aquarium Fish: Body, Fins, and Tank Context
Learn to draw a believable aquarium fish with clear body structure, fin placement, and simple tank context using a defined convention and checkable steps.
Free lesson
Four exercises
Worked answers
Object Drawing Lessons
This lesson teaches a repeatable method for drawing an aquarium fish inside a tank setting. You will build the body from a baseline and midline, place fins using a simple convention, and add tank context that reads clearly without clutter. The approach accepts valid stylistic variation: fish bodies range from slender to deep, and fins vary in shape and size. What matters is that proportions are deliberate, fin attachments make sense, and the tank context supports the subject. All measurements below are hypothetical examples chosen for practice; measure your own paper and tools if you adapt them. Use a pencil, eraser, and plain paper. Work lightly at first, then darken final lines.
Practice materials: Printable downloads are not available for this lesson yet. Use the instructions and four exercises below.
Reference illustration
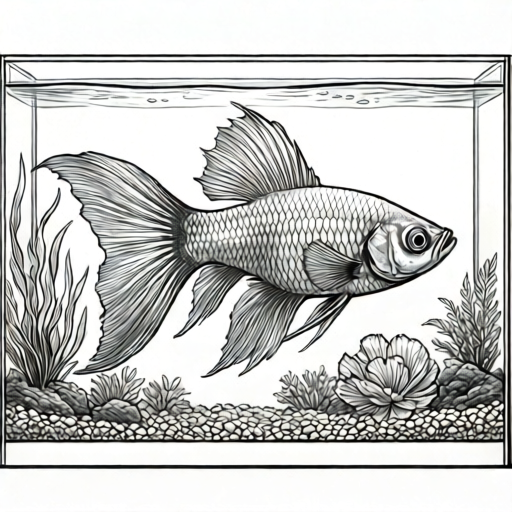
Use the stated measurements and conventions for each exercise.
Set a baseline and midline before drawing the body
Draw a light horizontal baseline for the fish's body length. Mark a midpoint on that baseline. Draw a light vertical midline through the midpoint; this line represents the fish's deepest body point. The distance from baseline to midline is the body depth. Choose a body length and depth that fit your paper, for example a length of 12 cm and a depth of 5 cm on a 20 cm wide sheet. These numbers are hypothetical examples, not standards.
Sketch the body as a smooth closed shape that crosses the baseline at the nose and tail base and reaches the midline at the top and bottom. A deep-bodied fish like an angelfish uses a larger depth relative to length; a slender fish like a danio uses a smaller depth. Keep the outline light so you can adjust symmetry before committing.
- Draw a light baseline and mark its midpoint.
- Draw a light vertical midline through the midpoint.
- Mark nose and tail-base points on the baseline.
- Sketch the top and bottom body curves to the midline depth.
- Check that the body is closed and roughly balanced above and below the baseline.
Place fins with a clear attachment convention
Use this convention: every fin attaches to the body outline at a marked root, and each fin extends outward from that root. Mark roots before drawing fin shapes. A typical aquarium fish has a dorsal fin on top, a caudal (tail) fin at the tail base, an anal fin on the lower rear, pelvic fins on the lower front, and pectoral fins on the sides near the gills. You do not need every fin to be visible; choose a view and stay consistent.
For a side view, draw the dorsal fin root along the top rear third of the body, the caudal fin root at the tail base, and the anal fin root along the lower rear third. Place the pectoral fin root just behind the gill area. Fin size should relate to body size: a caudal fin roughly one quarter to one third of body length is a reasonable hypothetical proportion for many aquarium fish. Vary fin shapes freely, but keep roots attached and edges smooth.
- Mark the dorsal fin root on the top rear third of the body.
- Mark the caudal fin root at the tail base.
- Mark the anal fin root on the lower rear third.
- Mark the pectoral fin root behind the gill area.
- Draw each fin outward from its root, keeping edges smooth and connected.
Add tank context that supports the fish
Tank context should frame the fish without competing with it. Draw a light rectangle or rounded rectangle around the fish to suggest the tank boundary, leaving margin between the fish and the glass. Add a horizontal waterline near the top, a simple substrate line near the bottom, and one or two vertical plant stems or a rock shape at the sides. Keep context lines lighter or thinner than the fish outline so the subject stays dominant.
Check scale: the fish should occupy roughly one third to one half of the tank width in a simple composition. If the fish is too large, the tank reads as cramped; if too small, the context overwhelms the subject. These proportions are hypothetical examples for practice. Adjust to your paper size and intended composition.
- Draw a light tank boundary with margin around the fish.
- Add a waterline near the top of the tank.
- Add a substrate line near the bottom.
- Place one or two simple plant or rock shapes at the sides.
- Confirm context lines are lighter than the fish outline.
Refine, check, and finalize
Review the drawing against three checks: body balance above and below the baseline, fin roots attached to the body, and tank context lighter than the fish. Erase construction lines only after the final outline is confident. Darken the fish outline and fin edges, then add simple eye and gill details. Keep details minimal so the structure remains readable.
Valid alternatives include different body depths, fin shapes, and tank decorations. The convention does not require a single correct fish; it requires deliberate proportions and consistent attachment. If you change the view, keep fin roots plausible for that view.
- Check body balance above and below the baseline.
- Check every fin root touches the body outline.
- Check tank context is lighter than the fish.
- Erase construction lines and darken final outlines.
- Add minimal eye and gill details.
Worked example
On a 20 cm wide sheet, draw a side-view aquarium fish with a 12 cm body length and 5 cm body depth, then add a tank boundary with margin. Describe the construction and the final check.
Worked answer
Draw a 12 cm baseline and mark its midpoint. Draw a vertical midline through the midpoint and mark 2.5 cm above and below the baseline for the body depth. Sketch a closed body from nose to tail base, reaching the midline at top and bottom. Mark the dorsal root on the top rear third, the caudal root at the tail base, the anal root on the lower rear third, and the pectoral root behind the gill area. Draw each fin outward from its root, with the caudal fin about 3 to 4 cm long as a hypothetical proportion. Draw a light tank boundary around the fish with at least 2 cm margin, add a waterline near the top and a substrate line near the bottom, and place one plant shape at the side. Final check: body balanced above and below the baseline, all fin roots attached, tank lines lighter than the fish outline.
Four practice exercises
Exercise 1
A student draws a 10 cm baseline and a 4 cm body depth, then sketches a body that reaches 3 cm above the baseline and 1 cm below. Using the midline check, describe the imbalance and state one correction.
Show answer and check
The body is unbalanced: it reaches 3 cm above and only 1 cm below the baseline, so the top is deeper than the bottom. Correction: adjust the lower curve to reach about 2 cm below the baseline so top and bottom are closer to equal around the midline.
Why: The midline represents the deepest body point, and balance is checked by comparing distances above and below the baseline. Equal or near-equal distances give a balanced body.
Check: Measure the vertical distance from baseline to the top curve and from baseline to the bottom curve at the midpoint; compare the two values.
Exercise 2
A side-view fish has a 12 cm body length. The caudal fin is drawn 6 cm long. Using the hypothetical proportion of one quarter to one third of body length, state whether the fin is within range and give a corrected length range.
Show answer and check
6 cm is too long. One quarter of 12 cm is 3 cm and one third is 4 cm, so a corrected caudal fin length is about 3 to 4 cm.
Why: The proportion is applied to body length: 12 divided by 4 equals 3, and 12 divided by 3 equals 4. The drawn 6 cm exceeds the upper value.
Check: Divide the body length by 4 and by 3 to get the range, then compare the drawn fin length to that range.
Exercise 3
A tank boundary is 18 cm wide. The fish is drawn 14 cm long. Using the hypothetical guide that the fish should occupy roughly one third to one half of the tank width, state whether the fish is too large and give a corrected length range.
Show answer and check
14 cm is too large. One third of 18 cm is 6 cm and one half is 9 cm, so a corrected fish length is about 6 to 9 cm.
Why: The guide is applied to tank width: 18 divided by 3 equals 6, and 18 divided by 2 equals 9. The drawn 14 cm exceeds the upper value.
Check: Divide the tank width by 3 and by 2 to get the range, then compare the drawn fish length to that range.
Exercise 4
A student marks a dorsal fin root on the top rear third, a caudal root at the tail base, and an anal root on the lower rear third, but draws the pectoral fin floating 1 cm away from the body behind the gill area. Identify the mistake and state the fix using the attachment convention.
Show answer and check
The pectoral fin is disconnected from the body. Fix: mark a pectoral root on the body outline behind the gill area, then redraw the fin outward from that root so it touches the body.
Why: The convention requires every fin to attach at a marked root on the body outline. A floating fin violates the attachment rule even if its position is roughly correct.
Check: Trace each fin edge back to the body outline; if there is a gap, the root is missing or misplaced.
Common mistakes
- Drawing fins as floating shapes disconnected from the body. Mark each fin root on the body outline first, then draw the fin outward from that root so it stays attached.
- Making the tank context darker or busier than the fish. Keep tank lines lighter and thinner, and limit decorations to one or two simple shapes at the sides.
- Ignoring the midline so the body is lopsided. Use the baseline and midline to compare top and bottom depth before darkening the outline.
- Making the fish too large for the tank boundary. Leave clear margin between the fish and the glass, and check that the fish occupies roughly one third to one half of the tank width.
Self-check rubric
- Body is a closed shape built from a baseline and midline with deliberate depth.
- Top and bottom body curves are roughly balanced around the baseline.
- Every visible fin has a marked root attached to the body outline.
- Fin shapes are smooth and consistent with the chosen view.
- Tank context includes a boundary, waterline, substrate line, and limited decoration.
- Tank context lines are lighter or thinner than the fish outline.
- Fish occupies a reasonable share of the tank width with clear margin.
- Final drawing is readable and construction lines are erased or faint.
Questions and answers
Do I need to draw every fin?
No. Choose a view and draw the fins visible from that view. A side view commonly shows dorsal, caudal, anal, and pectoral fins; pelvic fins may be partly hidden.
How deep should the body be?
Body depth is a stylistic choice. Use the midline to set a deliberate depth, then keep top and bottom curves balanced. Deep-bodied and slender fish are both valid.
What counts as tank context?
A light tank boundary, a waterline, a substrate line, and one or two simple plant or rock shapes. Context should frame the fish without competing with it.
Can I use different fin shapes?
Yes. The convention requires attached roots and smooth edges, not a single fin shape. Vary shapes as long as they connect to marked roots.