Free original lessons
Shaking Hands Drawing: Grip and Sleeve Construction
Learn to draw a handshake by building grip geometry and sleeve structure with clear steps, a worked example, and four practice tasks.
Free lesson
Four exercises
Worked answers
Object Drawing Lessons
A convincing handshake drawing depends less on rendering fingers and more on constructing the grip: where palms meet, how thumbs cross, and how sleeves frame the clasp. This lesson treats the handshake as a small architectural problem. You will establish a grip axis, block two palm masses, place thumb and finger overlaps, then build sleeve openings and folds that explain the arms behind the clasp. The convention used here is a simple line-and-shape construction: all measurements are relative proportions, and letter-style details such as nail shape or knuckle creases may vary. X-height is baseline to midline for any lettering on the plate, and letter styles vary, so labels are optional. Work on plain paper with a pencil and eraser. Numerical values in examples are hypothetical teaching values, not equipment standards; measure your own paper and tools if you adapt them.
Practice materials: Printable downloads are not available for this lesson yet. Use the instructions and four exercises below.
Reference illustration
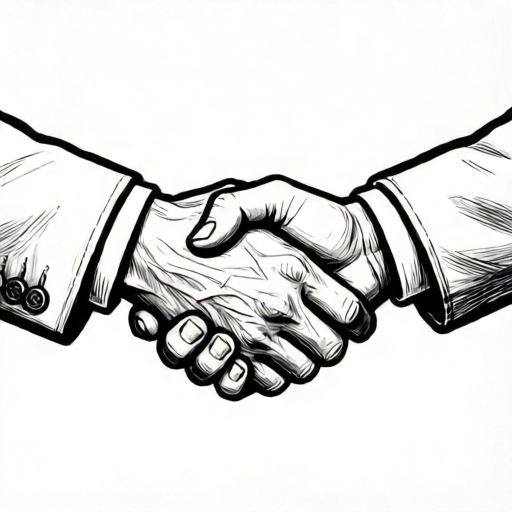
Use the stated measurements and conventions for each exercise.
Establish the grip axis and palm masses
Begin with a single grip axis: a short line angled slightly upward from the lower-left hand to the upper-right hand. This axis is the spine of the handshake. Mark a midpoint where the palms compress. On each side of the midpoint, block a rounded rectangular palm mass. The two masses should overlap slightly at the midpoint, because a real grip compresses the palm edges rather than leaving a gap.
Keep the palm masses similar in size unless you deliberately show one hand larger. A useful proportion is palm width about two-thirds of palm length. Draw lightly so you can adjust the overlap. The lower hand usually sits slightly forward, so its palm mass can extend a little below the axis; the upper hand sits slightly back, so its mass can sit a little above. This small offset prevents the drawing from looking like two flat mittens pressed together.
- Draw a light grip axis about 8 cm long on A4 paper; this is a hypothetical example, so scale to your page.
- Mark the midpoint and a second point one-third along the axis toward the upper hand.
- Block two rounded palm masses on opposite sides of the axis, overlapping at the midpoint by roughly 1 cm.
- Check that each palm mass is about two-thirds as wide as it is long, then erase construction lines only after the grip reads clearly.
Place thumbs, finger overlaps, and knuckle rhythm
The thumb is the clearest signal of a handshake. On the lower hand, draw the thumb wrapping over the top edge of the upper hand's palm mass. On the upper hand, draw the thumb crossing over the lower hand's thumb base. The two thumbs should form a shallow X or a parallel pair, depending on the grip style you choose. Avoid drawing both thumbs on the same side; that is the most common structural error.
Fingers are secondary but must support the grip. Draw four finger groups as short curved bands along the far edge of each palm mass. The bands should follow the grip axis, not radiate outward. Knuckle rhythm comes from spacing: make the first two finger bands closer together and the outer two slightly wider. This variation reads as a natural hand without requiring detailed anatomy. Keep fingernails optional; if drawn, use a simple oval and allow different oval proportions as valid alternatives.
- Draw the lower hand's thumb over the upper palm edge, starting from the lower palm mass.
- Draw the upper hand's thumb crossing the lower thumb base, forming a shallow X.
- Add four curved finger bands along each far palm edge, following the grip axis.
- Vary finger-band spacing slightly and check that no finger band crosses the thumb incorrectly.
Build sleeve openings and fold structure
Sleeves frame the grip and explain the arms. Draw a sleeve opening as a flattened oval or a soft rectangle at the wrist end of each palm mass. The opening should be wider than the wrist but narrower than the palm. For a shirt cuff, add a parallel band just behind the opening; for a jacket sleeve, add a slightly larger opening and a seam line. The sleeve body extends away from the grip along a gentle curve, not a straight tube.
Folds should radiate from the sleeve opening toward the elbow direction. Use three to five simple folds per sleeve: a compression fold at the inner elbow side, a diagonal fold across the forearm, and a short fold near the cuff. Keep fold lines lighter than the grip outline so the handshake remains the focus. Sleeve length and cuff width are stylistic choices; label any chosen numerical values as hypothetical examples and measure your own reference if needed.
- Draw a flattened oval sleeve opening at each wrist, wider than the wrist and narrower than the palm.
- Add a parallel cuff band behind each opening, about one-fifth of the palm length wide.
- Extend the sleeve body away from the grip with a gentle curve.
- Add three to five folds per sleeve, radiating from the opening, and keep them lighter than the grip lines.
Refine contrast and check the construction
Refinement is about hierarchy. Darken the grip outline, especially where palms compress and thumbs cross. Keep sleeve folds and finger bands lighter. Erase construction lines that no longer serve the drawing. Check the handshake by covering the sleeves: the grip alone should still read as two hands clasping. Then cover the fingers: the palm masses and thumbs should still explain the grip.
Use a simple self-check: trace the grip axis with your finger and confirm that both palm masses sit on opposite sides, both thumbs cross near the midpoint, and both sleeve openings sit behind the wrists. If any element breaks this pattern, adjust before adding detail. Valid alternatives include different thumb crossings, cuff styles, and finger-band spacing; the rubric rewards structural clarity, not a single universal hand shape.
- Darken the grip outline and thumb crossings; keep folds lighter.
- Erase leftover construction lines that do not describe grip or sleeve structure.
- Cover the sleeves and check that the grip still reads as a handshake.
- Cover the fingers and check that palms and thumbs still explain the clasp.
Worked example
On A4 paper, construct a handshake with a grip axis 8 cm long, two overlapping palm masses, crossed thumbs, four finger bands per hand, and two flattened sleeve openings with three folds each.
Worked answer
Draw the 8 cm axis angled slightly upward. Mark the midpoint. Block a lower palm mass about 5 cm long and 3.3 cm wide below the axis, and an upper palm mass about 5 cm long and 3.3 cm wide above the axis, overlapping 1 cm at the midpoint. Draw the lower thumb over the upper palm edge and the upper thumb crossing the lower thumb base in a shallow X. Add four curved finger bands along each far palm edge, following the axis. Draw flattened oval sleeve openings at each wrist, each about 3 cm wide and 1.5 cm tall, with a parallel cuff band about 1 cm wide. Extend sleeve bodies with gentle curves and add three light folds per sleeve radiating from each opening. Darken the grip outline and keep folds lighter.
Four practice exercises
Exercise 1
Construct a handshake on a 10 cm grip axis. Use palm masses 6 cm long and 4 cm wide, overlapping 1.2 cm at the midpoint. Draw crossed thumbs and four finger bands per hand. Describe the placement of each element.
Show answer and check
Draw a 10 cm axis angled slightly upward. Mark the midpoint at 5 cm. Place the lower palm mass below the axis, centered near 4 cm along the axis, and the upper palm mass above the axis, centered near 6 cm, overlapping 1.2 cm at the midpoint. Draw the lower thumb over the upper palm edge and the upper thumb crossing the lower thumb base in a shallow X. Add four curved finger bands along each far palm edge, following the axis. Keep the grip outline darker than the finger bands.
Why: The overlap ensures compression at the midpoint, and the offset centers keep one hand slightly forward. Crossed thumbs on opposite sides prevent the common same-side error. Finger bands follow the axis so the grip reads as a clasp rather than two flat hands.
Check: Measure the axis and palm masses with a ruler. Confirm the overlap is about 1.2 cm and that each thumb sits on a different side of the grip. Cover the finger bands and check that palms and thumbs still explain the handshake.
Exercise 2
Add sleeves to the handshake from the previous task. Draw flattened oval openings 3.5 cm wide and 1.8 cm tall at each wrist, cuff bands 1 cm wide, and three folds per sleeve. State where each fold starts and ends.
Show answer and check
At each wrist, draw a flattened oval 3.5 cm wide and 1.8 cm tall. Add a parallel cuff band 1 cm wide behind each opening. Extend each sleeve body away from the grip with a gentle curve. Draw three folds per sleeve: one compression fold starting at the inner elbow side of the opening and ending 3 cm along the sleeve; one diagonal fold crossing the forearm from the opening edge; and one short fold near the cuff, about 1.5 cm long. Keep all folds lighter than the grip outline.
Why: Flattened ovals read as fabric openings rather than rigid circles. Cuff bands clarify sleeve type. Folds radiating from the opening explain compression and keep the sleeve from looking like a straight tube.
Check: Measure each opening and cuff band. Confirm three folds per sleeve and that each fold starts near the opening. Check that folds are lighter than the grip outline by comparing line darkness.
Exercise 3
A student draws both thumbs on the upper side of the grip and makes both sleeve openings perfect circles 4 cm in diameter. Identify the structural errors and describe a corrected construction using a 9 cm grip axis.
Show answer and check
The thumbs are on the same side, so the grip cannot read as two hands clasping. Correct by placing the lower thumb over the upper palm edge and the upper thumb crossing the lower thumb base on the opposite side. The circular sleeve openings ignore fabric flattening. Replace them with flattened ovals about 3 cm wide and 1.5 cm tall at each wrist. Use a 9 cm axis, mark the midpoint at 4.5 cm, and overlap the palm masses by about 1 cm.
Why: Thumb placement is the primary grip signal; same-side thumbs collapse the structure. Circular openings read as rigid tubes, while flattened ovals read as cloth. A defined axis and midpoint keep the corrected construction checkable.
Check: Trace the grip axis and confirm thumbs sit on opposite sides. Measure the oval openings to confirm they are wider than tall. Check that the palm overlap is about 1 cm at the midpoint.
Exercise 4
Design a handshake with a jacket sleeve on the lower hand and a shirt cuff on the upper hand. Use a 12 cm grip axis, palm masses 7 cm long and 4.5 cm wide, and four finger bands per hand. Describe the sleeve differences and list three checks.
Show answer and check
Draw a 12 cm axis and mark the midpoint at 6 cm. Block the lower palm mass below the axis and the upper palm mass above, overlapping about 1.5 cm. Draw crossed thumbs and four finger bands per hand. For the lower hand, draw a larger jacket sleeve opening about 4.5 cm wide and 2.2 cm tall with a seam line and four folds. For the upper hand, draw a shirt cuff opening about 3.5 cm wide and 1.8 cm tall with a parallel cuff band 1 cm wide and three folds. Keep the jacket folds slightly heavier than the shirt folds but lighter than the grip outline. Checks: confirm thumbs are on opposite sides; confirm the jacket opening is larger than the shirt opening; confirm the grip still reads when sleeves are covered.
Why: Different sleeve types require different opening sizes and fold counts. The jacket opening is larger and has a seam, while the shirt cuff has a parallel band. Keeping folds lighter than the grip preserves hierarchy. The three checks test grip structure, sleeve differentiation, and focus.
Check: Measure both openings and compare widths. Count folds per sleeve. Cover the sleeves and verify the grip reads as a handshake. Confirm thumb sides by tracing the axis.
Common mistakes
- Drawing both thumbs on the same side of the grip. Place one thumb over the upper palm edge and the other crossing the lower thumb base, forming a shallow X or parallel pair.
- Making palm masses flat and equal, so the hands look like mittens. Offset one palm slightly above the axis and the other slightly below, and overlap them at the midpoint.
- Drawing sleeve openings as circles instead of flattened ovals. Flatten each opening and make it wider than the wrist but narrower than the palm.
- Letting sleeve folds compete with the grip outline. Keep folds lighter and limit them to three to five per sleeve, radiating from the opening.
Self-check rubric
- Grip axis is visible and both palm masses sit on opposite sides with a clear overlap.
- Thumbs cross on opposite sides of the grip, forming a shallow X or parallel pair.
- Four finger bands per hand follow the grip axis and do not contradict the thumb placement.
- Sleeve openings are flattened ovals wider than the wrist and narrower than the palm.
- Sleeve folds are lighter than the grip outline and limited to three to five per sleeve.
- Valid alternatives in thumb crossing, cuff style, and finger spacing are accepted if structural clarity is maintained.
Questions and answers
Do I need to draw full arms?
No. The brief focuses on grip and sleeve construction. Sleeve bodies can fade out a short distance from the cuff.
How many fingers should be visible?
Four finger bands per hand are enough. They can be simplified curves rather than individual fingers.
Can I use different thumb crossings?
Yes. A shallow X or a parallel pair are both valid if the thumbs sit on opposite sides of the grip.
What paper size should I use?
A4 is convenient, but any plain paper works. The 8 cm axis in the steps is a hypothetical example; scale it to your page.