Free original lessons
Serpent Drawing: Body Curve and Head Construction
Learn to draw a serpent using a smooth body curve and a constructed head. Includes steps, common mistakes, a worked example, and four practice tasks.
Free lesson
Four exercises
Worked answers
Object Drawing Lessons
This guide teaches a reliable method for drawing a serpent: first establish a flowing body curve, then build the head from simple shapes. The approach suits pencil and paper. Letter styles and handwriting vary, so the rubric rewards clear construction and smooth curves rather than a single perfect line. All measurements are hypothetical examples; measure your own paper and tools if you adapt them.
Practice materials: Printable downloads are not available for this lesson yet. Use the instructions and four exercises below.
Reference illustration
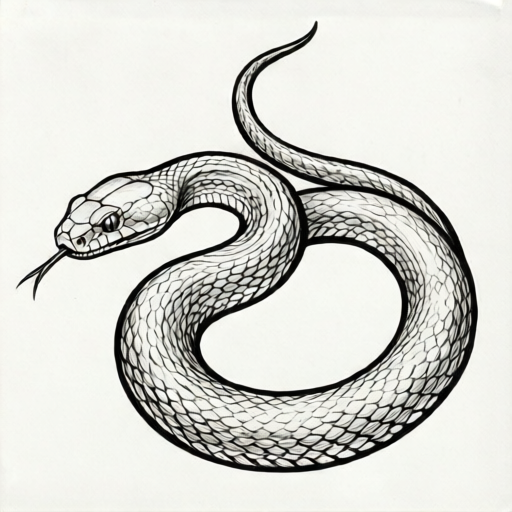
Use the stated measurements and conventions for each exercise.
Planning the body curve
Begin by deciding the serpent's overall path across the page. A serpent body reads as a series of gentle S-curves, not a straight line or a tangle. Sketch a light centerline that flows from tail to neck, keeping the curve smooth and continuous.
Use a soft pencil and light pressure so the guide can be adjusted. The centerline is not the final outline; it is the spine of the drawing. Keep the spacing between curves roughly even so the body appears balanced.
- Mark a start point for the tail near one edge of the paper and an end point for the neck near the opposite side.
- Draw a light centerline with two or three gentle bends, avoiding sharp corners.
- Check that the curve does not cross itself and that the bends are similar in size.
- Adjust the centerline with an eraser until the flow looks natural.
Building the head from simple shapes
Construct the head at the neck end of the centerline. Use a light oval for the skull and a smaller wedge for the snout. The jaw line should follow the direction of the body curve so the head feels connected.
Place the eye on the upper side of the head, not in the center. A serpent head is wider at the back and narrows toward the snout. Keep the construction lines light until the shape is satisfactory.
- Draw a light oval at the neck end, angled to match the body direction.
- Add a smaller wedge in front of the oval for the snout.
- Sketch a jaw line from the back of the oval to the tip of the snout.
- Mark the eye position on the upper half of the head.
- Refine the head outline, keeping the construction lines visible for checking.
Adding body width and final outline
Once the centerline and head are placed, add body width by drawing two parallel curves on either side of the centerline. The width should taper gradually toward the tail and widen slightly near the neck.
Keep the outline smooth and avoid sudden changes in thickness. A serpent's body is continuous, so the outline should not pinch or bulge unexpectedly. Erase the centerline only after the outline is complete.
- Draw one side of the body outline, following the centerline at a consistent distance.
- Draw the other side, matching the taper toward the tail.
- Check that the width changes gradually and that the head connects smoothly.
- Erase the centerline and construction lines, then darken the final outline.
Checking proportion and flow
Review the drawing by comparing the head size to the body width. A common issue is a head that is too large or too small. The head should be roughly one and a half times the body width at the neck, as a hypothetical guide.
Check the curve flow by tracing the outline with your eye. The body should read as one continuous shape. If a bend looks sharp, smooth it with a light eraser and redraw that section.
- Compare head width to neck width and adjust if needed.
- Trace the outline visually to confirm smooth flow.
- Check that the tail tapers gradually and does not end abruptly.
- Make final adjustments before darkening the outline.
Worked example
A serpent is drawn on a page 20 cm wide and 15 cm high. The centerline starts at the tail 2 cm from the left edge and ends at the neck 3 cm from the right edge. The body has two gentle bends. The neck width is 2 cm. Using the hypothetical guide that head width is 1.5 times neck width, what is the head width?
Worked answer
Head width = 1.5 × 2 cm = 3 cm.
Four practice exercises
Exercise 1
A serpent centerline has two bends. The neck width is 3 cm. Using the hypothetical guide that head width is 1.5 times neck width, calculate the head width. Then describe where the eye should be placed on the head.
Show answer and check
Head width = 1.5 × 3 cm = 4.5 cm. The eye should be placed on the upper half of the head, closer to the back than the snout.
Why: Multiply the neck width by 1.5 to get the head width. The eye position follows the construction rule for serpent heads.
Check: Verify the multiplication: 3 × 1.5 = 4.5. Confirm the eye is described as upper half and toward the back.
Exercise 2
A body outline is drawn with a neck width of 2 cm and a tail width of 0.5 cm over a centerline of length 18 cm. If the width decreases evenly, what is the width at the midpoint of the centerline?
Show answer and check
Midpoint width = (2 cm + 0.5 cm) ÷ 2 = 1.25 cm.
Why: For an even taper, the midpoint width is the average of the neck and tail widths.
Check: Add 2 and 0.5 to get 2.5, then divide by 2 to get 1.25 cm. Check that the value lies between 0.5 and 2.
Exercise 3
A student draws a serpent with three bends. The first bend uses a 4 cm radius arc, the second uses a 2 cm radius arc, and the third uses a 4 cm radius arc. The student claims the bends are balanced. Is this claim supported by the radii? Explain.
Show answer and check
No. The middle bend has a smaller radius (2 cm) than the outer bends (4 cm), so the bends are not evenly balanced. A balanced set would use similar radii, such as 4 cm, 4 cm, and 4 cm, or a gradual change.
Why: Balance in curve size is judged by similar radii. A sudden smaller radius creates a tighter bend that stands out.
Check: Compare the three radii: 4, 2, 4. The middle value differs from the others, so the claim is not supported.
Exercise 4
A serpent head is constructed with an oval 3 cm wide and a snout wedge 1.5 cm long. The neck width is 2 cm. Using the hypothetical guide that head width should be about 1.5 times neck width, does the oval width meet the guide? Show the arithmetic.
Show answer and check
Guide head width = 1.5 × 2 cm = 3 cm. The oval width is 3 cm, so it meets the guide.
Why: Multiply neck width by 1.5 and compare to the oval width.
Check: 2 × 1.5 = 3. The oval width equals 3 cm, so the check passes.
Common mistakes
- Drawing the body as a straight line with sharp zigzags. Use gentle S-curves and keep the centerline continuous. Smooth any sharp corners with an eraser before adding width.
- Placing the eye in the center of the head. Mark the eye on the upper half of the head, closer to the back than the snout.
- Making the head too large for the body. Use the neck width as a reference; the head should be about one and a half times the neck width as a hypothetical guide.
- Letting the body width change suddenly. Taper the outline gradually from neck to tail and check the width at several points along the curve.
Self-check rubric
- Body curve is smooth and continuous with no sharp corners.
- Centerline flows from tail to neck without crossing itself.
- Head is constructed from an oval and a wedge, with the eye on the upper half.
- Body width tapers gradually from neck to tail.
- Head width is proportionate to neck width, using a stated reference.
- Construction lines are light and can be erased cleanly.
- Final outline is clear and connects head to body smoothly.
- Valid alternative curve shapes are accepted if they meet the smoothness and proportion checks.
Questions and answers
Do I need special paper or tools?
No. Ordinary paper and a pencil with an eraser are sufficient. A soft pencil helps with light guide lines.
How many curves should the body have?
Two or three gentle bends are enough for a clear serpent shape. More curves can work if they remain smooth and do not cross.
Can I draw the head first?
You can, but starting with the body curve makes it easier to connect the head smoothly. If you start with the head, keep the construction light until the body is placed.
What if my curve looks uneven?
Erase the uneven section and redraw it with lighter pressure. Compare the bend sizes and adjust until they look balanced.