Free original lessons
Walking Figure Drawing: Stride, Arm Swing, and Weight Shift
Learn to draw a walking figure by building stride, arm swing, and weight shift with clear steps, a worked example, and four practice tasks.
Free lesson
Four exercises
Worked answers
Object Drawing Lessons
A convincing walking drawing depends on three linked ideas: the stride (how far the feet separate), the arm swing (how the arms counter the legs), and the weight shift (how the body leans over the supporting foot). This guide builds a walking figure from a simple skeleton, then refines it with a defined convention for proportions and a rubric that accepts valid stylistic variation. All measurements are hypothetical examples; measure your own paper and tools before drawing.
Practice materials: Printable downloads are not available for this lesson yet. Use the instructions and four exercises below.
Reference illustration
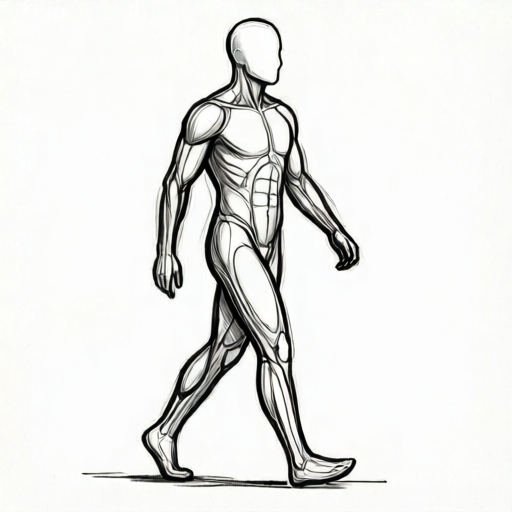
Use the stated measurements and conventions for each exercise.
Build the walking skeleton
Start with a light vertical line for the body axis and a horizontal line for the ground. Mark the head as an oval, the torso as a tapered box, and the pelvis as a short bar. Place the supporting foot under the pelvis and the swinging foot ahead or behind, depending on the stride phase.
Use a simple convention: one head height equals the vertical distance from the top of the head to the chin. For a hypothetical adult figure, use eight head heights total. Mark the midline of the body and the midline of each limb so you can check symmetry and swing.
- Draw the ground line and a light vertical axis for the body.
- Mark eight equal head-height units along the axis as a proportion guide.
- Place the pelvis bar at about the fourth unit from the top.
- Draw the supporting leg as two segments from pelvis to ground.
- Draw the swinging leg forward or back, keeping the knee slightly bent.
- Add the torso taper and the head oval above the pelvis.
Set the stride and arm swing
The arm swing opposes the legs: when the right leg is forward, the left arm is forward and the right arm is back. Under the opposition convention, the forward arm is on the opposite side from the forward leg, and the back arm is on the same side as the forward leg (equivalently, opposite the back leg).
Check that the forward foot and the forward arm are on opposite sides of the body axis. Under the opposition convention, the back arm shares a side with the forward leg and is opposite the back leg.
- Measure the stride as a horizontal distance between the feet.
- Draw the supporting leg with a nearly straight knee and the swinging leg with a slightly bent knee, keeping the back knee slightly bent rather than locked.
- Draw the arm opposite the forward leg swinging forward.
- Draw the other arm swinging back with a slight elbow bend.
- Check that shoulders and pelvis remain roughly parallel.
Show the weight shift
Weight shift means the body leans over the supporting foot. Draw a light vertical line from the supporting foot upward; the pelvis and head should sit close to this line. The swinging side of the pelvis can rise slightly, and the shoulder on the supporting side can drop a little.
Use a small lean, about half a head height of horizontal offset for a hypothetical example, and label it as a chosen value. Too much lean looks like falling; too little looks static. Check the lean by comparing the head position to the supporting foot.
- Identify the supporting foot and draw a vertical line above it.
- Shift the pelvis toward that line by a small chosen amount.
- Tilt the shoulder line slightly opposite the pelvis tilt.
- Check that the head stays near the supporting-foot line.
- Erase construction lines only after the weight shift reads clearly.
Refine with a defined convention and rubric
Use the head-height convention: one head height equals the vertical distance from the top of the head to the chin, and state the total number of head heights on your drawing. Figure proportions and gait styles vary, so state the proportion convention you use and keep it consistent.
The rubric below allows valid alternatives: a figure may use a longer stride, a different arm swing, or a stronger weight shift, as long as the relationships are consistent and checkable.
- State your proportion convention in a corner note.
- Check stride, arm opposition, and weight shift against the rubric.
- Adjust one variable at a time and re-check.
- Keep the final drawing free of construction lines that confuse the pose.
Worked example
Draw a walking figure with a stride of two head heights, right leg forward, left arm forward, and a small weight shift over the right foot. Use eight head heights total.
Worked answer
Place the ground line and eight head-height marks. Put the pelvis at the fourth mark. Draw the right foot forward by two head heights and the left foot back. Draw the left arm forward and the right arm back. Draw a vertical line above the right foot and shift the pelvis toward it by half a head height. Tilt the shoulder line slightly opposite. Check that the head stays near the right-foot line and that the left arm crosses near the line from the right foot to the left shoulder.
Four practice exercises
Exercise 1
Draw a walking figure with a stride of one and a half head heights, left leg forward, and a weight shift over the left foot. State your proportion convention.
Show answer and check
A figure with the left foot forward by one and a half head heights, the right arm forward, the left arm back, and the pelvis shifted toward the left-foot vertical line by a small chosen amount.
Why: The stride is shorter than the worked example, so the back knee bends more. Arm opposition pairs the left leg with the right arm. Weight shift follows the supporting left foot, which is the forward foot in this stride phase.
Check: Measure the stride horizontally; confirm the right arm is forward; draw a vertical line above the left foot and check the head is near it.
Exercise 2
Draw a walking figure with a stride of two head heights but no arm swing. Then add arm swing and explain the change.
Show answer and check
The first figure has legs in stride but arms hanging. The second adds right arm back and left arm forward if the right leg is forward.
Why: Without arm swing the pose reads as static or unnatural. Adding opposition restores walking rhythm.
Check: Compare the two drawings: the second should show the forward leg paired with the opposite back arm.
Exercise 3
Draw a walking figure where the weight shift is too large, then correct it. Use a hypothetical offset of one head height for the error and half a head height for the fix.
Show answer and check
The error figure leans far past the supporting foot; the corrected figure shifts the pelvis only half a head height toward the supporting-foot line.
Why: A large offset looks like falling. A small offset keeps the head near the supporting foot.
Check: Draw vertical lines above the supporting foot in both drawings and compare head positions.
Exercise 4
Draw a walking figure with a stride of two head heights and a shoulder tilt opposite the pelvis tilt. Label all chosen values as hypothetical examples.
Show answer and check
A figure with right leg forward, left arm forward, pelvis tilted slightly up on the swinging side, and shoulder line tilted slightly down on the supporting side.
Why: Opposite tilts create a natural counter-rotation. Labeling values keeps the drawing checkable and honest.
Check: Check that the shoulder tilt and pelvis tilt are opposite and small; confirm labels are present.
Common mistakes
- Both arms swing the same way as the legs. Oppose the arms: the forward leg pairs with the opposite-side forward arm, and the back arm is on the same side as the forward leg (opposite the back leg).
- The body leans away from the supporting foot. Shift the pelvis and head toward the supporting-foot vertical line.
- The stride is so wide that the back knee locks straight. Bend the back knee slightly and reduce stride to a checkable distance.
- Shoulders and pelvis stay perfectly level, making the pose static. Tilt the shoulder line slightly opposite the pelvis tilt.
Self-check rubric
- Stride is measurable and consistent with the stated convention.
- Arms oppose the legs on the same side.
- Weight shift places the head near the supporting-foot line.
- Shoulder and pelvis tilts are small and readable.
- Construction lines are removed or clearly subordinate.
- Any chosen numerical values are labeled as hypothetical examples.
Questions and answers
How do I check arm swing quickly?
Draw a line from the forward foot to the opposite shoulder; the back arm should cross near that line.
What if my figure looks like it is running?
Reduce stride, keep both feet near the ground, and avoid a large forward torso lean.
Can I use different proportions?
Yes, if you state your convention and keep it consistent; the rubric accepts valid alternatives.
How much weight shift is enough?
Use a small chosen offset, label it as hypothetical, and check that the head stays near the supporting-foot line.