Free original lessons
Soccer Player Drawing: Action Pose Construction and Kit Detail
Learn to draw a soccer player in motion using a stick-figure armature, limb angle guide, kit detail practice, and a blank outline for original work.
Free lesson
Four exercises
Worked answers
Object Drawing Lessons
Drawing a soccer player in action means capturing balance, motion, and kit detail without losing the figure's structure. This lesson uses a simple armature of joints and limb angles, then layers clothing and equipment. You will practice measuring angles with a protractor or by eye, build a pose from a defined convention, and check your work with a repeatable rubric. All measurements are hypothetical examples; measure your own paper and tools. The convention for art and handwriting is stated explicitly so valid alternatives are accepted.
Practice materials: Printable downloads are not available for this lesson yet. Use the instructions and four exercises below.
Reference illustration
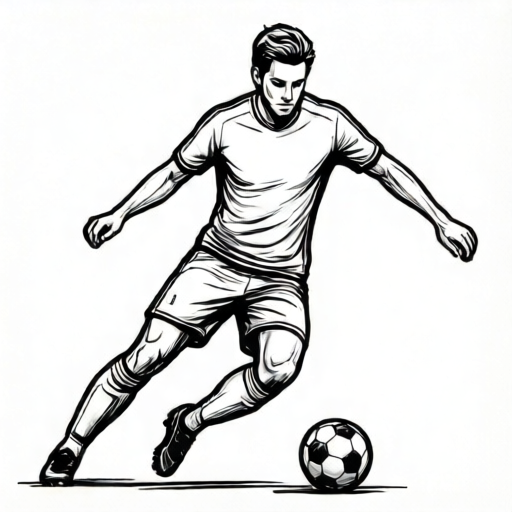
Use the stated measurements and conventions for each exercise.
Build the action pose from an armature
Start with a light stick figure: head circle, spine line, shoulder line, hip line, and four limb lines with joint marks at shoulder, elbow, hip, and knee. For a running or kicking pose, choose a clear direction of motion and lean the spine slightly forward. Use a protractor to set limb angles, or estimate against a vertical reference. Example hypothetical angles for a right-foot kicking pose: spine leans 10 degrees forward from vertical; left thigh 30 degrees forward from vertical; left knee bent 45 degrees; right thigh 20 degrees back from vertical; right knee nearly straight; left arm 40 degrees forward; right arm 30 degrees back. These are examples, not standards.
Check balance by drawing a vertical line from the head through the support foot. In a kick, the support foot is planted; the kicking leg swings. Keep joint marks visible until the pose reads clearly. Then thicken limbs with simple tapered shapes, keeping the same angles. The armature is a guide, not a final outline.
- Draw a head circle and a spine line leaning slightly in the direction of motion.
- Add shoulder and hip lines at right angles to the spine.
- Mark four joints per limb: shoulder, elbow, wrist; hip, knee, ankle.
- Set limb angles with a protractor or by eye; label each angle lightly.
- Check that a vertical line from the head falls near the support foot.
- Thicken limbs into tapered shapes without changing the joint angles.
Add kit detail with a defined convention
Kit detail includes jersey, shorts, socks, and cleats. Use a simple convention: draw the jersey as a rounded rectangle that follows the torso, with a neckline and sleeve seams. Shorts as a wider rectangle below the hip line, split at the center. Socks as tubes from knee to ankle, with a top band. Cleats as low wedges with a toe box and heel. This convention is not the only valid style; any clear, consistent representation is acceptable if it reads as soccer kit.
Place details after the pose is stable. Add a number or stripe on the jersey only if it helps identify the figure; keep it simple. For motion, let the jersey hem lift slightly on the trailing side and the sock top stay level. Use the same line weight for seams. If you use handwriting for a label, follow the x-height convention: x-height is from baseline to midline; letter styles vary, so accept any legible style that keeps consistent proportions.
- Draw the jersey outline following the torso and shoulder lines.
- Add a neckline and sleeve seams with light lines.
- Draw shorts below the hip line, split at the center.
- Add sock tubes from knee to ankle with a top band.
- Draw cleats as low wedges with toe box and heel.
- Check that kit lines follow the body's angles and do not hide joint marks until final.
Use a blank outline and angle guide for practice
A blank outline is a light armature with no kit, ready for you to add clothing and equipment. An angle guide is a set of reference lines at 0, 15, 30, 45, and 60 degrees from vertical, drawn on a separate sheet. Place the outline under the angle guide or beside it, and compare limb angles. This practice builds consistency before freehand drawing.
Measure your own paper and tools. If you choose a 20 cm by 25 cm practice sheet, that is a hypothetical example; use whatever size you have. Keep units consistent: degrees for angles, centimeters for lengths. Do not assume printer tolerances; measure the actual printed line spacing if you print a guide.
- Draw a vertical reference line and mark 0, 15, 30, 45, and 60 degrees with a protractor.
- Place a blank armature beside the guide.
- Compare each limb angle to the nearest guide line and adjust lightly.
- Add kit detail using the convention from the previous section.
- Check balance and joint clarity before finalizing.
Worked example
Draw a soccer player in a running pose moving to the right. Use a spine lean of 8 degrees forward, left thigh 25 degrees forward, left knee bent 40 degrees, right thigh 15 degrees back, right knee bent 20 degrees, left arm 35 degrees back, right arm 25 degrees forward. Add jersey, shorts, socks, and cleats using the convention. Check balance with a vertical line from the head to the support foot.
Worked answer
A completed drawing shows a figure leaning slightly right, with the left leg forward and bent, right leg trailing, arms opposite the legs. The support foot is the left foot; the vertical line from the head falls near it. Kit lines follow the torso and limbs, and joint marks are visible until final. Angles match the given values within a few degrees by eye.
Four practice exercises
Exercise 1
Draw an armature for a soccer player kicking with the right foot. Use these hypothetical angles: spine 12 degrees forward, left thigh 20 degrees forward, left knee bent 50 degrees, right thigh 25 degrees back, right knee 10 degrees bent, left arm 30 degrees forward, right arm 20 degrees back. Mark all joints and check balance.
Show answer and check
A stick figure with the stated angles, joint marks at shoulder, elbow, hip, and knee, and a vertical line from the head falling near the left (support) foot.
Why: The kicking leg swings back while the support leg is planted; the spine leans forward to keep balance. Joint marks make the angles checkable.
Check: Use a protractor or eye estimate to compare each limb angle to the given values; draw the vertical balance line and confirm it passes near the support foot.
Exercise 2
Add kit detail to the kicking armature from Exercise 1 using the convention: jersey as a rounded rectangle following the torso, shorts below the hip line, socks from knee to ankle, cleats as low wedges. Keep joint marks visible until final.
Show answer and check
A drawing with jersey, shorts, socks, and cleats placed according to the convention, with kit lines following the body angles and joint marks still visible.
Why: Kit detail should support the pose, not obscure it. The convention gives a repeatable way to place each item.
Check: Check that each kit item is present and follows the torso or limb angles; confirm joint marks are not hidden before finalizing.
Exercise 3
Create an angle guide on a separate sheet with lines at 0, 15, 30, 45, and 60 degrees from vertical. Place a blank armature beside it and adjust one limb to 30 degrees. State the units you used.
Show answer and check
A guide with five labeled lines and an armature with one limb set to 30 degrees, with units stated as degrees.
Why: The guide provides a visual reference for consistent angles; stating units makes the work checkable.
Check: Measure the angle between the limb and the vertical line with a protractor; confirm it is close to 30 degrees and that units are labeled.
Exercise 4
Draw a soccer player in a running pose moving left. Choose your own hypothetical angles, label them, and add a simple jersey number using the x-height convention. Check balance and list two valid alternative kit styles.
Show answer and check
A running figure moving left with labeled angles, a legible jersey number following x-height (baseline to midline), a balance check, and two alternative kit styles such as a striped jersey or longer shorts.
Why: Choosing your own angles builds decision-making; the x-height convention makes handwriting checkable; alternatives show that style is not fixed.
Check: Verify that angles are labeled with units, the balance line falls near the support foot, the number's x-height is consistent from baseline to midline, and the two alternatives are clearly described.
Common mistakes
- Drawing limbs as straight lines without joint marks, so the pose looks stiff. Mark shoulder, elbow, hip, and knee before thickening; keep a slight bend at each joint.
- Ignoring balance so the figure appears to fall. Draw a vertical line from the head through the support foot; adjust the spine lean or foot position.
- Adding kit detail before the pose is stable, hiding errors. Complete and check the armature first; add kit only after the pose reads clearly.
- Using inconsistent units or unmeasured angles. State units (degrees, centimeters) and measure your own tools; label hypothetical values as examples.
Self-check rubric
- Pose reads as soccer action with clear direction of motion.
- Armature shows joint marks and limb angles consistent with the chosen pose.
- Balance check: vertical line from head falls near the support foot.
- Kit detail follows a consistent convention and does not hide structural errors.
- Handwriting, if used, follows the x-height convention (baseline to midline) and is legible.
- Units and measurements are stated; hypothetical values are labeled as examples.
- Valid alternative styles are accepted if clear and consistent.
Questions and answers
Do I need a protractor?
No. You can estimate angles by eye against a vertical line, but a protractor makes the angle guide practice more checkable.
Is there one correct kit style?
No. The convention described is one clear approach; any consistent representation that reads as soccer kit is valid.
How do I check handwriting on a label?
Use the x-height convention: x-height is baseline to midline. Letter styles vary, so accept any legible style with consistent proportions.
Can I use the blank outline for a different pose?
Yes, if you adjust joint angles and recheck balance. The outline is a starting guide, not a fixed answer.