Free original lessons
Gargoyle Drawing: Wing Spread, Horn Taper, and Crouched Posture
Learn to draw a gargoyle with a clear wing-spread guide, tapered horn study, and crouched posture block-in using measurable checkpoints and a simple convention.
Free lesson
Four exercises
Worked answers
Object Drawing Lessons
This lesson builds a gargoyle drawing from three construction decisions: how the wings spread, how the horns taper, and how the crouched posture stacks weight over the feet. You will use a simple convention for judging height and alignment, then apply it to a worked example and four practice tasks. All measurements are hypothetical examples; measure your own paper and tools before drawing. The goal is a coherent, checkable construction rather than a single correct style.
Practice materials: Printable downloads are not available for this lesson yet. Use the instructions and four exercises below.
Reference illustration
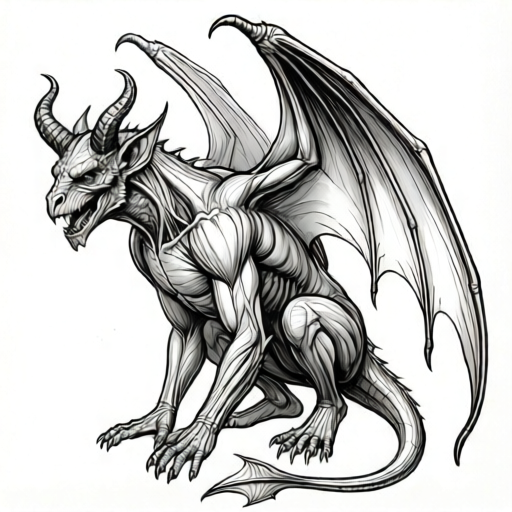
Use the stated measurements and conventions for each exercise.
Set a drawing convention and proportion checkpoints
Define a convention before drawing: x-height is the distance from the baseline to the midline of a letter or, in this lesson, from the ground line to the gargoyle's hip midline. Mark this distance on scrap paper and label it H. All vertical comparisons use H or simple fractions of H. Horizontal comparisons use the same unit. This keeps arithmetic checkable and avoids invented tolerances.
Choose a paper size and measure it. For example, if your paper is 20 cm wide and 28 cm tall, a hypothetical H of 6 cm leaves room for wings and horns. These numbers are examples only; substitute your measured values. Mark a ground line near the bottom and a hip midline at H above it. Mark a shoulder line and a horn-tip line using fractions such as 1.5H and 2H. Keep all units in centimeters or all in inches.
- Measure your paper width and height; record both in one unit.
- Choose a hypothetical H, such as one quarter of the paper height, and mark it.
- Draw a ground line and a hip midline exactly H apart.
- Mark shoulder and horn-tip lines at simple fractions of H.
- Label every checkpoint so later checks use the same reference.
Block in the crouched posture
A crouched posture reads as weight stacked over the feet. Start with a posture block: a vertical spine line, a hip block, a chest block, and two leg lines that bend at knee and ankle. Place the feet slightly wider than the hips so the silhouette looks stable. The head sits forward of the chest, not directly above the hips, to suggest a leaning crouch.
Use the hip midline as the anchor. If the feet are on the ground line and the hips are at H, the knees should fall between them, for example at 0.5H. The shoulders can sit at 1.2H and the head center at 1.4H. These are hypothetical proportions; adjust them but keep the arithmetic consistent. Check that the vertical distance from ground to hip equals H and that the head does not float above the horn-tip line.
- Draw the ground line and place two foot marks wider than the hip width.
- Draw the hip block centered on the hip midline.
- Add a spine line leaning slightly forward and a chest block above it.
- Bend the leg lines at knee and ankle, keeping knees between ground and hips.
- Place the head forward of the chest and check it against the shoulder line.
Construct the wing spread with a guide
Wing spread is easiest to control with a guide: a shoulder anchor point, a leading-edge line, a trailing-edge line, and a tip point. Decide the spread width as a simple multiple of H, such as 1.5H from the shoulder anchor to the tip on each side. Mark the tip points first, then draw the leading edge as a gentle curve from shoulder to tip and the trailing edge as a shorter curve below it.
Keep the wing membrane as a closed shape between the two edges. Add two or three finger lines from the shoulder area toward the trailing edge; these are construction lines, not a claim about anatomy. Check that the left and right tip points are the same distance from the spine line, and that the wing shape does not cross the horn-tip line unless you intend it to. Measure the actual distances on your paper rather than assuming a standard.
- Mark a shoulder anchor on each side of the chest block.
- Choose a spread distance, such as 1.5H, and mark both tip points.
- Draw the leading edge from shoulder to tip as a gentle curve.
- Draw the trailing edge below it and close the membrane shape.
- Add two or three finger construction lines and check left-right symmetry.
Study horn taper and finalize the silhouette
Horn taper is a sequence of decreasing widths along a curved center line. Draw a center line from the head to the horn tip, then mark three width checkpoints: base, middle, and near-tip. For a hypothetical example, use base width 2 cm, middle width 1 cm, and near-tip width 0.5 cm. These values are examples; measure your own drawing and keep the decrease consistent.
Finalize by checking the silhouette against the posture block and wing guide. The horn tip should sit near the horn-tip line, the wing tips should match the chosen spread, and the feet should remain on the ground line. Erase construction lines only after the checks pass. If a check fails, adjust the checkpoint rather than redrawing everything.
- Draw a curved center line from head to horn tip.
- Mark base, middle, and near-tip width checkpoints.
- Draw the horn outline through the checkpoints with decreasing width.
- Compare horn tip, wing tips, and feet to the marked lines.
- Adjust one checkpoint at a time and re-measure before erasing guides.
Worked example
On a hypothetical 20 cm by 28 cm paper, use H = 6 cm. Place the ground line at 4 cm from the bottom. Mark the hip midline at H above ground, the shoulder line at 1.2H, and the horn-tip line at 2H. Choose a wing spread of 1.5H per side. Describe the checkpoint positions and one arithmetic check.
Worked answer
Ground line is at 4 cm. Hip midline is at 4 + 6 = 10 cm from the bottom. Shoulder line is at 4 + 1.2 times 6 = 4 + 7.2 = 11.2 cm. Horn-tip line is at 4 + 2 times 6 = 4 + 12 = 16 cm. Wing spread per side is 1.5 times 6 = 9 cm from the spine line. Check: the vertical distance from ground to hip is 10 minus 4 = 6 cm, which equals H. All values are hypothetical examples measured on the chosen paper.
Four practice exercises
Exercise 1
Hypothetical paper: ground line at 3 cm from the bottom, H = 5 cm. Mark the hip midline, shoulder line at 1.2H, and horn-tip line at 2H. State each height from the bottom and one check.
Show answer and check
Hip midline: 3 + 5 = 8 cm. Shoulder line: 3 + 1.2 times 5 = 3 + 6 = 9 cm. Horn-tip line: 3 + 2 times 5 = 3 + 10 = 13 cm. Check: hip minus ground = 8 minus 3 = 5 cm, equal to H.
Why: Multiply H by the fraction, add the ground offset, and verify the hip distance equals H.
Check: Re-measure each marked line from the bottom edge and confirm the arithmetic in centimeters.
Exercise 2
A wing guide uses a spine line and two tip points. The left tip is 7 cm from the spine and the right tip is 9 cm. The chosen spread is 8 cm per side. Describe the adjustment and the check.
Show answer and check
Move the left tip outward by 1 cm to 8 cm and move the right tip inward by 1 cm to 8 cm. Check: both tips are now 8 cm from the spine, matching the chosen spread.
Why: Compare each measured distance to the chosen spread and adjust by the difference.
Check: Measure both tip distances again from the same spine line and confirm both equal 8 cm.
Exercise 3
Horn checkpoints are base 3 cm, middle 1.5 cm, near-tip 0.8 cm. A draft shows base 3 cm, middle 2 cm, near-tip 1 cm. State which checkpoint fails and give a corrected value that keeps a decreasing taper.
Show answer and check
The middle checkpoint fails because 2 cm is not smaller than the planned 1.5 cm. Correct the middle to 1.5 cm; the near-tip 1 cm is still smaller than 1.5 cm, so the taper decreases. Check: 3 > 1.5 > 1.
Why: A taper requires each width to be smaller than the previous one; compare the draft to the planned sequence.
Check: List the three widths in order and confirm each is smaller than the one before.
Exercise 4
Posture block: ground line at 2 cm, hips at 7 cm, knees at 4.5 cm, shoulders at 9 cm. H is 5 cm. Check whether hips equal H above ground and whether knees lie between ground and hips. State the results.
Show answer and check
Hips minus ground = 7 minus 2 = 5 cm, equal to H. Knees at 4.5 cm lie between ground 2 cm and hips 7 cm. Both checks pass.
Why: Subtract the ground height from the hip height and compare to H; then compare the knee height to the ground and hip heights.
Check: Re-measure the three heights from the bottom edge and repeat the two comparisons.
Common mistakes
- Placing the hips above or below the marked hip midline. Re-measure from the ground line to the hip block and move the block so the distance equals H.
- Making one wing tip farther from the spine than the other. Measure both tip distances from the spine line and move the shorter or longer tip to match the chosen spread.
- Drawing horn widths that increase toward the tip. Re-mark base, middle, and near-tip widths so each is smaller than the previous one, then redraw the outline.
- Letting the head float above the horn-tip line or far behind the chest. Check the head center against the shoulder line and move it forward or down until it sits within the planned range.
Self-check rubric
- Ground line, hip midline, shoulder line, and horn-tip line are marked and labeled.
- The vertical distance from ground to hip equals the chosen H within the drawing's measurement.
- Feet are on the ground line and wider than the hip block.
- Knees fall between ground and hips, and the head sits forward of the chest.
- Wing tip distances from the spine line match the chosen spread on both sides.
- Wing membrane is closed between leading and trailing edges.
- Horn widths decrease from base to near-tip at the marked checkpoints.
- Construction lines are consistent and checks are recorded before erasing.
Questions and answers
Do I need to use the hypothetical numbers exactly?
No. The numbers are examples. Measure your paper and choose values that fit, then keep all comparisons in the same unit and check them with simple arithmetic.
What if my gargoyle style has different proportions?
The convention and checkpoints still work. Change H or the fractions, but record the new values and use them consistently so the checks remain valid.
How do I know the wing spread is balanced?
Measure from the spine line to each wing tip. If both distances match your chosen spread, the guide is balanced within your drawing.
Can I skip the finger construction lines on the wing?
Yes. They are optional construction aids. The required checks are the leading edge, trailing edge, closed membrane, and matched tip distances.