Free original lessons
Drawing Eyes in Pencil: Iris, Catchlight, and Lid Shading
Learn to draw a realistic eye with pencil: build iris texture, place a catchlight, shade the lid crease, and render the tear duct with clear steps and checks.
Free lesson
Four exercises
Worked answers
Object Drawing Lessons
This lesson teaches a repeatable pencil method for a single realistic eye. You will construct the eye from simple shapes, layer iris texture, place a catchlight deliberately, shade the lid and crease, and finish the tear duct. The convention used here is that x-height means the distance from the baseline to the midline of lowercase letters; letter styles vary, so treat x-height as a proportional guide rather than a fixed measurement. All numerical values are hypothetical examples you can adjust after measuring your own paper and pencil. Work on smooth paper with a 2B pencil for line and tone, a 4B for darks, and a kneaded eraser for lifting highlights.
Practice materials: Printable downloads are not available for this lesson yet. Use the instructions and four exercises below.
Reference illustration
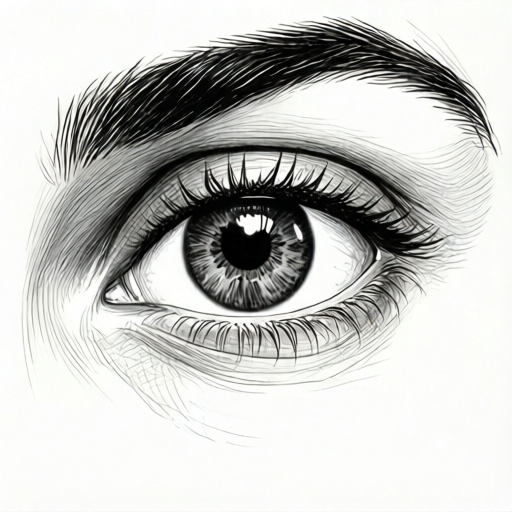
Use the stated measurements and conventions for each exercise.
Build the eye shape and proportion
Start with a light horizontal baseline and a midline above it. The gap between baseline and midline is your x-height guide; use it to compare the height of the iris and the lid opening. Draw an almond-shaped lid opening whose width is about two and a half times its height. Place the iris as a circle that is partly covered by the upper lid, so roughly one fifth of the iris is hidden. Mark the pupil at the center of the iris.
Keep all construction lines light. Check symmetry by comparing the distance from the inner corner to the pupil and from the pupil to the outer corner. These distances need not be equal, but they should look intentional. Measure your actual paper and pencil before committing to any numerical value; the numbers here are examples only.
- Draw a light baseline and a midline above it; label the gap as your x-height guide.
- Sketch an almond lid opening about 2.5 times wider than tall.
- Place a circle for the iris so the upper lid covers about one fifth of it.
- Mark the pupil at the iris center and check inner and outer corner distances.
Layer iris texture and place the catchlight
Iris texture comes from radial lines that run from pupil to outer iris edge. Draw them lightly and vary their spacing; avoid a perfect sunburst. Darken the iris ring near the pupil and leave a slightly lighter band near the outer edge. The catchlight is a small bright shape, usually a rounded rectangle or oval, placed on the side of the iris facing the light source. Decide your light direction first, then place the catchlight consistently.
Use the kneaded eraser to lift the catchlight rather than drawing white. Keep the catchlight edge crisp on the lit side and softer on the shadow side. A second, much smaller catchlight opposite the main one can suggest reflected light, but keep it subtle.
- Draw radial iris lines from pupil to outer edge with varied spacing.
- Darken the ring around the pupil and lighten the outer band slightly.
- Choose a light direction and place the main catchlight on the lit side.
- Lift the catchlight with a kneaded eraser and add a subtle secondary reflection.
Shade the lid, crease, and tear duct
Shade the upper lid with a gradient that is darkest at the crease and lightest near the lid edge. The crease line sits above the lid opening and follows its curve, but it is not a hard outline; soften it with a light touch. The lower lid receives a thin shadow just beneath the lid edge, thicker near the outer corner. The tear duct is a small triangular shape at the inner corner; shade it lightly and leave a tiny highlight to suggest moisture.
Check tonal balance by squinting: the pupil should be the darkest area, the crease next, and the catchlight the brightest. If the lid shading looks flat, add a mid-tone between crease and lid edge. Measure your actual equipment if you test pencil grades; the grades named here are examples.
- Shade the upper lid darkest at the crease and lighter toward the lid edge.
- Soften the crease line so it reads as a fold, not an outline.
- Add a thin lower-lid shadow, thicker near the outer corner.
- Shade the tear duct lightly and leave a small moisture highlight.
Worked example
Draw a single realistic eye on smooth paper using a 2B pencil for line and tone and a 4B for darks. Use a light source from the upper left. Include iris texture, one main catchlight, lid crease shading, and a tear duct. Keep the lid opening about 2.5 times wider than tall and let the upper lid cover about one fifth of the iris.
Worked answer
The finished drawing shows an almond lid opening with a partly hidden iris. Radial iris lines vary in spacing, the ring near the pupil is darker, and the outer band is slightly lighter. The main catchlight sits on the upper-left iris as a small rounded shape lifted with a kneaded eraser; a faint secondary reflection sits opposite. The upper lid is darkest at the crease and lightens toward the lid edge, the lower lid has a thin shadow thicker at the outer corner, and the tear duct is lightly shaded with a tiny highlight. The pupil is the darkest area and the catchlight the brightest.
Four practice exercises
Exercise 1
On a blank eye outline, draw an iris circle and mark how much of it the upper lid should cover if the lid opening is 5 cm wide and 2 cm tall. Use the lesson proportion of about one fifth hidden.
Show answer and check
The lid opening is 5 cm wide and 2 cm tall. One fifth of the iris height is hidden; if the iris is drawn about 2.5 cm tall, about 0.5 cm is hidden by the upper lid.
Why: The lesson uses a lid opening about 2.5 times wider than tall and hides about one fifth of the iris. With a 5 cm by 2 cm opening, an iris about 2.5 cm tall hides about 0.5 cm.
Check: Measure the drawn iris height and confirm the hidden portion is about one fifth of it; check that the visible iris still looks circular.
Exercise 2
A light source comes from the upper right. Describe where to place the main catchlight and one subtle secondary reflection on an iris, and state how each should be edged.
Show answer and check
Place the main catchlight on the upper-right side of the iris, crisp on the lit side and softer on the shadow side. Place a much smaller secondary reflection on the lower-left side, kept subtle and soft.
Why: Catchlight placement follows the chosen light direction. The main highlight faces the light; a secondary reflection appears opposite and should not compete with the main one.
Check: Squint at the drawing: the main catchlight should be the brightest spot and clearly on the lit side; the secondary reflection should be visibly smaller and softer.
Exercise 3
Describe how to shade an upper lid so the crease reads as a fold rather than an outline. Include where the darkest tone goes and how the tone changes toward the lid edge.
Show answer and check
Shade darkest at the crease and gradually lighten toward the lid edge. Soften the crease line with light pressure so it blends into the surrounding tone instead of forming a hard outline.
Why: A fold reads as a soft gradient. A hard line flattens the lid and looks like an outline rather than a crease.
Check: Squint: the crease should be the darkest part of the lid, with a smooth transition to a lighter lid edge and no sharp outline.
Exercise 4
Draw a tear duct at the inner corner of an eye. State its basic shape, how to shade it, and what small feature suggests moisture.
Show answer and check
Draw a small triangular shape at the inner corner. Shade it lightly, darker toward the inner point, and leave a tiny highlight to suggest moisture.
Why: The tear duct is a small recessed shape. Light shading with a tiny highlight reads as moisture without overworking the area.
Check: Check that the tear duct is small relative to the iris, lightly shaded, and has one tiny highlight; it should not be the darkest area of the eye.
Common mistakes
- Drawing the iris as a full circle that sits entirely inside the lid opening. Let the upper lid cover about one fifth of the iris so the eye reads as spherical.
- Placing the catchlight without deciding the light direction. Choose one light source first, then place the main catchlight on the lit side and keep secondary reflections subtle.
- Making the lid crease a hard outline. Soften the crease with light pressure and a gradient so it reads as a fold.
- Leaving the tear duct as a flat dark triangle. Shade it lightly and add a tiny highlight to suggest moisture and depth.
Self-check rubric
- Eye shape is almond-like and the lid opening is roughly 2.5 times wider than tall, or a deliberate alternative is clearly readable.
- Iris is partly covered by the upper lid, with about one fifth hidden or a consistent alternative proportion.
- Iris texture uses varied radial lines rather than a uniform sunburst.
- Main catchlight is placed consistently with a chosen light direction and lifted cleanly.
- Lid crease is shaded as a soft fold, not a hard outline.
- Tear duct is shaded with a small moisture highlight.
- Tonal order is clear: pupil darkest, crease next, catchlight brightest.
- Valid alternatives are accepted when proportions, light direction, and tonal order remain internally consistent.
Questions and answers
How do I know where to put the catchlight?
Decide the light direction first. Place the main catchlight on the side of the iris facing that light, usually as a small rounded shape. Keep it crisp on the lit side and softer on the shadow side.
How much of the iris should the upper lid cover?
About one fifth is a useful starting proportion. Adjust after measuring your own drawing; the key is that the iris looks partly hidden, not fully visible.
What does x-height mean in this lesson?
X-height is the distance from the baseline to the midline of lowercase letters. Letter styles vary, so use it as a proportional guide for comparing heights, not as a fixed measurement.
Can I use a different pencil grade?
Yes. The grades named here are hypothetical examples. Test your actual pencils on scrap paper and adjust pressure to reach the same tonal relationships.