Free original lessons
Ear Drawing Easy: Outline, Inner Folds, and Lobe Construction
Learn to draw a believable ear using a simple outline, clear helix and antihelix folds, and a shaped lobe. Includes practice tasks and checks.
Free lesson
Four exercises
Worked answers
Object Drawing Lessons
Drawing an ear becomes manageable when you separate the shape into three decisions: the outer contour, the inner folds, and the lobe. This lesson uses a consistent convention so you can check your work without chasing a single perfect copy. You will build the ear from a tilted oval, place the helix and antihelix as folded ridges, then shape the lobe with a deliberate curve. All measurements are hypothetical examples; measure your own paper and pencil if you need exact values. The goal is a clear, readable ear that holds together at a small size.
Practice materials: Printable downloads are not available for this lesson yet. Use the instructions and four exercises below.
Reference illustration
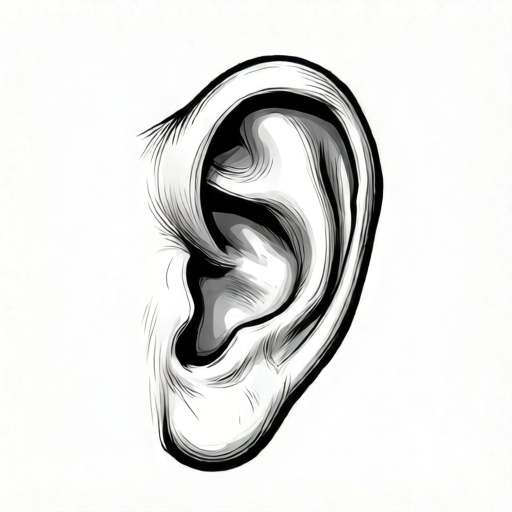
Use the stated measurements and conventions for each exercise.
Start with a tilted oval outline
Begin by drawing a light oval that is taller than it is wide. Tilt the oval slightly so the top leans toward the back of the head and the bottom sits forward. This tilt gives the ear its natural hang. Keep the line light because you will refine it later.
Mark the baseline and midline. The baseline is the lowest point of the lobe. The midline is an imaginary horizontal line through the middle of the oval. X-height in this lesson means the distance from baseline to midline, not a letter measurement. Use that distance to judge proportions: the lobe usually sits in the lower third of the oval, and the top curve rises above the midline.
Refine the outer contour into three arcs: a rounded top, a gentle back curve, and a front curve that dips inward near the lobe. Do not close the lobe yet; leave a small gap where the lobe will attach.
- Draw a light oval about two parts tall to one part wide.
- Tilt the oval so the top leans back and the bottom leans forward.
- Mark the baseline at the lowest point and the midline through the center.
- Replace the oval with three arcs: top, back, and front.
- Leave the lobe area open for the next stage.
Place the helix and antihelix folds
The helix is the outer rim. Draw it as a band that follows the top and back of the outline, stopping before the lobe. The band should be narrow at the top and slightly wider at the back. Keep the inner edge of the helix parallel to the outer contour so the rim reads as a fold, not a second outline.
The antihelix is the inner Y-shaped ridge. Start a curve inside the helix near the top, then split it into two branches: one toward the front and one toward the back. The front branch often fades before reaching the lobe. The back branch curves down and stops above the lobe. These folds are ridges, so draw them with a soft double line or a single line plus a shadow hint.
Check the spacing: the gap between the helix and antihelix should be roughly even along the top. If the gap pinches, redraw the antihelix branch rather than thickening the helix.
- Draw the helix band inside the top and back contour.
- Start the antihelix curve inside the helix near the top.
- Split the antihelix into front and back branches.
- Fade the front branch before the lobe.
- Stop the back branch above the lobe and check even spacing.
Shape the lobe and close the ear
The lobe is not a circle. It is a soft, rounded shape that hangs below the back branch of the antihelix. Draw the lobe as a shallow U or a rounded triangle, depending on the ear you are studying. The front edge of the lobe should connect smoothly to the front contour, and the back edge should meet the helix band.
Close the ear by connecting the lobe to the outline with a gentle curve. Avoid a sharp corner at the bottom. If the lobe looks too wide, narrow the front edge rather than flattening the bottom. If it looks too small, extend the bottom curve downward by a small amount and recheck against the midline.
Finally, add a light shadow under the helix and inside the antihelix split. Keep shadows simple: one soft line or a small shaded wedge. The ear should read clearly at a glance without heavy detail.
- Draw the lobe as a shallow U or rounded triangle below the back branch.
- Connect the front lobe edge to the front contour.
- Connect the back lobe edge to the helix band.
- Round the bottom so no sharp corner remains.
- Add one soft shadow under the helix and inside the antihelix split.
Worked example
Draw an ear about 6 cm tall and 3 cm wide on plain paper. Use a tilted oval, place the helix band and antihelix split, then shape the lobe. Check that the lobe sits in the lower third and that the helix gap is roughly even.
Worked answer
A finished ear with a tilted oval outline, a helix band following the top and back, an antihelix split near the top third, and a rounded lobe below the back branch. The lobe occupies roughly the lower third of the height. The helix gap is even along the top, and one soft shadow sits under the helix. Measurements are hypothetical examples; the drawing is checked by proportion and fold placement, not by exact centimeters.
Four practice exercises
Exercise 1
Draw only the outer outline of an ear on a 10 cm by 10 cm area. Use a tilted oval, mark the baseline and midline, and replace the oval with three arcs. Leave the lobe area open. Do not add folds.
Show answer and check
A tilted oval outline with a marked baseline and midline, refined into top, back, and front arcs. The lobe area remains open. The outline is taller than wide and leans back at the top.
Why: This isolates the contour decision. A tilted oval prevents a flat circle, and the three arcs create a natural ear shape before folds are added.
Check: Measure the height and width of your outline. The height should be greater than the width. Confirm the top leans back and the front curve dips inward near the open lobe area.
Exercise 2
Inside a finished outline, draw the helix band and the antihelix split. The helix should follow the top and back and stop before the lobe. The antihelix should start in the top third and split into two branches. Check that the gap between helix and antihelix is roughly even along the top.
Show answer and check
A helix band with a narrow top and slightly wider back, plus an antihelix split near the top third. The front branch fades before the lobe, and the back branch stops above the lobe. The gap is even along the top.
Why: The helix and antihelix are the main inner folds. Placing the split in the top third keeps the folds readable and prevents the antihelix from crowding the lobe.
Check: Compare the gap at three points along the top: front, middle, and back. The gaps should be similar. Confirm the split is above the midline and the front branch does not reach the lobe.
Exercise 3
Draw three lobe shapes below the same back antihelix branch: one shallow U, one rounded triangle, and one too-wide oval. Label which two are valid and which one needs correction. Use the baseline-to-midline convention to judge the lobe height.
Show answer and check
The shallow U and rounded triangle are valid. The too-wide oval needs correction because it spreads beyond the front contour and loses the lobe shape. The valid lobes sit in the lower third and connect smoothly to the front and back edges.
Why: The lobe is a soft shape, not a circle. Two valid alternatives show that the rubric accepts variation, while the too-wide oval demonstrates a proportion error.
Check: Check that each valid lobe stays within the lower third of the ear height and connects to both the front contour and the helix band. The invalid oval should be visibly wider than the back branch and should not meet the front contour smoothly.
Exercise 4
Draw a complete ear with outline, helix, antihelix, and lobe. Add one soft shadow under the helix and one inside the antihelix split. Then write a two-sentence check describing how you confirmed the proportions and fold placement.
Show answer and check
A complete ear with a tilted outline, even helix gap, top-third antihelix split, and rounded lobe. One soft shadow sits under the helix and one inside the split. The check notes that the lobe is in the lower third and the helix gap is even along the top.
Why: This combines all three decisions and adds simple shading. The written check makes the self-assessment explicit and uses the same criteria as the rubric.
Check: Verify four points: the outline is taller than wide, the helix gap is even, the antihelix split is in the top third, and the lobe is rounded and in the lower third. Confirm the shadows do not hide the outline.
Common mistakes
- Drawing the ear as a flat circle or perfect oval. Tilt the oval and replace it with three arcs: top, back, and front. The lobe should hang below the midline.
- Making the helix a second outline instead of a band. Keep the inner edge of the helix parallel to the outer contour and leave a visible gap. The band should be narrow at the top and slightly wider at the back.
- Splitting the antihelix too low or too high. Start the split near the top third of the ear, inside the helix. The front branch should fade before the lobe, and the back branch should stop above the lobe.
- Shaping the lobe as a sharp triangle or a perfect circle. Use a shallow U or rounded triangle. Connect both edges smoothly and round the bottom.
Self-check rubric
- Outline is tilted and built from three arcs, not a flat circle.
- Helix reads as a band with an even gap along the top.
- Antihelix split starts in the top third and has two branches.
- Front antihelix branch fades before the lobe.
- Lobe is rounded, sits in the lower third, and connects smoothly.
- Shadows are simple and support the folds without hiding the outline.
- Valid alternatives are accepted: single-line or double-line folds, shallow U or rounded-triangle lobe, and any consistent size.
Questions and answers
Do I need to draw a full face first?
No. This lesson isolates the ear. You can practice the outline, folds, and lobe on their own before placing the ear on a head.
How large should the ear be?
Any size works if the proportions hold. A practical starting size is about two parts tall to one part wide. Treat that ratio as a hypothetical example and adjust to your paper.
What does x-height mean here?
In this lesson, x-height is the distance from the baseline to the midline. It is a proportion guide, not a letter measurement. Letter styles vary, so use the baseline-to-midline convention consistently.
Can I use a single line for the folds?
Yes. A single line plus a soft shadow can read as a fold. A double line is also valid if the gap stays even. The rubric accepts both approaches.