Free original lessons
Draw a Milk Carton and Glass with Contour Construction
Learn to draw a milk carton and glass using contour lines, rim ellipses, and volume cues. Includes worked example, practice tasks, and a fair rubric.
Free lesson
Four exercises
Worked answers
Object Drawing Lessons
This lesson teaches a reliable way to draw a milk carton beside a glass using contour construction. You will build the carton from a simple box, place the glass with a rim ellipse, and use line weight and shading to show volume. The method works for any carton shape and glass size because you measure what you see rather than copying a fixed template. All drawing conventions are stated so you can check your own work and accept valid alternatives.
Practice materials: Printable downloads are not available for this lesson yet. Use the instructions and four exercises below.
Reference illustration
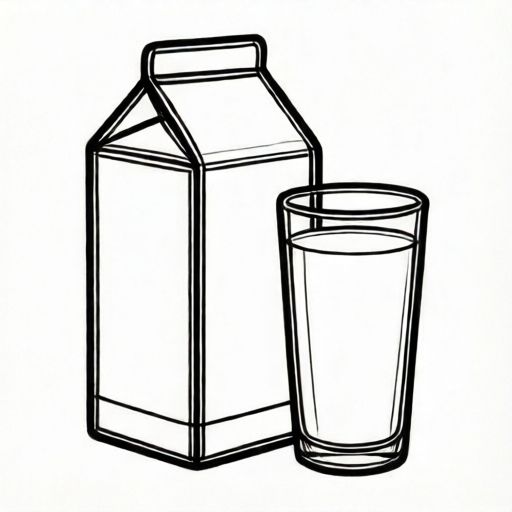
Use the stated measurements and conventions for each exercise.
Set the drawing convention and measure the objects
Use a light pencil for construction lines and a darker pencil for final contours. Define x-height as the distance from the baseline to the midline of lowercase letters; this is only a reference for any lettering you add, not a rule for the drawing. Letter styles vary, so do not force a single handwriting style.
Place the carton and glass on a flat surface at eye level. Measure the carton height, width, and depth with a ruler or a pencil held at arm's length. Measure the glass height and rim diameter the same way. Record all numbers in one unit, such as centimeters. Any numerical values you choose for practice are hypothetical examples, not manufacturing standards.
- Measure carton height, width, and depth; write the three numbers.
- Measure glass height and rim diameter; write both numbers.
- Mark the baseline and the midline on your paper as light horizontal guides.
- Decide the order: draw the carton first, then the glass, so overlaps are clear.
Construct the carton contour
Start with a rectangular box in light line. The front face is a rectangle whose height and width match your measurements. Add the top gable as two sloping lines that meet at a ridge. The ridge runs from the front top edge to the back top edge. Keep the vertical edges parallel to the page edge unless your view is tilted; if tilted, let them converge slightly toward a vanishing point you choose.
Refine the contour by checking that opposite edges are equal in length. The carton's silhouette should show the front face, one side face, and the gable. Use a slightly heavier line where the carton meets the table and where the gable folds. These weight changes describe volume without shading.
- Draw the front rectangle using measured height and width.
- Add the side face as a parallelogram with depth equal to your measured depth.
- Draw the gable: two sloping lines from the top corners to a ridge point above the center.
- Check equal opposite edges and adjust before darkening the contour.
- Add fold lines on the gable and a light base line where the carton touches the table.
Place the glass with rim ellipse and volume
The glass rim is an ellipse, not a circle, when seen from any angle above or below. Draw a light horizontal line at the rim height. Mark the rim diameter on that line, then draw a smooth ellipse through those marks. The ellipse's height depends on your viewing angle: a higher eye level makes a flatter ellipse. Measure the actual rim width and use that as the ellipse's long axis.
Build the glass body as two slightly curved vertical lines from the rim ellipse down to the base. The base is a smaller ellipse. Add a water line if the glass is filled; this is another ellipse at the water height. Use a thin line for the glass contour and a slightly heavier line at the base and where the glass overlaps the carton. Shading inside the glass should follow the curved surface, not straight vertical bands.
- Mark rim height and rim diameter; draw the rim ellipse lightly.
- Draw two curved side lines down to the base ellipse.
- Add the base ellipse and check that its width is smaller than the rim width.
- Add a water-line ellipse if needed, using the same center as the rim.
- Darken the final contour and add curved shading lines to show roundness.
Check contour, overlap, and volume
Check the drawing by comparing measured lengths on the page to your recorded numbers. The carton height should match its measured height at the same scale. The glass rim width should match its measured diameter. Overlap matters: if the glass is in front of the carton, the glass contour continues unbroken and the carton line stops at the glass edge.
Volume is shown by three cues: line weight at contact points, curved shading on the glass, and fold lines on the carton gable. A flat carton with no fold lines looks like a rectangle. A glass with straight vertical shading looks like a cylinder. Adjust these cues until the forms read as solid.
- Compare page lengths to recorded measurements at your chosen scale.
- Trace each overlap to confirm the front object's contour is unbroken.
- Check that the glass shading curves with the surface.
- Check that the carton gable has at least one fold line and a ridge.
- Erase construction lines only after the final contour is stable.
Worked example
A carton measures 10 cm high, 6 cm wide, and 4 cm deep. A glass measures 8 cm high with a 5 cm rim diameter. Draw both at half scale, with the glass in front and to the right of the carton.
Worked answer
At half scale, the carton is 5 cm high, 3 cm wide, and 2 cm deep. Draw the front rectangle 5 by 3 cm. Add the side face 2 cm deep. Draw the gable ridge above the center. The glass is 4 cm high with a 2.5 cm rim diameter. Place the glass so its rim overlaps the carton's lower right edge. Draw the rim ellipse with a 2.5 cm long axis, then two curved sides down to a smaller base ellipse. Stop the carton contour where the glass begins. Darken the glass contour and add curved shading.
Four practice exercises
Exercise 1
A carton is 12 cm high, 7 cm wide, and 5 cm deep. Draw it at full scale with a gable ridge. State the length of the front top edge and the side top edge.
Show answer and check
Front top edge is 7 cm; side top edge is 5 cm. The front rectangle is 12 by 7 cm, and the side face is 5 cm deep.
Why: The front face uses height and width. The side face uses depth. The top edges follow those measured lengths.
Check: Measure the drawn front top edge and side top edge with a ruler; they should read 7 cm and 5 cm.
Exercise 2
A glass has a 6 cm rim diameter and is 9 cm tall. Draw the rim ellipse and base ellipse at half scale. The base diameter is 4 cm. State the long axis of each ellipse on your page.
Show answer and check
Rim long axis is 3 cm; base long axis is 2 cm. The glass height on the page is 4.5 cm.
Why: Half scale divides every measurement by two. The ellipse long axis equals the scaled diameter.
Check: Measure the widest part of each ellipse; they should read 3 cm and 2 cm.
Exercise 3
Draw a carton 8 cm high, 5 cm wide, and 3 cm deep with a glass 6 cm high and 4 cm rim diameter in front of it. The glass overlaps the carton's lower left corner. Describe where the carton contour stops.
Show answer and check
The carton contour stops at the glass rim and side lines. The glass contour continues unbroken because the glass is in front.
Why: Overlap rule: the front object's contour is continuous, and the back object's contour ends at the front object's edge.
Check: Trace the glass outline with your finger; it should be unbroken. The carton line should touch but not cross it.
Exercise 4
A carton is 10 cm high, 6 cm wide, and 4 cm deep. A glass is 7 cm high with a 5 cm rim diameter. At full scale, what is the total width of the drawing if the glass is placed 2 cm to the right of the carton?
Show answer and check
Total width is 6 + 2 + 5 = 13 cm.
Why: Add the carton width, the gap, and the glass rim diameter. All units are centimeters.
Check: Measure the widest horizontal extent of the drawing; it should read 13 cm.
Common mistakes
- Drawing the glass rim as a perfect circle. Draw an ellipse whose long axis equals the measured rim diameter and whose short axis matches your viewing angle.
- Making the carton side face the same width as the front face. Use the measured depth for the side face; depth is usually smaller than width in a front view.
- Letting the carton line cross through the glass. Decide which object is in front, then stop the back object's contour at the front object's edge.
- Shading the glass with straight vertical bands. Curve the shading lines to follow the glass surface and keep them parallel to the rim ellipse.
Self-check rubric
- Carton front face matches measured height and width at the chosen scale.
- Carton side face uses measured depth and opposite edges are equal.
- Gable has a ridge and at least one fold line.
- Glass rim is an ellipse with long axis equal to measured rim diameter.
- Glass base ellipse is smaller than the rim ellipse.
- Overlap is correct: front object's contour is unbroken.
- Line weight marks contact points and fold lines.
- Shading on the glass curves with the surface.
- Valid alternatives are accepted: different letter styles, slightly different ellipse flatness, and freehand contour variation that preserves proportions.
Questions and answers
Do I need exact measurements to start?
No. Measure roughly with a pencil at arm's length, then keep the same scale throughout. Exact numbers are less important than consistent proportions.
What if my carton has a different gable shape?
Measure the actual fold lines and ridge position. The construction steps stay the same: front face, side face, then gable from measured points.
How do I know the ellipse is correct?
Check that the long axis equals the measured rim width and that the ellipse is smooth and symmetric. A flatter ellipse means a higher eye level.
Can I use a ruler for every line?
Use a ruler for construction measurements, then draw final contours freehand. Freehand contours look more natural and still follow the measured structure.