Free original lessons
Pencil Tree Drawing: Trunk Texture, Branch Taper, and Graphite Shading
Learn to draw a single tree in pencil by building branch structure, adding trunk texture with varied strokes, and shading with a graphite value strip.
Free lesson
Four exercises
Worked answers
Object Drawing Lessons
This lesson teaches a reliable pencil method for drawing one tree: first establish a tapered branch skeleton, then add trunk texture with directional strokes, then apply graphite shading in clear value steps. You will use a simple convention for stroke direction and a value strip you create yourself, so the result is checkable without relying on a single correct style. All measurements are hypothetical examples; measure your own paper and pencil before drawing.
Practice materials: Printable downloads are not available for this lesson yet. Use the instructions and four exercises below.
Reference illustration
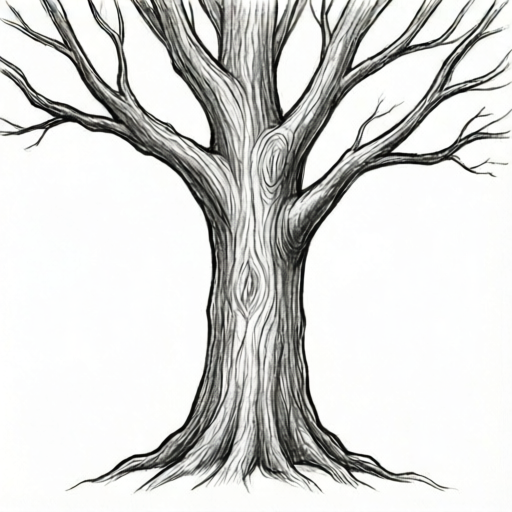
Use the stated measurements and conventions for each exercise.
Build the branch skeleton with taper
Start with a light pencil line for the trunk center. Mark the trunk width at the base and at the first major fork. A simple taper rule: the trunk is widest at the ground and narrows by about one third at the first fork. These numbers are hypothetical; adjust to your paper size.
Draw two or three main branches from the fork, each narrower than the trunk at the joint. Continue splitting into smaller branches. Every branch should taper toward its tip: the width at the tip is roughly half the width at its base. Keep lines light so you can adjust.
Check structure by tracing from the trunk to each tip without lifting your pencil. If a branch suddenly widens, correct it. The skeleton is correct when every joint is narrower than the segment before it and the overall silhouette reads as one tree.
- Mark the trunk base width and the first-fork width with two short ticks.
- Draw the trunk edges as gentle curves between the ticks.
- Add two or three main branches, each starting narrower than the trunk at the joint.
- Split each main branch into two smaller branches, tapering each tip to about half its base width.
- Trace every path from trunk to tip and fix any widening joint.
Add trunk texture with a defined stroke convention
Use a stroke convention: trunk texture strokes run mostly vertical, following the trunk edges, and vary in length and pressure. Short strokes suggest rough bark; longer, lighter strokes suggest smoother bark. This is a convention, not a universal rule, so valid alternatives include curved strokes that follow the trunk contour.
Work in bands: draw a few strokes, leave a gap, then draw more. Avoid covering the whole trunk evenly. Vary pressure from light to medium; do not press hard enough to groove the paper.
Check texture by stepping back: the trunk should still read as a cylinder, not a flat rectangle. If strokes cross the trunk edges, shorten them so they stay inside the silhouette.
- Choose one stroke direction that follows the trunk contour.
- Draw five short strokes in a band, then skip a small gap.
- Repeat bands up the trunk, varying stroke length and pressure.
- Keep all strokes inside the trunk edges.
- Step back and confirm the trunk still reads as rounded.
Apply graphite shading with a value strip
Make a value strip on scrap paper: four patches from light to dark using your pencil. Label them 1 (lightest) to 4 (darkest). This strip is your reference; it is not a standard scale, just a personal check.
Shade the tree in three passes. Pass one: value 1 on the shaded side of the trunk and under main branches. Pass two: value 2 where branches overlap and at the trunk base. Pass three: value 3 only in the deepest gaps. Leave the lit side at paper white or value 1.
Check shading by comparing your drawing to the strip: the darkest area should match patch 3 or 4, and the lightest should match patch 1 or the paper. If two areas look the same but should differ, adjust one.
- Create a four-patch value strip and label 1 to 4.
- Shade the shaded side of the trunk at value 1.
- Add value 2 under main branches and at the trunk base.
- Place value 3 only in the deepest gaps.
- Compare the drawing to the strip and adjust one area.
Finish and self-check the tree study
Refine branch tips: sharpen the taper by darkening the last short segment slightly. Do not add leaves unless the brief asks; this study focuses on trunk and branch structure.
Final check: every branch tapers, trunk texture follows the contour, and shading matches the value strip in at least three distinct values. If any check fails, correct only that part.
- Darken the last short segment of each branch tip to sharpen taper.
- Confirm three distinct values are visible.
- Confirm texture strokes stay inside the trunk.
- Erase stray marks and sign the study if desired.
Worked example
A student draws a trunk 4 cm wide at the base and 3 cm wide at the first fork, then adds a main branch 2 cm wide at the joint. Is the taper correct?
Worked answer
Yes. The trunk narrows from 4 cm to 3 cm, and the branch at the joint is 2 cm, which is narrower than the trunk at that point. Each segment tapers toward its tip.
Four practice exercises
Exercise 1
Draw a trunk 6 cm wide at the base and 4 cm wide at the first fork. Add one main branch 3 cm wide at the joint. State whether the taper is correct and why.
Show answer and check
Correct. The trunk narrows from 6 cm to 4 cm, and the branch at the joint is 3 cm, narrower than the trunk at that point.
Why: Taper means each segment is narrower than the one before. 6 > 4 > 3 satisfies this.
Check: Compare the three widths in order: base, fork, branch joint. Each must be smaller than the previous.
Exercise 2
A trunk is 5 cm wide at the base. The first fork is 3 cm wide. A branch at the fork is 4 cm wide. Identify the error and give a corrected branch width.
Show answer and check
The branch is wider than the trunk at the fork (4 cm > 3 cm). A corrected width is 2 cm, which is narrower than 3 cm.
Why: A branch cannot be wider than the trunk at its joint. The corrected width must be less than 3 cm.
Check: Compare branch joint width to trunk width at the same point; branch must be smaller.
Exercise 3
You shade a trunk with values 1, 2, and 3 from your strip. The darkest gap should match which patch, and how many distinct values must be visible?
Show answer and check
The darkest gap should match patch 3 (or 4 if your strip allows). At least three distinct values must be visible.
Why: The rubric requires three distinct values; the deepest gap gets the darkest value you have tested.
Check: Place the drawing next to the strip and count distinct values; confirm the darkest area matches patch 3 or 4.
Exercise 4
A texture stroke crosses 1 cm outside the trunk edge on a trunk 4 cm wide. What is the fix, and what convention keeps strokes valid?
Show answer and check
Shorten the stroke so it stays inside the trunk edge. The convention is that texture strokes follow the trunk contour and remain inside the silhouette.
Why: Strokes outside the edge break the cylinder read. The convention defines valid stroke direction and placement.
Check: Trace the trunk edge and confirm no stroke crosses it; check that strokes follow the contour.
Common mistakes
- Drawing branches that widen at joints. Re-draw the joint so the new branch starts narrower than the segment before it.
- Covering the trunk with even, parallel strokes. Use bands with gaps and vary stroke length and pressure.
- Shading everything one value. Compare to your value strip and force at least three distinct values.
- Letting texture strokes cross the trunk edge. Shorten strokes so they stay inside the silhouette.
Self-check rubric
- Branch structure: every joint is narrower than the segment before it; tips taper to about half their base width.
- Trunk texture: strokes follow the trunk contour, vary in length and pressure, and stay inside the silhouette.
- Shading: at least three distinct values from the personal value strip are visible.
- Overall readability: the drawing reads as one tree with a rounded trunk, not a flat shape.
- Valid alternatives: curved texture strokes or different stroke directions are accepted if they follow the contour and stay inside the trunk.
Questions and answers
Do I need a specific pencil grade?
No. Use any graphite pencil you have. Make your value strip with that pencil so the shading check matches your tool.
How wide should the trunk be?
Choose a width that fits your paper. The taper rule (about one third narrower at the first fork) is a hypothetical example; adjust to your drawing.
Can I use curved texture strokes?
Yes. The convention is strokes that follow the trunk contour. Curved strokes are a valid alternative if they stay inside the trunk edges.
Should I draw leaves?
This lesson excludes foliage. Focus on trunk texture, branch taper, and graphite shading.