Free original lessons
Draw a Glass of Water: Rim Ellipse, Refraction Line, and Cast Shadow
Learn to draw a glass of water using a rim ellipse, a refraction line, and a cast shadow. Includes a worked example, four practice tasks, and a rubric.
Free lesson
Four exercises
Worked answers
Object Drawing Lessons
This lesson teaches a reliable method for drawing a simple glass of water. You will build the glass from three checkable parts: the rim ellipse, the refraction line where the water surface meets the glass, and the cast shadow on the table. The method uses a defined convention for the rim ellipse and accepts valid stylistic alternatives. All measurements are hypothetical examples; measure your own paper and reference objects. The practice tasks are self-contained and can be solved from the text alone.
Practice materials: Printable downloads are not available for this lesson yet. Use the instructions and four exercises below.
Reference illustration
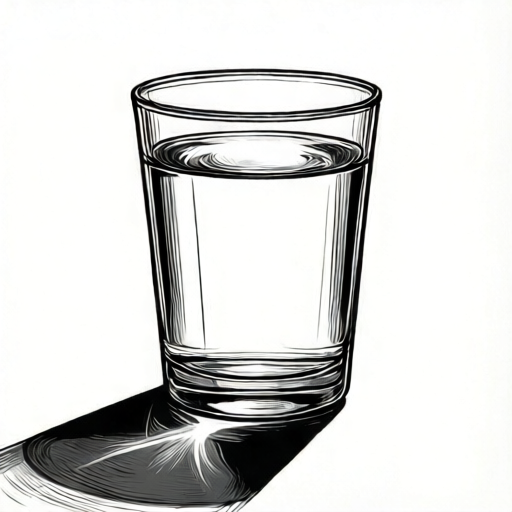
Use the stated measurements and conventions for each exercise.
Set the rim ellipse with a defined convention
Place the glass on a table at eye level or slightly above. The rim appears as an ellipse. Use this convention: the ellipse's horizontal axis is the full visible width of the rim; the vertical axis is the apparent height of the rim opening. Mark the horizontal axis first, then the vertical axis, then connect the four points with a smooth curve. This convention is a guide, not a universal answer; a flatter or rounder ellipse is valid if it matches what you see.
Check the ellipse by folding a scrap paper along the horizontal axis and holding it to the drawing. The top and bottom halves should mirror. If they do not, adjust the vertical axis. Keep the ellipse centered over the glass body.
- Mark the left and right edges of the rim; connect them with a light horizontal line.
- Mark the top and bottom of the rim opening on the vertical center line.
- Draw a smooth ellipse through the four marks.
- Fold-check the ellipse for symmetry and adjust.
Place the refraction line at the water surface
The water surface meets the glass at a second ellipse, lower than the rim. Draw a light horizontal line across the glass at the water level, then curve it slightly to follow the glass. This is the refraction line. Objects behind the glass appear shifted below this line; you can suggest this with one short offset line inside the glass.
Keep the refraction line parallel to the rim ellipse's horizontal axis. If the glass is tilted, the line tilts with it. Do not draw the water surface as a straight line across a curved glass; the slight curve is what makes the drawing read as a glass.
- Mark the water level on the glass sides.
- Draw a light curved line between the marks, matching the rim curve.
- Add one short offset line inside the glass to suggest refraction.
- Erase construction marks after the line is clear.
Add the cast shadow on the table
The cast shadow falls on the table opposite the light source. Decide the light direction first, then place the shadow on the opposite side. The shadow starts at the base of the glass and stretches outward. Its shape is a soft elongated oval or wedge. Keep the shadow darker near the base and lighter at the far edge.
Use a hypothetical example: if the light comes from the upper left, the shadow falls to the lower right. Measure the shadow length against the glass height; a shadow about half the glass height is a reasonable starting point. Label any numbers you choose as hypothetical.
- Mark the light direction with a small arrow outside the drawing.
- Draw the shadow outline from the glass base outward, opposite the light.
- Shade darkest at the base and fade toward the far edge.
- Check that the shadow does not cross the glass body.
Refine edges and check the whole drawing
Refine the glass outline so the sides taper slightly toward the base. The rim ellipse should sit centered on the body. The refraction line should be lower than the rim and parallel to it. The cast shadow should touch the base and fall opposite the light.
Use a simple check: measure the rim width and the base width with a ruler. In a typical tumbler the base is slightly narrower; record your own ratio as a hypothetical example. Confirm the water line is between rim and base, and the shadow is on the correct side.
- Darken the final glass outline and rim ellipse.
- Confirm the refraction line is parallel to the rim.
- Confirm the shadow direction matches the light arrow.
- Erase all construction lines and sign the study.
Worked example
Draw a glass of water on a table. The glass is 10 cm tall, the rim is 6 cm wide, and the water level is 4 cm above the base. Light comes from the upper left. Use the rim ellipse convention, a refraction line, and a cast shadow.
Worked answer
Mark a vertical center line. Draw the rim ellipse with a 6 cm horizontal axis and a 2 cm vertical axis (hypothetical). Mark the water level 4 cm above the base and draw a curved refraction line parallel to the rim. Draw the glass sides tapering to a 5 cm base. Place the cast shadow to the lower right, about 5 cm long, darkest at the base. Check: rim width 6 cm, base 5 cm, water line between rim and base, shadow opposite the light.
Four practice exercises
Exercise 1
Draw a glass 12 cm tall with a 7 cm rim and water 5 cm above the base. Light from the upper right. Use the rim ellipse convention and place the cast shadow.
Show answer and check
Rim ellipse with 7 cm horizontal axis and about 2.5 cm vertical axis (hypothetical); water line 5 cm above base, curved and parallel to rim; cast shadow to the lower left, about 6 cm long.
Why: The light from the upper right puts the shadow to the lower left. The water line sits between rim and base and follows the rim curve.
Check: Measure rim 7 cm and base about 6 cm; confirm water line is 5 cm above base and shadow is opposite the light.
Exercise 2
Draw a glass 9 cm tall with a 5 cm rim and water 3 cm above the base. Light from the left. Add one short offset line inside the glass to suggest refraction.
Show answer and check
Rim ellipse 5 cm by about 1.8 cm (hypothetical); water line 3 cm above base; offset line just below the water line; cast shadow to the right, about 4 cm long.
Why: The offset line shows the shift of background objects below the water surface. The shadow falls opposite the left light.
Check: Confirm the offset line is below the refraction line and the shadow is on the right.
Exercise 3
Draw a glass 15 cm tall with an 8 cm rim and water 7 cm above the base. Light from the upper left. Make the cast shadow darkest at the base.
Show answer and check
Rim ellipse 8 cm by about 3 cm (hypothetical); water line 7 cm above base; shadow to the lower right, about 7 cm long, darkest at the base.
Why: A taller glass needs a slightly larger vertical axis to keep the ellipse readable. The shadow length scales with height.
Check: Measure rim 8 cm and shadow about 7 cm; check the darkest shading is at the base.
Exercise 4
Draw a glass 10 cm tall with a 6 cm rim and water 4 cm above the base. Light from the right. Use a flatter rim ellipse than the worked example and justify it.
Show answer and check
Rim ellipse 6 cm by about 1.5 cm (hypothetical, flatter); water line 4 cm above base; shadow to the left, about 5 cm long. Justification: a flatter ellipse matches a lower viewing angle.
Why: The convention allows flatter ellipses when the view is lower. The shadow still falls opposite the right light.
Check: Confirm the ellipse passes the fold check and the shadow is on the left.
Common mistakes
- Drawing the rim as a perfect circle. Use the horizontal and vertical axis convention to make an ellipse; check with the fold test.
- Drawing the water surface as a straight line across a curved glass. Curve the refraction line slightly to follow the glass, parallel to the rim ellipse.
- Placing the cast shadow on the same side as the light. Mark the light direction first, then place the shadow opposite it.
- Making the shadow cross the glass body. Start the shadow at the base and stretch it outward on the table only.
Self-check rubric
- Rim ellipse uses the horizontal and vertical axis convention and passes the fold check.
- Refraction line is lower than the rim and parallel to the rim ellipse.
- Cast shadow touches the base and falls opposite the marked light direction.
- Glass sides taper slightly toward the base and the rim is centered.
- Construction lines are erased and the drawing is clean.
- Valid stylistic alternatives are accepted if the three checkable parts are correct.
Questions and answers
Do I need a real glass to draw this?
A real glass helps, but the tasks are self-contained. Use the described dimensions and convention.
Is the rim ellipse always the same shape?
No. The convention gives a checkable starting shape; flatter or rounder ellipses are valid if they match your view.
How dark should the cast shadow be?
Darkest at the base and lighter at the far edge. Use your own pencil pressure; no fixed value is required.
Can I use a ruler for the axes?
Yes. A ruler helps set the horizontal and vertical axes; the curve is drawn freehand.