Free original lessons
Caribou Drawing: Antler Branching, Hooves, and Body Proportion
Learn to draw a caribou with clear antler branching, sturdy hooves, and balanced body proportions using a simple convention and checkable steps.
Free lesson
Four exercises
Worked answers
Object Drawing Lessons
This lesson teaches a repeatable method for drawing a single caribou. You will use a defined drawing convention: the body is measured in head-lengths, the back line is a gentle arc, and antlers branch from a forward-curving main beam. Hooves are drawn as two-toed wedges with a visible split. Letter styles and line weights may vary; the rubric rewards structural clarity, not a single perfect rendering. All measurements are hypothetical examples you can scale to your paper. Work lightly first, then firm up lines after checking proportions.
Practice materials: Printable downloads are not available for this lesson yet. Use the instructions and four exercises below.
Reference illustration
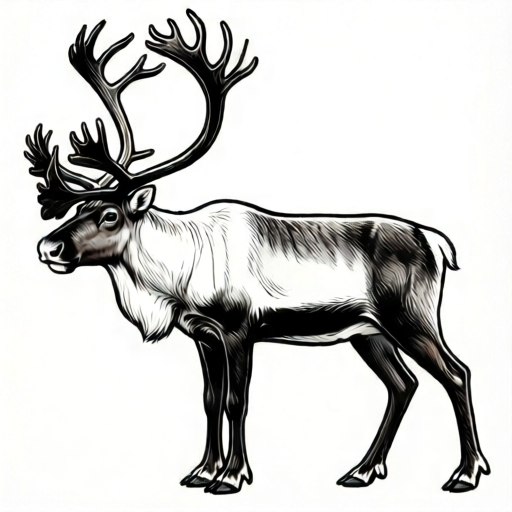
Use the stated measurements and conventions for each exercise.
Set the body proportion with head-length units
Choose a head length (HL) as your unit. A practical starting proportion for a caribou body is about 3.5 HL from chest to rump, with shoulder height about 2.5 HL. These are hypothetical example values, not standards; adjust to your reference or paper size.
Draw a light horizontal baseline for the ground. Mark shoulder and rump points along a gentle back arc. The neck slopes forward and down, and the chest is deeper than the hindquarters. Keep the belly line slightly higher than the chest bottom.
- Mark one HL on scrap paper and keep it as your measuring stick.
- Draw a light ground line and place shoulder and rump marks about 3.5 HL apart.
- Set shoulder height at about 2.5 HL above the ground line.
- Sketch the back as a shallow arc, then add chest, belly, and hindquarter curves.
- Check that the chest depth is roughly one HL and the neck length about one HL.
Build antlers with clear branching
Caribou antlers are complex, so simplify to a main beam plus named branches. Draw the main beam first as a forward-curving line, then add branches as short tapered lines. Use a branching diagram convention: each branch leaves the beam at a visible angle and never crosses another branch without a clear junction.
A workable hypothetical example is a main beam with three forward branches and two upward branches per side. Keep branch lengths varied but readable. The antler spread can be about 1.5 HL across, measured tip to tip.
- Draw the main beam from the skull base, curving forward and slightly up.
- Add a brow branch near the base, pointing forward.
- Add two mid-beam branches at different angles so they do not overlap confusingly.
- Add upward branches near the tip and taper every branch to a point.
- Check that each branch has a clear junction and that the spread is about 1.5 HL.
Construct hooves and legs
Draw each leg as a tapered column from shoulder or hip to the hoof. The hoof is a two-toed wedge: a short block split by a center line, with the front edge slightly rounded. Caribou hooves are broad and sturdy; keep the hoof width about one-third of the leg width at the ankle.
Use consistent units: if the leg length is about 1.5 HL, the hoof block is about 0.2 HL tall. These are hypothetical examples. Check that all four hooves sit on the ground line and that the split line is visible.
- Draw the front legs slightly forward and the hind legs slightly back for balance.
- Taper each leg toward the ankle, keeping the knee and hock readable.
- Draw a short hoof block at the ground line.
- Add a center split line and a rounded front edge.
- Check hoof height and width against your HL unit and confirm ground contact.
Refine the head, neck, and final checks
Place the head at the top of the neck with a long muzzle and small ears. The eye sits about halfway between the top of the skull and the muzzle line. Keep the neck thick and the chest deep to match caribou build.
Before finishing, check the whole drawing against your HL unit: body length, shoulder height, antler spread, and hoof size. Erase construction lines only after the proportions read clearly.
- Draw the muzzle as a rounded rectangle about 0.6 HL long.
- Add the eye, ear, and a simple nostril line.
- Check neck thickness and chest depth against the body unit.
- Firm up final lines and remove light construction marks.
- Label your HL unit on the practice panel for future studies.
Worked example
Using a head length of 2 cm, draw a caribou with body length 3.5 HL, shoulder height 2.5 HL, antler spread 1.5 HL, and hoof height 0.2 HL. Describe the construction order and the final check.
Worked answer
Mark 2 cm as one HL. Draw a ground line and place shoulder and rump marks 7 cm apart (3.5 HL). Set shoulder height at 5 cm (2.5 HL). Sketch the back arc, chest, belly, and hindquarters. Draw the neck about 2 cm long and the head with a 1.2 cm muzzle. Draw the main antler beam, then add branches so the tip-to-tip spread is about 3 cm (1.5 HL). Draw four legs about 3 cm long (1.5 HL) and hoof blocks 0.4 cm tall (0.2 HL) with a center split. Final check: body 7 cm, shoulder 5 cm, antler spread 3 cm, hoof 0.4 cm, all hooves on the ground line.
Four practice exercises
Exercise 1
A caribou drawing uses a head length of 3 cm. The body is drawn 10.5 cm long and the shoulder height is 7.5 cm. Are these proportions consistent with 3.5 HL body length and 2.5 HL shoulder height? Show your arithmetic.
Show answer and check
Yes. 3.5 HL = 3.5 × 3 cm = 10.5 cm. 2.5 HL = 2.5 × 3 cm = 7.5 cm. Both match.
Why: Multiply the head-length unit by the proportion factors and compare with the drawn measurements.
Check: Recompute 3 × 3.5 and 3 × 2.5, then confirm the drawn values equal those products.
Exercise 2
An antler spread is drawn as 4.5 cm tip to tip using a head length of 3 cm. What is the spread in HL units? If the target is 1.5 HL, is the drawing correct?
Show answer and check
4.5 cm ÷ 3 cm = 1.5 HL. Yes, it matches the target.
Why: Divide the measured spread by the head-length unit to convert to HL units.
Check: Multiply 1.5 by 3 cm to recover 4.5 cm.
Exercise 3
A hoof block is drawn 0.6 cm tall with a head length of 3 cm. The planned hoof height is 0.2 HL. Is the hoof too tall, too short, or correct? Give the target height.
Show answer and check
Target height = 0.2 × 3 cm = 0.6 cm. The hoof is correct.
Why: Convert the planned proportion to centimeters using the head-length unit.
Check: Divide 0.6 cm by 3 cm to confirm 0.2 HL.
Exercise 4
A body is drawn 12 cm long with a head length of 4 cm. The shoulder height is drawn 8 cm. Check body length and shoulder height against 3.5 HL and 2.5 HL. State any correction needed.
Show answer and check
Body target = 3.5 × 4 cm = 14 cm, so 12 cm is 2 cm too short. Shoulder target = 2.5 × 4 cm = 10 cm, so 8 cm is 2 cm too short. Lengthen the body by 2 cm and raise the shoulder by 2 cm.
Why: Compute each target from the HL unit and subtract the drawn value to find the difference.
Check: Add the corrections back: 12 + 2 = 14 cm and 8 + 2 = 10 cm, then divide by 4 cm to confirm 3.5 HL and 2.5 HL.
Common mistakes
- Drawing antlers as a solid fan without clear branch junctions. Draw the main beam first, then add each branch as a separate tapered line with a visible junction.
- Making the body too long or too short because no unit is used. Mark one head length and measure body length and shoulder height against it before refining.
- Drawing hooves as single blocks with no split. Add a center split line and a rounded front edge to show the two-toed hoof.
- Letting hooves float above or sink below the ground line. Draw the ground line first and place every hoof block on it.
Self-check rubric
- Body length and shoulder height are measured against a clearly marked head-length unit.
- The back line is a gentle arc and the chest is deeper than the hindquarters.
- Antlers show a main beam with at least three clear branches per side and visible junctions.
- Hooves are two-toed wedges with a center split and sit on the ground line.
- Construction lines are light and final lines are readable.
- Valid alternative styles are accepted if structural clarity and consistent units are maintained.
Questions and answers
Do I have to use the exact head-length values?
No. The values are hypothetical examples. Use them as a starting point and adjust to your paper or reference while keeping the units consistent.
Can I draw antlers with fewer branches?
Yes. The goal is clear branching, not a fixed count. Keep each branch readable and show a clear junction with the main beam.
How do I know if my proportions are correct?
Check body length, shoulder height, antler spread, and hoof size against your chosen head-length unit. If the numbers are consistent, the drawing is structurally sound.
What if my handwriting or line style differs from the example?
That is acceptable. The rubric rewards structural clarity and consistent units, not a single universal style.