Free original lessons
Drawing Zombies: Pose, Torn Clothing, and Shading
Learn to draw a zombie figure using pose construction, torn-clothing fold cues, and simple shading. Includes practice tasks, a rubric, and a planned printable.
Free lesson
Four exercises
Worked answers
Object Drawing Lessons
This lesson teaches a clear, repeatable method for drawing a single zombie figure. You will build the pose from simple shapes, add torn clothing with believable fold cues, and apply shading to show form. The focus is on the figure itself, not gore or scene composition. All measurements are examples; measure your own paper and tools. The printable described at the end is planned, not yet produced.
Practice materials: Printable downloads are not available for this lesson yet. Use the instructions and four exercises below.
Reference illustration
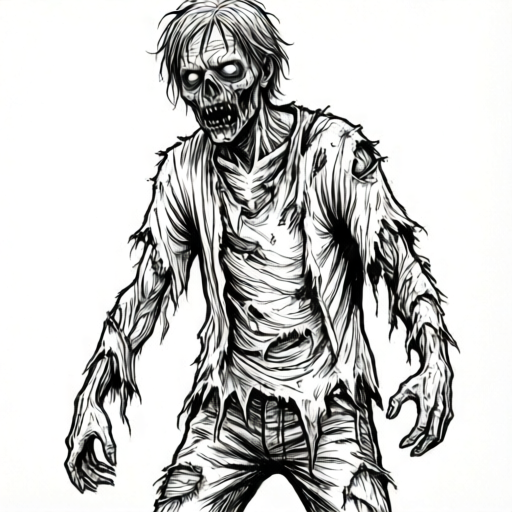
Use the stated measurements and conventions for each exercise.
Build the pose from simple shapes
Start with a light construction drawing. Use a circle for the head, an oval for the ribcage, a smaller oval for the pelvis, and straight lines for the limbs. Place the feet first so the figure has a stable base. A shambling zombie often leans forward: shift the ribcage oval slightly ahead of the pelvis and tilt the head down.
Define the action line from the back heel through the pelvis to the head. Keep it simple and curved. Then add joints as small circles at shoulders, elbows, hips, and knees. Check that the two sides of the body balance: if one arm reaches forward, the opposite leg often steps forward too.
- Draw a light vertical guide and mark the total figure height.
- Place the feet as two small ovals; one foot ahead of the other.
- Draw the pelvis oval and ribcage oval, offset to show a forward lean.
- Add the head circle and a curved action line through the body.
- Draw limb lines with joint circles, then thicken them into simple tubes.
Add torn clothing with fold cues
Clothing follows the body but hangs loose where it is torn. Draw the main garment shape over the torso and limbs, then cut notches and jagged edges at hems, elbows, and knees. A tear should reveal a simple shape underneath, such as a forearm or shin, not detailed anatomy.
Use three fold cues: a long crease where fabric bends, a short wrinkle where it bunches, and a hanging flap where it is torn. Keep folds aligned with the direction the fabric pulls. For example, a torn sleeve on a forward-reaching arm will have folds running toward the elbow and a flap hanging down.
- Draw the garment outline slightly larger than the body.
- Mark tear locations at hems and joints with small V-shaped notches.
- Add one long crease at each major bend.
- Add two or three short wrinkles near bunched areas.
- Draw a hanging flap at one tear and check it overlaps the body clearly.
Shade for form without gore
Choose a single light direction, such as upper left. Shade the side of each tube away from the light. Use a soft pencil for broad shadow and a harder pencil for edges. Keep shadows simple: one core shadow per limb, one under the chin, and one under any hanging flap.
Leave a narrow light band next to the shadow on rounded forms. This helps the figure read as three-dimensional. Avoid black outlines everywhere; let shadow separate overlapping shapes. If you use hatching, keep lines parallel and spaced evenly.
- Mark the light direction with a small arrow outside the figure.
- Shade the underside of the chin and the back of the neck.
- Shade one side of each limb tube, leaving a light band.
- Add a cast shadow under the hanging flap and at the feet.
- Check that no shadow is darker than the darkest clothing tone unless intended.
Worked example
A zombie stands with the left foot forward, right arm reaching forward, and a torn sleeve at the right elbow. The light comes from upper left. Describe the construction and shading choices in order.
Worked answer
Draw the left foot oval ahead of the right. Place the pelvis oval, then shift the ribcage oval slightly toward the forward foot (the left foot) to show a forward lean. Add the head circle tilted down. Draw the right arm line reaching forward with an elbow joint circle. Thicken the limbs into tubes. Draw the garment outline, then notch the right sleeve at the elbow and add a hanging flap below it. Add one long crease at the right elbow and two short wrinkles near the shoulder. Mark light from upper left. Shade the right side of the head, the underside of the chin, the lower side of the reaching arm, and under the flap. Leave a light band on the upper left of each tube. Check that the flap overlaps the forearm and that the cast shadow connects it to the body.
Four practice exercises
Exercise 1
Construct a zombie figure leaning forward with the right foot ahead. The left arm hangs down and the right arm bends at the elbow. List the order of construction shapes and one check for balance.
Show answer and check
Right foot oval ahead of left; pelvis oval; ribcage oval shifted forward; head circle tilted down; action line from left heel through pelvis to head; joint circles at shoulders, elbows, hips, knees; limb tubes. Balance check: the forward lean should be matched by the ahead foot, and the hanging arm should not cross the body centerline without a reason.
Why: Placing the feet first fixes the base. Offsetting the ribcage creates the lean. Joint circles prevent stiff limbs. The balance check confirms the pose reads as stable rather than falling.
Check: Measure the horizontal distance from the pelvis center to the ahead foot and to the back foot. The ahead foot should be farther forward than the pelvis by a clear margin. Confirm the action line passes near the pelvis center.
Exercise 2
A torn pant leg at the left knee reveals a simple shin shape. Describe where to place the tear, one fold cue above it, and one shading choice if light comes from the right.
Show answer and check
Place the tear at the left knee with a V-notch and a hanging flap below the knee. Add one long crease above the knee where the fabric bends. With light from the right, shade the left side of the shin and the underside of the flap; leave a light band on the right side of the shin.
Why: A tear at a joint is believable because fabric bends there. The crease above the knee follows the bend. Shading opposite the light shows the shin as a tube and connects the flap to the leg.
Check: Confirm the flap overlaps the shin outline and that a cast shadow falls on the shin under the flap. Check that the light band is on the right side of the shin, matching the marked light direction.
Exercise 3
You have drawn a zombie with both arms reaching forward and a torn shirt at the chest. Name two fold cues on the shirt and explain how to avoid making the tears look like random holes.
Show answer and check
Use one long crease across the chest where the fabric pulls toward the arms and two short wrinkles near the shoulders. To avoid random holes, draw the simple chest shape first, then place each tear over that shape and draw the torn edge around it. Add a hanging flap at one tear and shade underneath it.
Why: Reaching arms pull fabric across the chest, so a long crease is logical. Short wrinkles near shoulders show bunching. Drawing the body shape first ensures each tear reveals something readable.
Check: Trace each tear edge and confirm it surrounds a visible simple shape. Check that the long crease runs roughly perpendicular to the pull direction and that no more than two short wrinkles appear per bunched area.
Exercise 4
A zombie figure is 12 cm tall on your paper. The head is 2 cm, the ribcage oval is 3 cm, and the pelvis oval is 2 cm. The legs are each 5 cm and the torso gap between ribcage and pelvis is 1 cm. Do these parts sum to the figure height? Show the arithmetic and state one adjustment if not.
Show answer and check
Sum: head 2 + ribcage 3 + gap 1 + pelvis 2 + legs 5 = 13 cm, which is 1 cm more than 12 cm. Adjust by reducing the torso gap to 0 cm or shortening the legs to 4 cm, then recheck. These numbers are hypothetical examples; measure your own drawing.
Why: Adding the vertical parts checks whether the construction fits the chosen height. A 1 cm excess means one part must shrink. The adjustment keeps the total consistent.
Check: Re-add the adjusted parts: 2 + 3 + 0 + 2 + 5 = 12 cm, or 2 + 3 + 1 + 2 + 4 = 12 cm. Confirm the sum equals the figure height before thickening the limbs.
Common mistakes
- Making both legs straight and parallel, so the figure looks stiff. Offset the feet and bend one knee slightly; check the action line curves through the pelvis.
- Drawing tears as random holes without showing what is underneath. Place each tear over a simple body shape and draw that shape first, then the torn edge around it.
- Shading every edge darkly, which flattens the figure. Pick one light direction and shade only the side away from it; leave a light band on rounded forms.
- Adding too many folds so the clothing looks noisy. Limit folds to one long crease per bend and two short wrinkles per bunched area.
Self-check rubric
- Pose: feet are offset, action line is curved, and joints are marked before thickening.
- Proportions: head, ribcage, and pelvis relate clearly; limb lengths are plausible for the chosen style.
- Torn clothing: at least two tears show a simple body shape underneath and include a hanging flap.
- Fold cues: one long crease per major bend and limited short wrinkles; folds follow fabric pull.
- Shading: one light direction is marked and followed; shadows show form without gore.
- Clarity: overlapping shapes read correctly; no unnecessary black outlines.
- Alternative conventions allowed: stylized proportions, different light direction, or simplified folds are valid if consistent and checked against the steps.
Questions and answers
Do I need to draw gore to make a zombie read clearly?
No. A forward-leaning pose, torn clothing, and simple shading are enough. This lesson excludes gore by design.
How large should the figure be?
Choose a height that fits your paper with space for feet and a cast shadow. The numerical examples here are hypothetical; measure your own paper.
Can I use a different light direction?
Yes. Any single consistent direction works. Mark it before shading and keep all shadows on the opposite side.
What if my torn flap looks like a separate object?
Make the flap overlap the body edge and shade underneath it. A cast shadow on the body connects the flap to the figure.