Free original lessons
Basic Anime Drawing: Eye, Hairline and Proportion Guides
Learn basic anime drawing by placing eye shape, hairline and proportion guides on a face. Includes a worked example, four practice tasks and a fair rubric.
Free lesson
Four exercises
Worked answers
Object Drawing Lessons
This lesson teaches a repeatable way to draw an anime-style face using simple proportion guides. You will set a head oval, mark a horizontal midline, place eye shapes on that line, and use a hairline arc to position the fringe. The convention is explicit: x-height means the distance from the baseline to the midline of lowercase letters, and letter styles vary, so treat all measurements as guides rather than fixed rules. Work in pencil on plain paper. Measure your own sheet and pencil; any numerical values below are hypothetical examples, not printer or hardware standards. The goal is a clear, balanced face study, not a specific character.
Practice materials: Printable downloads are not available for this lesson yet. Use the instructions and four exercises below.
Reference illustration
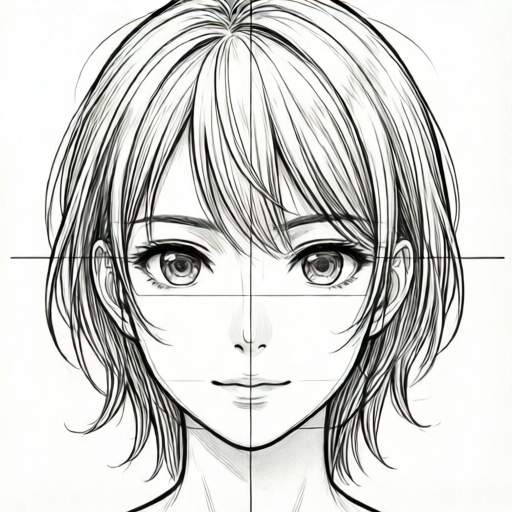
Use the stated measurements and conventions for each exercise.
Set the head oval and midline
Begin with a light oval for the head. Draw a vertical center line and a horizontal midline. The midline is the baseline for the eyes; the top of the oval is the crown. Keep lines light so you can adjust them.
Measure your paper with a ruler. For this lesson, suppose the oval is 10 cm tall and 7 cm wide. These are hypothetical example values; use whatever fits your sheet. Mark the midline halfway down the oval, about 5 cm below the crown and 5 cm above the chin.
- Draw a light vertical line for the face center.
- Draw an oval around it, about 10 cm tall and 7 cm wide as a hypothetical example.
- Mark the horizontal midline halfway down the oval.
- Label the crown, midline and chin lightly.
Place eye shapes on the midline
Anime eyes are often larger and more stylized than realistic eyes. Place two eye shapes on the midline, leaving a gap between them roughly one eye wide. The outer corners can tilt up or down; choose one tilt and repeat it on both sides for balance.
Use a simple almond or rounded rectangle as the eye guide. Add an upper lid line and a pupil circle. The pupil can sit centered or slightly toward the inner corner. Keep both eyes the same height and width unless you deliberately want an expression.
- Mark the eye width on the midline, using about 2 cm per eye as a hypothetical example.
- Leave a gap of about 2 cm between the eyes.
- Draw the upper lid curve and lower lid curve for each eye.
- Add a pupil circle inside each eye guide.
Use a hairline arc for the fringe
The hairline is a guide for where the fringe begins. Draw a light arc across the forehead, above the eyes. The arc can be high, middle or low; each changes the face's character. Choose one arc and keep it consistent.
From the hairline arc, draw fringe strands downward. Vary strand length and direction, but keep the roots on or near the arc. Hair covers part of the forehead, so the arc should remain visible as a construction line until the final cleanup.
- Draw a light arc across the forehead above the eye line.
- Mark three to five root points along the arc.
- Draw fringe strands from the roots toward the eyebrows or cheeks.
- Check that the fringe does not hide both eyes completely unless intended.
Check proportions and clean up
Compare the eye line, hairline and chin. The distance from the midline to the chin should feel balanced with the distance from the crown to the midline. If the face looks too long, lower the hairline or raise the chin line slightly.
Erase construction lines gently, then darken the final eye, hair and face outlines. Keep the pupil and lid lines clear. A simple check is to view the drawing from arm's length and confirm both eyes sit on the same horizontal level.
- Compare crown-to-midline and midline-to-chin distances.
- Confirm both pupils are the same height.
- Confirm the hairline arc sits above the eyes.
- Erase light guides and darken final lines.
Worked example
Draw a face oval 10 cm tall and 7 cm wide. Place the midline at 5 cm from the crown. Draw two eyes on the midline, each 2 cm wide, with a 2 cm gap. Add a hairline arc 2 cm above the midline. Draw three fringe strands from the arc.
Worked answer
The oval is centered on a vertical line. The midline crosses at 5 cm below the crown and 5 cm above the chin. The left eye spans from 1 cm to 3 cm from the left edge of the oval; the right eye spans from 5 cm to 7 cm. The gap is 2 cm. The hairline arc is a light curve 2 cm above the midline. Three fringe strands start on the arc and end near the eyebrows. Both pupils are centered at the same height. Construction lines are light and final lines are darker.
Four practice exercises
Exercise 1
Draw a face oval 8 cm tall and 6 cm wide. Mark the midline at 4 cm from the crown. Place two eyes on the midline, each 1.5 cm wide, with a 1.5 cm gap. Add a hairline arc 1.5 cm above the midline.
Show answer and check
A centered oval with a midline at 4 cm below the crown and 4 cm above the chin. With a 6 cm width, two 1.5 cm eyes and a 1.5 cm gap total 4.5 cm, leaving 0.75 cm margins on each side. Left eye from 0.75 cm to 2.25 cm; gap from 2.25 cm to 3.75 cm; right eye from 3.75 cm to 5.25 cm; right margin from 5.25 cm to 6.0 cm. Hairline arc 1.5 cm above the midline.
Why: The midline is half the oval height. Eye widths and gap are equal, so the eyes are balanced. The hairline arc is above the eye line, leaving forehead space.
Check: Measure the oval height and confirm the midline is at half. Measure both eye widths and the gap; they should match the given values. Confirm the arc is above the eyes.
Exercise 2
Draw a face oval 12 cm tall and 8 cm wide. Place the midline at 6 cm. Draw eyes each 2 cm wide with a 2 cm gap. Draw a low hairline arc 1 cm above the midline and four fringe strands. Check that the fringe does not cover both pupils.
Show answer and check
A centered oval with midline at 6 cm below the crown and 6 cm above the chin. Eyes from 1 cm to 3 cm and from 5 cm to 7 cm. Hairline arc 1 cm above the midline. Four strands start on the arc; at least part of each pupil remains visible.
Why: A low hairline leaves less forehead but still sits above the eyes. Four strands give variety. Keeping pupils visible maintains a clear face study.
Check: Measure the midline and eye positions. Confirm the arc is 1 cm above the midline. Look at the pupils and confirm both are at least partly visible.
Exercise 3
Draw a face oval 9 cm tall and 7.2 cm wide. Mark the midline at 4.5 cm. Draw two eyes each 1.8 cm wide with a 1.8 cm gap. Tilt the outer corners up by the same amount on both eyes. Add a hairline arc 2 cm above the midline.
Show answer and check
A centered oval with midline at 4.5 cm below the crown and 4.5 cm above the chin. With a 7.2 cm width, two 1.8 cm eyes and a 1.8 cm gap total 5.4 cm, leaving 0.9 cm margins on each side. Left eye from 0.9 cm to 2.7 cm; gap from 2.7 cm to 4.5 cm; right eye from 4.5 cm to 6.3 cm; right margin from 6.3 cm to 7.2 cm. Both outer corners tilt up equally. Hairline arc 2 cm above the midline.
Why: Equal tilt on both eyes keeps the face balanced. The gap equals one eye width, and the arithmetic fits the oval width with equal margins. The higher arc leaves more forehead, which suits a stylized look.
Check: Measure eye widths and gap; each should be 1.8 cm. Confirm the left margin (0.9 cm) equals the right margin (0.9 cm). Compare the tilt of both outer corners; they should match. Confirm the arc is above the eyes.
Exercise 4
Draw a face oval 10 cm tall and 7 cm wide. Place the midline at 5 cm. Draw eyes each 2 cm wide with a 2 cm gap. Draw a hairline arc 1.5 cm above the midline. Add five fringe strands, then erase construction lines and darken final lines. State one valid alternative you could use.
Show answer and check
A centered oval with midline at 5 cm below the crown and 5 cm above the chin. Eyes from 1 cm to 3 cm and from 5 cm to 7 cm. Arc 1.5 cm above the midline. Five strands start on the arc. Final lines are darker; guides are erased. A valid alternative is a lower hairline arc with shorter fringe, as long as the eyes remain visible and the arc is above the eye line.
Why: The measurements keep the eyes balanced. Five strands add detail. Erasing guides makes the final drawing clear. The alternative is valid because it keeps the same proportion logic.
Check: Measure the midline, eye widths and gap. Confirm the arc is above the eyes. Check that construction lines are erased and final lines are clear. Confirm the stated alternative still places the arc above the eye line.
Common mistakes
- Placing the eyes above or below the midline without a reason. Return the eye guides to the midline, then adjust only if you deliberately change the expression.
- Making one eye larger than the other. Measure both eye widths with a ruler or mark equal widths on the midline before drawing curves.
- Drawing the hairline arc after the fringe, so roots float. Draw the arc first, then start every fringe strand from a marked root point on the arc.
- Using heavy construction lines that are hard to erase. Keep guides light and darken only the final outlines after checking proportions.
Self-check rubric
- Head oval is closed and centered on a vertical guide.
- Midline is marked and both eyes sit on or near it.
- Eye widths are equal or intentionally varied with a clear reason.
- Gap between eyes is roughly one eye wide.
- Hairline arc is visible above the eyes and fringe roots start on or near it.
- Construction lines are light and final lines are clear.
- Valid alternatives are accepted when the eye tilt, hairline height or fringe direction is consistent and explained.
Questions and answers
Do I need special paper or a printer?
No. Plain paper and a pencil work. If you use a printed template later, measure the actual sheet and adjust the example values.
Can the eyes be different shapes?
Yes, as long as the difference is intentional. For a balanced study, keep both eyes the same height and width, then vary tilt or pupil position for expression.
What does x-height mean here?
X-height is the distance from the baseline to the midline of lowercase letters. Letter styles vary, so use it only as a comparative guide, not a fixed measurement.
How do I know the face is balanced?
Check that both eyes sit on the midline, the gap between eyes is about one eye wide, and the hairline arc sits above the eyes.