Free original lessons
How to Draw Snake Scales: Overlapping Rows and Shading
Build staggered overlapping snake-scale rows with a stated scale unit, consistent overlap, and one light direction. Includes a convention, rubric, worked example, and four practice tasks.
Free lesson
Four exercises
Worked answers
Object Drawing Lessons
Snake scales read as a repeating surface pattern, not a single outline. This lesson builds a reliable method: establish a scale-size unit, draw staggered overlapping rows, then shade with a consistent light direction. The convention below is one valid choice among many; scale shapes and light directions vary, so the rubric rewards internal consistency and clear overlap rather than one universal answer. All measurements are hypothetical examples unless you measure your own paper and tools.
Practice materials: Printable downloads are not available for this lesson yet. Use the instructions and four exercises below.
Reference illustration
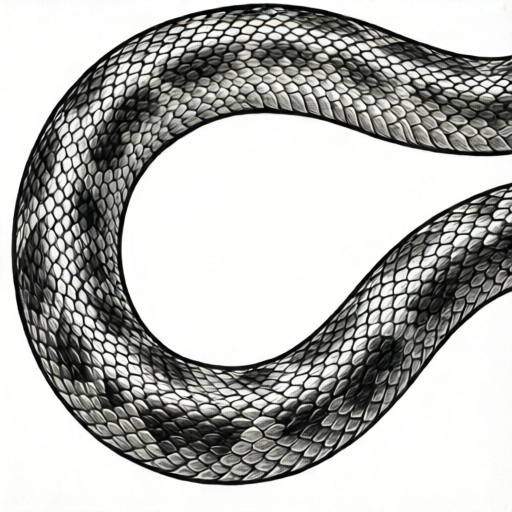
Use the stated measurements and conventions for each exercise.
Set a scale unit and row direction
Choose a scale unit before drawing. A practical hypothetical example is a 6 mm wide by 4 mm tall scale on A4 paper, but any consistent unit works. Mark the unit on scrap paper and keep it beside the drawing so rows do not drift.
Decide the row direction: scales usually point toward the tail. Draw a faint guide line along the body axis, then mark row baselines perpendicular to it. Keep row spacing equal to about three-quarters of the scale height so each row overlaps the one behind it.
- Measure and label your scale unit on scrap paper.
- Draw a faint body-axis guide and mark evenly spaced row baselines.
- Mark scale centers along each baseline at the chosen unit width.
Build staggered overlapping rows
Offset each new row by half a scale width from the row before. This staggering prevents vertical seams and creates the interlocking look of snake scales. Draw the back row first, then bring each forward row slightly over the previous one.
Use a simple rounded-diamond or shield shape. Draw the back row first, then bring each forward row slightly over the previous one: the forward row's bottom edge overlaps the top edge of the row behind it, leaving the forward row's top edge free. Overlap should be visible but not so deep that scales disappear.
- Draw the farthest row completely.
- Offset the next row by half a unit and draw scales so their bottoms overlap the previous row.
- Repeat until the panel is filled, checking that no straight vertical gaps appear.
Shade with one light direction
Pick one light direction, for example from the upper left, and state it on the page. Shade the lower-right edge of each scale with a soft pencil stroke, leaving the upper-left lighter. Keep stroke direction parallel to the scale edge to suggest curvature.
Add a thin darker line only where a scale overlaps the one behind it. Avoid shading every edge equally; equal shading flattens the pattern. A light mid-tone on the scale body and a darker overlap line are enough.
- Write the light direction at the top of the page.
- Shade the shadow side of each scale with parallel strokes.
- Darken only the overlap contact line, then check the panel from a short distance.
Check consistency and pattern rhythm
Step back and scan for row drift, uneven spacing, and shading that switches direction. A useful check is to count scales across one row and compare with the next; the count should differ by at most one when staggering is correct.
If a row looks crowded, reduce overlap rather than shrinking scales mid-row. Consistency of unit and light direction matters more than perfect shape.
- Count scales in three consecutive rows and compare.
- Check that every overlap line is on the same side relative to the light.
- Redraw only the inconsistent row rather than patching single scales.
Worked example
On a 60 mm by 40 mm panel, draw three staggered rows of scales using a 6 mm wide by 4 mm tall unit, with light from the upper left. State the overlap depth and shade consistently.
Worked answer
Mark three baselines 3 mm apart (three-quarters of 4 mm). Row one: ten scales at 6 mm spacing. Row two: offset 3 mm; place 9 full-width scales plus two half-width edge pieces (total 10 units), overlapping row one by 1 mm. Row three: offset again by 3 mm. Shade the lower-right edge of each scale and darken only the overlap contact line. Check: row counts differ by at most one, overlap is 1 mm throughout, and all shadow edges face lower right.
Four practice exercises
Exercise 1
A panel is 48 mm wide. Using a 6 mm scale unit, how many scales fit in one row, and how many full-width equivalents fit in a staggered row offset by 3 mm?
Show answer and check
Eight full-width scales fit in the first row (48 divided by 6 equals 8), with centers at 3, 9, 15, 21, 27, 33, 39, and 45 mm; each scale spans 0–6 mm through 42–48 mm. For the staggered row, shift every center by half a unit (3 mm). Full-width scales must span 3–9 mm through 39–45 mm, so their centers fall at 6, 12, 18, 24, 30, 36, and 42 mm; the scale centered at 6 mm spans 3–9 mm and the scale centered at 42 mm spans 39–45 mm, so both are full width. The remaining edge pieces are half-width: one spans 0–3 mm (visible center at 1.5 mm) and one spans 45–48 mm (visible center at 46.5 mm). That gives 7 full-width scales plus two half-width pieces, totaling 7 + 0.5 + 0.5 = 8 full-width equivalents. Check: 8 times 6 equals 48 mm, and every staggered full-scale center is 3 mm from the nearest first-row center.
Why: 48 divided by 6 equals 8 full-width equivalents. Offsetting by half a unit shifts centers by 3 mm, so the staggered row places full-scale centers at 6, 12, ..., 42 mm; the two edge pieces are half-width pieces spanning 0–3 mm and 45–48 mm, and the seven interior scales are full width. The total is 7 + 0.5 + 0.5 = 8 full-width equivalents.
Check: Multiply the full-width equivalents by 6 mm and confirm the total is 48 mm; confirm each staggered full-scale center is 3 mm from the nearest first-row center and that the two edge pieces are half width.
Exercise 2
Three rows use a 5 mm scale height with 1.25 mm overlap. What is the vertical distance from the top of row one to the top of row three?
Show answer and check
7.5 mm.
Why: Each new row advances by scale height minus overlap: 5 minus 1.25 equals 3.75 mm. Two advances give 7.5 mm.
Check: Add 3.75 twice and compare with the drawn baselines.
Exercise 3
A student shades the upper-left edge of every scale but states light comes from the upper left. What is wrong, and what is the fix?
Show answer and check
The shadow is on the lit side. Shade the lower-right edge instead, or restate the light direction as lower right and shade consistently.
Why: Shadow falls opposite the light source; the stated direction and shaded edge must agree.
Check: Compare the written light direction with the shaded edge on three scales.
Exercise 4
A row of 9 scales is followed by a row of 9 scales with no offset. What visual problem appears, and how many scales should the offset row show if half-scales are allowed?
Show answer and check
A vertical seam appears because scale edges line up in columns. For a 9-unit-wide row of 1-unit-wide scales offset by half a unit, place full-scale centers at 1.0, 2.0, 3.0, 4.0, 5.0, 6.0, 7.0, and 8.0 units, so each full scale spans 0.5–1.5 through 7.5–8.5 units. Add two half-width edge pieces: one spanning 0–0.5 units (visible center at 0.25 units) and one spanning 8.5–9 units (visible center at 8.75 units). That gives 8 full-width scales plus two half-width pieces, covering 8 + 0.5 + 0.5 = 9 units. Check: 8 + 0.5 + 0.5 = 9 units, and every staggered full-scale center is 0.5 units from the nearest unoffset center.
Why: No offset aligns scale edges into columns. A half-unit offset staggers centers and permits edge half-scales, so the staggered row contains eight full-width scales and two half-width edge pieces, totaling 9 units.
Check: Trace a vertical line through the panel; it should cross staggered, not aligned, scale edges.
Common mistakes
- Drawing rows directly above one another without offset. Offset each row by half a scale width so seams stagger.
- Shading all four edges of every scale equally. Choose one light direction and shade mainly the opposite edge and the overlap line.
- Changing scale size partway across a row. Keep the measured unit constant; adjust overlap depth instead of scale width.
- Making overlap so deep that scales vanish. Limit overlap to roughly one-quarter of scale height and check the row count.
Self-check rubric
- Scale unit is stated and held constant across rows.
- Rows are staggered by about half a scale width.
- Overlap is visible and roughly equal between rows.
- One light direction is stated and applied consistently.
- Overlap contact lines are darker than scale bodies.
- Valid alternatives in shape or light direction are accepted if internally consistent.
Questions and answers
Do snake scales have to be diamond-shaped?
No. Rounded diamonds, shields, and oval shapes are all valid. The rubric checks consistent shape and overlap, not a single species pattern.
How much should rows overlap?
A hypothetical example is one-quarter of the scale height. Measure your own unit and keep the overlap equal across rows.
Can I use a different light direction?
Yes, provided you state it and apply it consistently to every scale and overlap line.
How do I fix a drifting row?
Erase the whole row and redraw from the baseline rather than correcting individual scales.