Free original lessons
Realistic Owl Drawing: Feather Texture and Eye Highlights
Learn to shade a realistic owl with layered feather texture and bright eye highlights using pencil, paper, and simple checkable steps.
Free lesson
Four exercises
Worked answers
Object Drawing Lessons
This lesson teaches a realistic owl shading plate, not a cartoon. You will build feather texture in layers and place eye highlights so the owl reads as a living bird. Work on a blank owl outline or draw your own from the described proportions. Use a graphite pencil, a soft eraser, and smooth paper. Keep your pencil sharp for fine feather lines and use the side of the lead for soft shadow. Measure your actual paper and tools before starting; any numbers here are hypothetical examples. The convention for this lesson: x-height means the distance from the baseline to the midline of lowercase letters in your own handwriting, used only when labeling your practice sheet. Letter styles vary, so do not copy a single alphabet. All resources described are planned and free, not yet built.
Practice materials: Printable downloads are not available for this lesson yet. Use the instructions and four exercises below.
Reference illustration
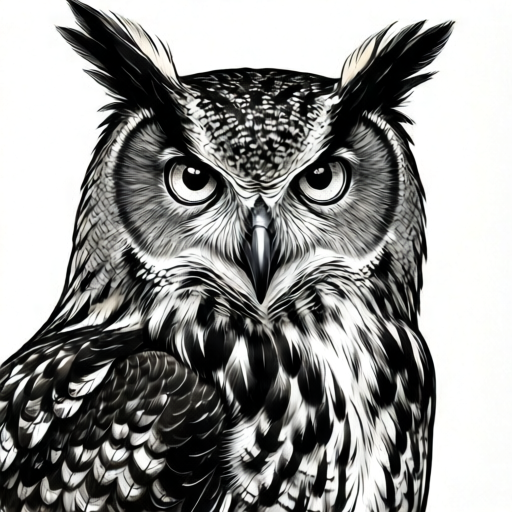
Use the stated measurements and conventions for each exercise.
Set up the owl outline and light direction
Choose one light source, for example a lamp at the upper left. Mark a small arrow on the back of your paper so you do not forget. On a blank owl outline, the head is a rounded oval, the body a larger teardrop below it, and two ear tufts rise from the top corners. Keep the eyes large and forward-facing, about one-third of the head width apart.
Before shading, test your pencil on scrap paper. Make a light patch, a medium patch, and a dark patch. Label them with your own handwriting; if you use x-height as a guide, keep labels small and consistent. This test tells you how much pressure gives each value.
- Draw or trace the owl outline lightly so erasing is easy.
- Mark the light arrow at the upper left and keep it visible.
- Test three pencil pressures on scrap paper and label them light, medium, dark.
- Check that the eyes sit on a horizontal midline across the head oval.
Layer feather texture from soft undercoat to sharp tips
Feathers are not one flat texture. Start with a soft undercoat: use the side of the pencil to fill the body with light gray, leaving the chest and face slightly lighter. Then add medium-length strokes that follow the body curve. Finally, sharpen the pencil and draw short, tapered lines for individual feather tips.
Work in three passes. Pass one is broad and soft. Pass two adds direction: strokes flow down and outward from the head. Pass three adds contrast at the edges of feather groups. Do not outline every feather; group them into patches and let some edges stay soft.
- Fill the body with a light undercoat using the side of the lead.
- Draw medium strokes that follow the body curve, denser near the wings.
- Sharpen the pencil and add short tapered tips at feather group edges.
- Soften any harsh line with a light eraser tap, then re-add one sharp tip.
Place eye highlights and facial disk shading
The eye highlight is a small bright shape, not a full white circle. Decide where the light hits: with an upper-left lamp, the highlight sits at the upper left of each pupil. Leave that spot white by shading around it, or lift it with a clean eraser after shading. Keep both eyes consistent.
Shade the facial disk around the eyes with soft, radiating strokes. Darken the area just under the brow and beside the beak, but keep the cheek lighter. The beak is a small triangle below the eyes; shade its lower edge darker and leave a thin light line on top.
- Mark the highlight position on each pupil before shading.
- Shade the pupil around the highlight, keeping the spot clean.
- Add radiating soft strokes on the facial disk, darker under the brow.
- Shade the beak with a darker lower edge and a thin light top line.
Balance values and finish the plate
Step back and compare the darkest and lightest areas. A realistic owl needs a clear range: dark pupils, medium feather patches, and light highlights. If the drawing looks flat, darken the deepest feather gaps and lift one or two highlights. If it looks harsh, soften the transition between feather groups.
Check the eye highlights last. They should be the brightest spots on the face. Keep the paper clean by resting your hand on scrap paper. Erase any stray marks gently and avoid overworking the surface.
- Compare darkest and lightest values from a short distance.
- Darken feather gaps if the plate looks flat.
- Soften harsh transitions with a light eraser tap.
- Confirm both eye highlights are the brightest spots and remain clean.
Worked example
A student shades an owl head with an upper-left lamp. They leave a small white spot at the upper left of each pupil, add soft radiating strokes around the eyes, and group body feathers into three patches with sharp tips only at patch edges. The darkest area is under the brow. Is this consistent with the lesson?
Worked answer
Yes. The highlight position matches the light arrow, the facial disk uses radiating strokes, and feather texture is grouped rather than outlined. The dark brow area supports the upper-left light.
Four practice exercises
Exercise 1
On scrap paper, make three value patches labeled light, medium, and dark using your pencil. Then shade a small oval with the light patch and add five short dark feather tips at its lower edge. Describe your result.
Show answer and check
A light oval with five distinct darker tips at the lower edge, showing a clear value difference between undercoat and tips.
Why: This isolates the layering skill: soft base first, sharp tips second. The label check keeps your handwriting consistent without requiring a single style.
Check: Compare the oval to your three patches. The oval should match the light patch and the tips should match the dark patch.
Exercise 2
Draw two circles as pupils. With an upper-right light source, place a small highlight on each pupil and shade around it. State where each highlight sits.
Show answer and check
Each highlight sits at the upper right of its pupil, and the shading darkens the lower left side.
Why: Highlight position must follow the chosen light direction, and both eyes must agree.
Check: Draw an arrow for the light source. Confirm both highlights are on the same side as the arrow.
Exercise 3
Shade a facial disk around two eyes using radiating strokes. Keep the cheek lighter and darken under the brow. List two value changes you made.
Show answer and check
Under the brow is darker than the cheek, and the area beside the beak is darker than the outer disk.
Why: The facial disk needs soft direction and a clear light-to-dark transition to avoid flatness.
Check: Squint at the drawing. You should still see a lighter cheek and a darker brow area.
Exercise 4
Draw a small owl body outline. Add three feather patches: one light, one medium, one dark. Put sharp tips only at patch edges. Explain how you avoided outlining every feather.
Show answer and check
The patches have different values, and sharp tips appear only where patches meet; the interior of each patch stays soft.
Why: Grouping feathers creates realistic texture without a cartoon outline.
Check: Count the sharp tips. They should be at patch edges, not scattered evenly across every patch.
Common mistakes
- Drawing every feather as a separate outline. Group feathers into patches and draw only the tips at group edges.
- Making the eye highlight a large white circle. Keep the highlight small and place it consistently at the upper left of each pupil.
- Using one flat pencil pressure everywhere. Test three pressures on scrap paper and use light, medium, and dark deliberately.
- Shading the facial disk with straight lines. Use soft radiating strokes that follow the curve around the eyes.
Self-check rubric
- Light direction is marked and consistent with highlight placement.
- Feather texture shows at least three passes: soft undercoat, directional strokes, sharp tips.
- Eye highlights are small, bright, and placed consistently on both eyes.
- Facial disk shading radiates around the eyes and keeps the cheek lighter.
- Value range includes clear dark, medium, and light areas.
- Valid alternatives are accepted: highlight shape may be a dot or short oval, and feather groups may vary in number if texture reads clearly.
Questions and answers
Do I need a printed outline?
No. You can draw the described oval head and teardrop body yourself. A blank outline is planned as a free resource but is not yet built.
How small should the eye highlight be?
Small enough to stay bright after shading around it. A tiny dot or short oval works; test on scrap paper first.
Can I use a mechanical pencil?
Yes. Use a sharp lead for feather tips and the side of the lead for soft undercoat. Test your actual pencil before shading.
What if my owl looks like a cartoon?
Check proportions: large forward eyes, a small beak, and grouped feather patches. Avoid thick outlines and oversized highlights.