Free original lessons
Draw a Wolf: Head, Body, and Fur Direction Practice
Learn to draw a wolf using simple construction shapes, then add fur direction lines. Includes a worked example, four practice tasks, and a rubric for self-checking.
Free lesson
Four exercises
Worked answers
Object Drawing Lessons
This lesson teaches a repeatable way to draw a wolf by building the head and body from simple shapes, then adding fur direction lines that follow the form. You will use a construction plate approach: first place light guide shapes, then refine outlines, then indicate fur flow. The convention for fur direction is a set of short, tapered strokes that run from the back of the head toward the muzzle on the face, and from the shoulders toward the tail along the body. These strokes are not shading; they are directional marks that show how fur lies. Because letter styles and line weights vary, the rubric rewards clear direction and proportion rather than a single perfect outline. All measurements below are hypothetical examples; measure your own paper and tools before drawing. Work lightly at first so guide lines can be adjusted. The four practice tasks are self-contained and can be solved from the text alone.
Practice materials: Printable downloads are not available for this lesson yet. Use the instructions and four exercises below.
Reference illustration
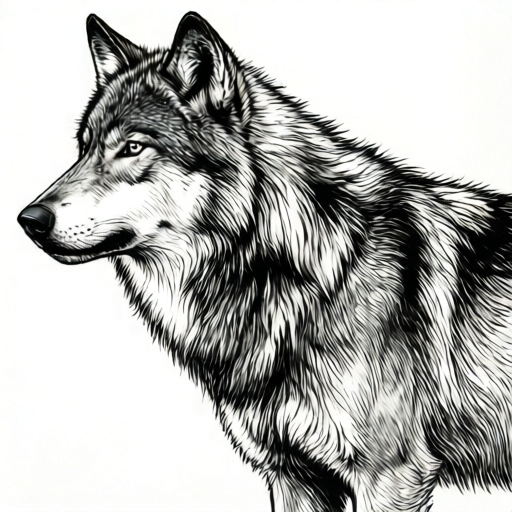
Use the stated measurements and conventions for each exercise.
Building the Head and Body with Guide Shapes
Start with a light construction drawing. For the head, draw a circle for the cranium and a tapered wedge for the muzzle. The wedge should be about half the width of the circle and point forward. Place the eyes on a midline that runs through the circle, roughly one-third down from the top. The nose sits at the front tip of the wedge. Ears are two triangles set on top of the circle, angled slightly outward. For the body, draw an oval for the chest and a longer oval for the hindquarters, connected by a gently curved back line. The neck connects the head circle to the chest oval. Keep all guide lines light so they can be erased or refined.
Check proportions by comparing widths: the head circle should be about one-third the length of the body oval. The legs are simple tapered columns; front legs attach under the chest, hind legs under the hindquarters. Paws are small rounded rectangles. Do not add fur yet. The goal is a clear skeleton of shapes that you can adjust before committing to darker lines.
- Draw a light circle for the cranium and a tapered wedge for the muzzle, pointing forward.
- Add a midline through the circle and place two small eye ovals one-third down from the top.
- Draw two triangular ears on top of the circle, angled slightly outward.
- Draw a chest oval and a hindquarter oval, then connect them with a curved back line.
- Add a neck line from the head circle to the chest oval.
- Draw four tapered leg columns and small rounded paw rectangles.
- Check that the head circle is about one-third the body oval length; adjust lightly.
Refining the Outline and Placing Features
Once the guide shapes look balanced, refine the outline with a slightly darker line. Follow the outer edge of the circle and wedge, but soften the transition where the muzzle meets the cranium. The wolf's forehead should slope gently into the muzzle. Keep the ears pointed but not too tall; a common error is making them look like cat ears. The eyes are almond-shaped, not round, and set at a slight angle. The nose is a rounded triangle at the tip of the wedge. Add a subtle mouth line under the nose, curving slightly upward at the corners.
For the body, refine the back line so it dips slightly behind the shoulders and rises over the hindquarters. The chest should be deeper than the belly. Legs should taper toward the paws. At this stage, erase the guide lines that are no longer needed, but keep the midline until the eyes are placed. Check symmetry by looking at the drawing from a distance or by turning it upside down; this helps spot uneven ears or eyes.
- Refine the head outline, softening the muzzle-to-cranium transition.
- Draw almond-shaped eyes at a slight angle along the midline.
- Add a rounded triangular nose at the muzzle tip and a subtle mouth line.
- Refine the back line with a slight dip behind the shoulders and a rise over the hindquarters.
- Taper the legs toward the paws and erase unnecessary guide lines.
- Check symmetry by viewing the drawing upside down or from a distance.
Adding Fur Direction Lines
Fur direction lines are short, tapered strokes that show how fur lies on the form. Use a convention: on the face, strokes run from the back of the head toward the muzzle, becoming shorter near the nose. On the body, strokes run from the shoulders toward the tail, following the curve of the back and sides. On the legs, strokes run downward toward the paws. These lines are not shading; they are directional marks. Keep them evenly spaced and vary their length slightly to suggest natural fur without turning the drawing into a shading study.
Start with the face: draw a few strokes along the cheek from the ear toward the muzzle. Then add strokes on the forehead that curve gently toward the nose. On the body, begin at the shoulder and draw strokes that follow the back line toward the hindquarters. On the chest, strokes can fan slightly outward. Avoid crossing strokes or making them too long; short tapered marks read more clearly. Check that every stroke has a clear start and end point that follows the form.
- Draw short tapered strokes on the cheek from the ear toward the muzzle.
- Add forehead strokes that curve gently toward the nose.
- On the body, draw strokes from the shoulder toward the hindquarters, following the back curve.
- Fan chest strokes slightly outward and keep leg strokes running downward.
- Check that strokes are evenly spaced, tapered, and follow the form without crossing.
Checking Proportion and Fur Flow
Use simple arithmetic to check proportions. For example, if your body oval is 12 cm long, the head circle should be about 4 cm wide (one-third). If your head circle is 6 cm wide, the muzzle wedge should be about 3 cm long (half the circle width). These are hypothetical examples; measure your own drawing and adjust. For fur flow, trace each stroke with your finger and ask whether it points from the back of the head toward the muzzle on the face, and from shoulder to tail on the body. If a stroke points backward on the face, it breaks the convention.
A useful check is to cover the fur lines and look only at the construction shapes; the wolf should still read clearly. Then uncover the fur lines and check that they reinforce the form rather than flatten it. Because letter styles and line weights vary, accept any clear directional stroke that follows the convention, even if it is not identical to the example.
- Measure the body oval length and divide by three to estimate head circle width.
- Measure the head circle width and halve it to estimate muzzle wedge length.
- Trace each fur stroke with your finger to confirm direction.
- Cover the fur lines and check that the construction still reads as a wolf.
- Uncover the fur lines and confirm they reinforce the form.
Worked example
Draw a wolf using the construction plate method. Use a body oval 12 cm long and a head circle 4 cm wide. Add fur direction lines following the convention. Check proportions with simple arithmetic.
Worked answer
First, draw a light 4 cm circle for the cranium and a 2 cm tapered wedge for the muzzle (half the circle width). Place eyes one-third down from the top on a midline. Add two triangular ears on top, angled outward. Draw a 12 cm chest-and-hindquarter oval, connect with a curved back line, and add a neck line. Add four tapered legs and small paw rectangles. Refine the outline, then add fur strokes: cheek strokes from ear to muzzle, forehead strokes curving toward nose, body strokes from shoulder to tail, leg strokes downward. Check: 12 cm body divided by 3 equals 4 cm head width, which matches. The drawing reads as a wolf with clear fur direction.
Four practice exercises
Exercise 1
A student draws a body oval 15 cm long and a head circle 6 cm wide. Using the proportion rule that head circle width should be about one-third of body oval length, is the head too wide, too narrow, or correct? Show the arithmetic.
Show answer and check
The head is too wide. One-third of 15 cm is 5 cm, so the head circle should be about 5 cm wide, not 6 cm.
Why: Divide body oval length by three: 15 divided by 3 equals 5. Compare 6 cm to 5 cm; 6 is larger, so the head is too wide by 1 cm.
Check: Re-measure the body oval and head circle with a ruler, then divide body length by three and compare.
Exercise 2
A student draws a head circle 8 cm wide and a muzzle wedge 5 cm long. Using the rule that muzzle length should be about half the head circle width, is the muzzle too long, too short, or correct? Show the arithmetic.
Show answer and check
The muzzle is too long. Half of 8 cm is 4 cm, so the muzzle should be about 4 cm long, not 5 cm.
Why: Divide head circle width by two: 8 divided by 2 equals 4. Compare 5 cm to 4 cm; 5 is larger, so the muzzle is too long by 1 cm.
Check: Measure the head circle width, halve it, and compare to the measured muzzle length.
Exercise 3
A student adds fur strokes on the face that point from the muzzle toward the back of the head. According to the convention in this lesson, is this correct? If not, describe the correct direction.
Show answer and check
No, it is not correct. Face strokes should run from the back of the head toward the muzzle, not the reverse.
Why: The convention states that face fur strokes run from the back of the head toward the muzzle. Strokes pointing from muzzle to back of head break this convention and should be redrawn.
Check: Trace each face stroke with a finger and confirm it starts near the ear or back of head and ends toward the nose.
Exercise 4
A student draws body fur strokes that run from the tail toward the shoulders. According to the convention, is this correct? If not, describe the correct direction and give one check method.
Show answer and check
No, it is not correct. Body strokes should run from the shoulders toward the tail. A check method is to trace each stroke and confirm it starts near the shoulder and ends toward the hindquarters.
Why: The convention states body fur strokes run from shoulders toward the tail. Strokes running from tail to shoulders reverse the direction and should be redrawn.
Check: Trace each body stroke with a finger; confirm start is near shoulder and end is toward tail. Also check that strokes follow the back curve.
Common mistakes
- Making the muzzle too wide or too short, so the head looks like a bear or a cat. Use the wedge shape: muzzle length about half the head circle width, and taper it toward the nose.
- Drawing fur strokes in random directions or crossing them. Follow the convention: face strokes run from back of head to muzzle; body strokes run from shoulder to tail; leg strokes run downward.
- Making the ears too tall and pointed like a cat's. Keep ears as triangles set on top of the circle, angled slightly outward, with height roughly equal to half the circle width.
- Skipping the construction shapes and drawing the outline directly. Always start with light guide shapes for the head circle, muzzle wedge, chest oval, and hindquarter oval; refine after checking proportions.
Self-check rubric
- Head and body construction shapes are present and proportionally related (head circle about one-third body oval length).
- Muzzle wedge is tapered and about half the head circle width.
- Ears are triangular, set on top of the circle, and angled slightly outward.
- Eyes are almond-shaped and placed on the midline about one-third down from the top.
- Fur direction strokes follow the convention: face strokes from back of head to muzzle, body strokes from shoulder to tail, leg strokes downward.
- Fur strokes are short, tapered, evenly spaced, and do not cross randomly.
- The drawing reads clearly as a wolf when fur lines are covered.
- Valid alternative fur patterns are accepted if direction is consistent and follows the form.
Questions and answers
Do I need to erase all guide lines?
Erase guide lines that are no longer needed, but keep the midline until the eyes are placed. Light guide lines can remain if they do not distract from the final drawing.
How long should fur direction strokes be?
Keep strokes short and tapered, roughly one to two centimeters on a typical sketch. Vary length slightly for natural look, but avoid long strokes that cross other lines.
Can I use a different fur direction convention?
Yes, as long as it is consistent and clearly follows the form. The rubric rewards clear direction and consistency, not a single universal pattern.
What if my proportions are off?
Adjust lightly before darkening lines. Use the arithmetic check: head circle about one-third body oval length, muzzle about half head circle width.