Free original lessons
Worker Drawing: Pose, Tool, and Clothing Construction
Learn to draw a worker figure with clear pose, tool, and clothing construction using a defined convention, checkable proportions, and a printable practice plan.
Free lesson
Four exercises
Worked answers
Object Drawing Lessons
This lesson teaches a repeatable method for drawing a worker figure that reads clearly as a worker through pose, tool, and clothing construction. The approach uses a simple convention: x-height is measured from baseline to midline, and letter styles vary, so the figure is built from checkable landmarks rather than a single universal silhouette. You will construct a stable stance, attach a tool with believable grip and angle, and layer clothing that shows function. All measurements are hypothetical examples unless you measure your own equipment. The practice tasks are self-contained and solvable from the text.
Practice materials: Printable downloads are not available for this lesson yet. Use the instructions and four exercises below.
Reference illustration
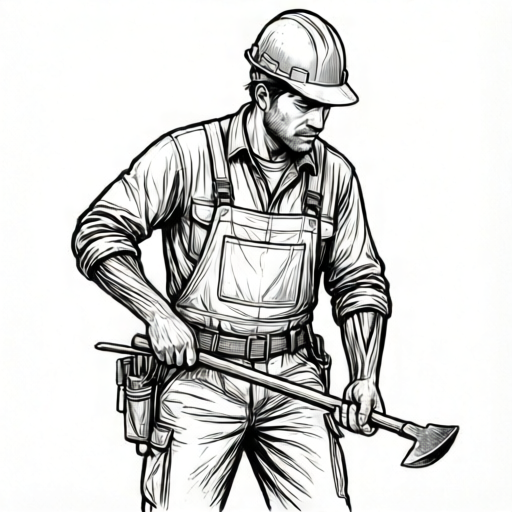
Use the stated measurements and conventions for each exercise.
Establishing a Checkable Pose
Begin with a vertical center line and a baseline. Mark a midline at a chosen fraction of the figure height; for this lesson, treat the midline as the hip landmark and label it clearly on your paper. This is a convention, not a universal rule. Measure the actual drawing surface and pencil if you need precise values, and label any numerical choice as a hypothetical example.
Build the stance from three anchors: the support foot, the hip midline, and the shoulder line. A worker pose usually shows weight shifted toward the task. Place the support foot under the hip, offset the other foot slightly, and tilt the shoulder line toward the tool. Check that the head sits above the support foot and that the tool-side shoulder is lower.
- Draw a baseline and a vertical center line.
- Mark a midline at a chosen fraction of the figure height and label it as the hip landmark.
- Place the support foot on the baseline under the hip.
- Offset the free foot and tilt the shoulder line toward the tool side.
- Check head-over-support-foot and shoulder tilt before adding details.
Constructing the Tool and Grip
A tool reads clearly when its handle, working end, and angle are consistent with the pose. Choose one simple tool, such as a hand tool with a straight handle and a distinct working end. Draw the handle first as a line from the hand toward the working end, then add the working end as a simple shape. Keep the wrist neutral and the elbow slightly bent.
The grip should show contact: the hand wraps the handle, and the thumb sits on the near side. Avoid drawing the tool floating beside the hand. Check the angle by extending the handle line to the working end and confirming it points toward the task area. If the tool is long, mark a hypothetical length on your paper and label it as an example.
- Draw the handle line from the hand toward the task area.
- Add the working end as a simple shape at the handle end.
- Wrap the hand around the handle and place the thumb on the near side.
- Check that the handle angle points toward the task area.
- Label any chosen length as a hypothetical example.
Clothing Construction That Shows Function
Clothing should explain the worker's task. Use three layers: a base layer at the torso, a work layer with a clear opening or fastening, and protective details such as a cuff, knee patch, or apron. Draw the work layer over the torso landmarks so the clothing follows the body, not a generic outline.
Show function through folds and fastenings. A bent elbow creates compression folds at the inner elbow; a raised shoulder creates tension lines toward the neck. Keep folds simple and directional. Check that every clothing detail corresponds to a body landmark or a task action. Letter styles vary, so any labels on clothing should be described in words rather than imitated as a single style.
- Draw the base layer at the torso using the shoulder and hip landmarks.
- Add the work layer with a clear opening or fastening.
- Add one protective detail such as a cuff or knee patch.
- Draw compression folds at bent joints and tension lines at raised shoulders.
- Check that each clothing detail matches a landmark or action.
Checking the Finished Figure
Use a simple checklist before finalizing. Confirm the head is above the support foot, the tool handle meets the hand, the working end points toward the task, and the clothing follows the body landmarks. Measure the actual drawing surface if you need a scale check, and label any numerical value as a hypothetical example.
Because letter styles vary and x-height is baseline to midline, do not judge labels by a single style. Instead, check that any written note is legible and consistent with your own convention. The goal is a clear worker figure, not a single universal answer.
- Check head-over-support-foot.
- Check hand-to-handle contact.
- Check working-end direction.
- Check clothing-to-landmark alignment.
- Check that any labels follow your stated convention.
Worked example
Draw a worker holding a simple hand tool at waist height, with weight on the left foot and the tool pointing toward a task area on the right. Use the midline as the hip landmark and show one protective clothing detail.
Worked answer
The figure stands with the left foot on the baseline under the hip midline. The right foot is offset slightly. The shoulder line tilts down toward the right, where the tool hand is. The handle line runs from the right hand toward the task area, and the working end is a simple shape at the far end. The hand wraps the handle with the thumb on the near side. The work layer has a clear front opening, and a cuff appears at the tool-side wrist. Compression folds appear at the bent right elbow. Check: head above left foot, hand on handle, working end toward task, cuff at wrist landmark.
Four practice exercises
Exercise 1
Draw a worker standing with weight on the right foot, holding a hand tool with a straight handle at chest height. The tool points left. Mark the hip midline and show one cuff.
Show answer and check
A figure with the right foot on the baseline under the hip midline, left foot offset, shoulder line tilted left, handle line from the hand toward the left task area, working end at the far end, and a cuff at the tool-side wrist.
Why: The support foot anchors the pose, the shoulder tilt follows the tool side, and the cuff marks the wrist landmark. The handle line establishes the tool direction before the working end is added.
Check: Confirm head above right foot, hand wrapped around handle, working end pointing left, and cuff at the wrist landmark.
Exercise 2
Draw a worker kneeling on one knee with a tool resting on the ground beside the support knee. Show a knee patch and one compression fold at the bent hip.
Show answer and check
A figure with one knee on the baseline, the other foot forward, the tool handle meeting the hand and the working end on the ground, a knee patch at the support knee, and a fold at the bent hip.
Why: The support knee and forward foot create a stable kneeling pose. The tool rests on the ground, so the working end is at ground level. The knee patch and hip fold follow body landmarks.
Check: Confirm the support knee is on the baseline, the hand meets the handle, the working end touches the ground, and the knee patch sits at the knee landmark.
Exercise 3
Draw a worker reaching upward with a tool, weight on both feet, and a work layer with a clear front opening. Show tension lines from the raised shoulder toward the neck.
Show answer and check
A figure with both feet on the baseline, the tool hand raised, the handle line pointing upward, the working end above the hand, a front opening on the work layer, and tension lines from the raised shoulder toward the neck.
Why: Both feet share weight, so the pose is balanced. The raised arm changes the shoulder line, and tension lines explain the clothing response. The front opening shows clothing construction.
Check: Confirm both feet are on the baseline, the hand meets the handle, the working end is above the hand, and tension lines connect the raised shoulder to the neck.
Exercise 4
Draw a worker leaning slightly forward with a tool pointing down toward a task area. Show a protective apron and a fold at the bent elbow. Label one hypothetical length on the handle.
Show answer and check
A figure leaning forward with the support foot under the hip, the tool hand forward, the handle line pointing down, the working end at the task area, an apron over the torso, an elbow fold, and a labeled hypothetical handle length.
Why: The forward lean shifts the shoulder line, and the downward tool angle follows the task area. The apron covers the torso landmarks, and the elbow fold marks the bent joint. The label is explicitly hypothetical.
Check: Confirm the support foot is under the hip, the hand meets the handle, the working end points down, the apron follows the torso, and the label is marked as a hypothetical example.
Common mistakes
- Drawing the tool floating beside the hand. Draw the handle line first, then wrap the hand around it so contact is visible.
- Making the pose symmetrical and static. Shift weight to the support foot and tilt the shoulder line toward the tool.
- Adding clothing details that do not match body landmarks. Place openings, cuffs, and folds at the shoulder, elbow, hip, or knee landmarks.
- Treating one letter style as the only correct label style. State your convention: x-height is baseline to midline, and letter styles vary; check legibility instead.
Self-check rubric
- Pose shows a clear support foot and a shoulder tilt toward the tool.
- Tool handle meets the hand and the working end points toward the task area.
- Clothing details correspond to body landmarks or task actions.
- Folds are directional and simple, matching bent or raised joints.
- Any labels follow the stated convention: x-height is baseline to midline, and letter styles vary.
- Any numerical values are labeled as hypothetical examples or measured from actual equipment.
Questions and answers
Do I need a specific tool to complete the lesson?
No. Choose one simple hand tool with a straight handle and a distinct working end. The construction steps work for any such tool.
How do I know the pose is stable?
Check that the head sits above the support foot and that the shoulder line tilts toward the tool side. These two checks catch most instability.
What does x-height mean here?
X-height is measured from baseline to midline. It is a convention for this lesson, not a universal standard, and letter styles vary.
Can I use my own measurements?
Yes. Measure your actual drawing surface and pencil, and label any chosen numerical value as a hypothetical example.