Free original lessons
Draw a Side-View Ox: Body Mass, Horn Curves, and Hoof Placement
Learn a four-step side-view ox drawing using body-mass proportions, curved horns, and grounded hooves, with practice tasks and a clear rubric.
Free lesson
Four exercises
Worked answers
Object Drawing Lessons
This lesson teaches a reliable way to draw a side-view ox by building from large body masses to small details. You will use a simple convention: the ox stands on a ground line, its body is a large oval, its head is a block, its horns curve outward and up, and its hooves sit flat on the ground. The goal is not a single perfect copy but a drawing that reads clearly as an ox with believable proportions. All measurements below are hypothetical examples you can adjust after measuring your own paper and reference. Work lightly at first, then darken the lines you keep.
Practice materials: Printable downloads are not available for this lesson yet. Use the instructions and four exercises below.
Reference illustration
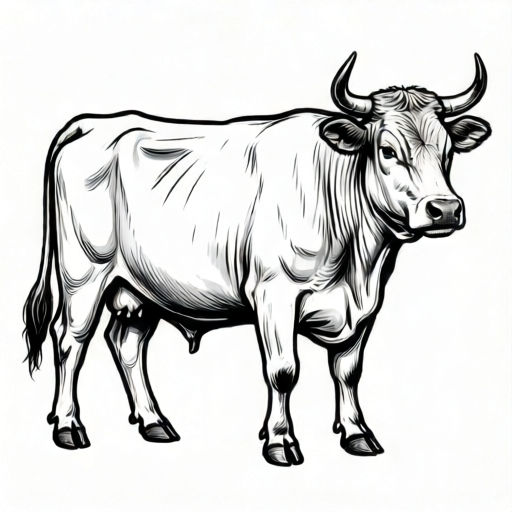
Use the stated measurements and conventions for each exercise.
Step 1: Set the ground line and body oval
Draw a horizontal ground line across the lower third of your paper. This line is the baseline for the hooves. Above it, sketch a large oval for the body. A useful hypothetical proportion is that the body oval is about twice as long as it is tall. Keep the oval tilted very slightly so the back is nearly level and the belly curves gently downward.
Mark the shoulder and hip points on the oval. The shoulder is roughly one-quarter of the body length from the front, and the hip is roughly one-quarter from the back. These marks will guide the legs later.
- Draw a light horizontal ground line.
- Sketch a large oval for the body, about 2:1 length to height.
- Mark shoulder and hip points on the oval.
- Check that the oval sits above the ground line with room for legs.
Step 2: Add the head block and neck
Place a rectangular block for the head at the front of the body oval. The block should be about one-third the height of the body oval and slightly narrower than it is tall. Connect the head block to the body with two short neck lines. The neck should be thick and short, not thin like a horse's.
Add a small wedge for the muzzle at the front of the head block. The muzzle is lower than the eyes and points slightly downward. Keep the head block level with the top of the body oval or slightly lower.
- Draw a head block at the front of the body oval.
- Connect the head to the body with two neck lines.
- Add a muzzle wedge at the front of the head.
- Check that the neck is short and thick.
Step 3: Draw the horn curves
Ox horns grow outward from the top of the head and then curve upward. Start each horn at the top corners of the head block. Draw a gentle outward curve, then an upward curve. In side view, draw the near horn fully and the far horn partly behind it, offset slightly so both read as horns; keep their curves consistent.
A hypothetical guide is that each horn is about half the height of the head block. Keep the curves smooth and avoid sharp angles. The horn tips should point upward, following the outward-then-upward curve.
- Mark the horn bases at the top corners of the head block.
- Draw an outward curve from each base.
- Continue each curve upward to a rounded tip.
- Check that the horns are smooth and roughly symmetrical.
Step 4: Add legs and hooves on the ground line
Draw four legs from the shoulder and hip marks down to the ground line. In side view, the near front and near back legs are fully visible, while the far legs are partly hidden. Make the legs sturdy and slightly tapered. Each leg should end in a hoof that sits flat on the ground line.
The hooves are small, blocky shapes. A hypothetical proportion is that each hoof is about one-tenth the height of the body oval. Place the hooves so their bottom edges touch the ground line. Add a simple shadow as an oval under the body, touching the hooves.
- Draw the near front and near back legs from the body marks to the ground line.
- Add the far legs slightly behind the near legs.
- Draw blocky hooves flat on the ground line.
- Add a simple shadow oval under the body.
Worked example
A learner draws a body oval 8 cm long and 4 cm tall, a head block 2 cm tall, and horns 1 cm tall. They place hooves 1 cm above the ground line. Identify one proportion check and one placement check.
Worked answer
Proportion check: the body oval is 8:4, or 2:1, which matches the guide. Placement check: the hooves are 1 cm above the ground line, so they must be moved down until their bottom edges touch the line.
Four practice exercises
Exercise 1
Draw a side-view ox on a ground line. Use a body oval 10 cm long and 5 cm tall, a head block about 1.7 cm tall, and horns about 0.85 cm tall. Place all hooves on the ground line.
Show answer and check
A completed drawing with a 10:5 body oval, a head block about 1.7 cm tall, horns about 0.85 cm tall, and four hooves touching the ground line.
Why: The body oval is 2:1, the head block is about one-third of the 5 cm body height (about 1.7 cm), and the horns are about half the head height (about 0.85 cm), matching the lesson guides.
Check: Measure the oval and head block with a ruler. Check that every hoof's bottom edge touches the ground line.
Exercise 2
A drawing has a body oval 6 cm long and 6 cm tall, horns pointing straight up, and hooves 0.5 cm below the ground line. List three fixes.
Show answer and check
Stretch the oval to about 12 cm long or 3 cm tall to reach 2:1; redraw the horns with an outward-then-upward curve; move the hooves up so their bottom edges touch the ground line.
Why: The round oval makes the ox look pig-like, straight horns do not read as ox horns, and sunken hooves break the ground contact.
Check: Re-measure the oval ratio, trace the horn curve, and confirm hoof contact with the ground line.
Exercise 3
Draw an ox with a body oval 9 cm long and 4.5 cm tall. Add a shadow oval 7 cm long and 1 cm tall under the body. Check that the shadow touches the hooves.
Show answer and check
A drawing with a 2:1 body oval and a shadow oval whose top edge meets the hooves.
Why: The shadow supports the ground line and helps the ox look grounded rather than floating.
Check: Measure the body oval ratio and confirm the shadow touches at least two hooves.
Exercise 4
Redraw your ox from the first exercise, but make the neck shorter and thicker. Keep the body oval and horn curves the same. Note one change you made.
Show answer and check
A revised drawing with a shorter, thicker neck and the same body oval and horns. The noted change should describe the neck adjustment.
Why: A short, thick neck is a key ox feature and helps the head block connect naturally to the body.
Check: Compare the two drawings side by side and confirm the neck is shorter and thicker while the oval and horns remain consistent.
Common mistakes
- Making the body oval too round, so the ox looks like a pig. Stretch the oval to about twice as long as it is tall and keep the back nearly level.
- Drawing horns that point straight up or straight out. Use a two-part curve: outward first, then upward, with smooth transitions.
- Letting hooves float above or sink below the ground line. Check that every hoof's bottom edge touches the same ground line.
- Making the neck too thin or too long. Keep the neck short and thick, connecting the head block close to the body oval.
Self-check rubric
- Body oval is clearly longer than tall, roughly 2:1, and sits above the ground line.
- Head block is connected by a short, thick neck and includes a muzzle wedge.
- Horns show a smooth outward-then-upward curve and are roughly symmetrical.
- Four legs are present, with hooves flat on the ground line.
- A simple shadow touches the hooves and supports the ground line.
- Valid alternatives are accepted if the ox reads clearly and proportions remain believable.
Questions and answers
Do I need to measure exactly?
No. The proportions are guides. Measure your own paper and adjust the oval and head block to fit comfortably.
Can the horns curve differently?
Yes. Ox horn styles vary. The key is a smooth outward-then-upward curve that reads clearly as horns.
How many legs should be visible?
In side view, show four legs, but the far legs can be partly hidden behind the near legs.
What if my ox looks too tall?
Shorten the legs slightly and widen the body oval. The body should dominate the drawing.