Free original lessons
Draw Overlapping Dragon Scales with Consistent Shading
Learn to draw a patch of layered dragon scales with a clear overlap direction and simple shading under each scale edge, using a grid and step-by-step guidance.
Free lesson
Four exercises
Worked answers
Object Drawing Lessons
This lesson teaches you to draw a patch of overlapping dragon scales. You will establish a consistent overlap direction, build rows of scales that tuck under the row above, and add light shading beneath each scale edge to show depth. The focus is on the scale patch itself, not on constructing a full dragon body or designing a creature. You will use a simple convention: each scale is a rounded shape whose lower edge overlaps the upper edge of the scale below it. A printable grid with arrows and a shaded example is planned but not yet built; for now, you can draw your own grid on paper. All measurements and numerical examples are hypothetical and should be adjusted to your actual tools.
Practice materials: Printable downloads are not available for this lesson yet. Use the instructions and four exercises below.
Reference illustration
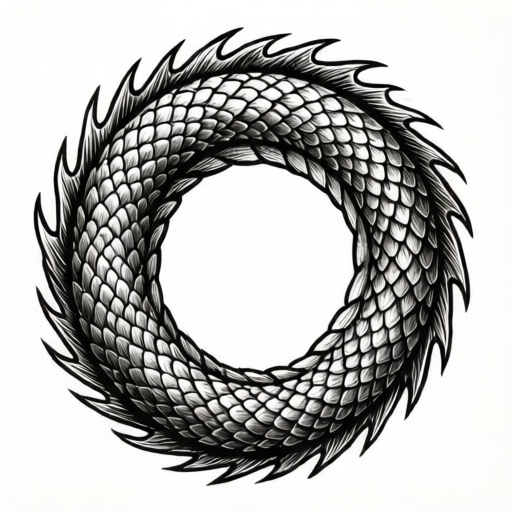
Use the stated measurements and conventions for each exercise.
Set up a grid and choose an overlap direction
Start by drawing a light rectangular grid on your paper. A grid of about 6 columns and 4 rows gives enough space to practice a small patch. Label the top row as row 1 and the bottom row as row 4. Choose one overlap direction: scales in each row will overlap the row below, meaning the bottom edge of a scale in row 1 sits over the top edge of a scale in row 2. Mark a small arrow on the side of the grid pointing downward to remind you that upper rows overlap lower rows.
Keep the grid lines faint so they do not compete with your scale outlines. You will erase or ignore them later. The grid is a guide for spacing, not a permanent part of the drawing.
- Draw a light grid with 6 columns and 4 rows, each cell about 2 cm wide and 2 cm tall (hypothetical example; measure your own paper).
- Write an arrow on the left margin pointing down to indicate that upper rows overlap lower rows.
- Label the rows 1 to 4 from top to bottom.
Draw the first row of scales
In row 1, draw a series of rounded scale shapes. Each scale should be wider than it is tall, like a flattened teardrop or a rounded shield. Leave a small gap between scales so they do not touch. The bottom edge of each scale should curve downward slightly. These scales will later overlap the row below, so their bottom edges should be clear and unbroken.
Use a consistent size for the scales in this row. If you vary the size too much, the overlap pattern becomes harder to read. A simple convention is to make each scale about 1.5 cm wide and 1 cm tall (hypothetical example).
- Draw 5 to 6 rounded scales in row 1, spaced evenly.
- Make each scale wider than tall, with a gently curved bottom edge.
- Keep the bottom edges clean and unbroken.
Add overlapping rows below
Move to row 2. Draw scales that sit slightly lower than the row 1 scales, so that the bottom edges of row 1 scales cover the top edges of row 2 scales. Offset the row 2 scales horizontally by about half a scale width so they sit between the row 1 scales, with row 1 scales overlapping their top edges. This creates a brick-like pattern. Repeat for rows 3 and 4, always keeping the same overlap direction: upper rows cover lower rows.
Check that every scale in a lower row is partially hidden by at least one scale above it. If a lower scale is fully visible, move that lower scale upward or shift the upper scale downward so the upper scale's bottom edge covers the lower scale's top edge.
- Draw row 2 scales offset by half a scale width from row 1.
- Ensure the bottom edges of row 1 scales overlap the top edges of row 2 scales.
- Repeat for rows 3 and 4, maintaining the same downward overlap direction.
- Verify that each lower scale is partially covered by a scale above.
Add simple shading under each scale edge
Shading is what makes the overlap read as depth. Where the bottom edge of an upper scale covers the top edge of the scale below, draw a narrow band of light shading on the visible part of the lower scale, immediately beneath the upper scale's bottom edge. Use a pencil and keep the shading soft. This suggests a small shadow cast by the upper scale onto the lower one.
Keep the shading consistent: same width and same darkness for every scale edge. A band about 2 mm wide is a hypothetical example; adjust to your scale size. Do not shade the entire lower scale, only the area immediately under the overlapping edge. Leave the rest of each scale light.
- Identify the bottom edge of each scale.
- Draw a narrow shaded band just below that edge, on the scale underneath.
- Keep the band width and darkness consistent across all scales.
- Leave the upper part of each scale unshaded.
Worked example
On a grid with 4 columns and 3 rows, draw a patch of overlapping scales with downward overlap and light shading under each scale edge. Describe the result.
Worked answer
Row 1 has 4 scales, each about 1.5 cm wide and 1 cm tall, with curved bottom edges. Row 2 has 4 scales offset by half a scale width, positioned so the bottom edges of row 1 scales cover their top edges. Row 3 repeats the offset pattern. The bottom edges of row 1 scales cast shading onto row 2 scales, and the bottom edges of row 2 scales cast shading onto row 3 scales; each band is about 2 mm wide. The overlap direction is consistently downward, and the shading is light and even.
Four practice exercises
Exercise 1
Draw a 3-row by 3-column patch of scales with upward overlap (lower rows overlap upper rows). Add shading under each overlapping edge. Describe your result.
Show answer and check
With upward overlap, row 3 scales cover row 2 scales, and row 2 scales cover row 1 scales. Shading bands sit on the scale being covered, just below the covering edge: row 1 scales receive shading under the bottom edges of row 2 scales, and row 2 scales receive shading under the bottom edges of row 3 scales. Row 3 is the bottom row and is not covered from below, so it receives no shading under its bottom edge.
Why: Upward overlap means the lower row covers the upper row. The shaded band always sits on the scale being covered, just below the covering edge.
Check: Verify that every scale in rows 1 and 2 is partially covered by a scale below it, and that shading appears only on the covered scales just under the covering edges. Row 3 is the bottom row and is not overlapped from below, so it has no shading under its bottom edge.
Exercise 2
A learner draws 4 scales in row 1 and 4 scales in row 2 directly below without offset. The bottom edges of row 1 scales cover the top edges of row 2 scales. Is the overlap consistent? Explain.
Show answer and check
Yes, the overlap direction is consistent (upper row covers lower row), but the lack of horizontal offset means each row 2 scale is covered by only one row 1 scale directly above. This is valid but produces a column-like pattern rather than a brick pattern. Consistency of direction is maintained.
Why: Offset is a spacing choice, not a requirement for consistent overlap direction. The key is that upper scales cover lower scales.
Check: Check that each row 2 scale is partially hidden by the scale directly above and that no row 2 scale is fully visible.
Exercise 3
You have a grid with cells 3 cm wide and 2 cm tall. You want scales about half the cell width. What scale width and shading band width would you use? Use hypothetical values and state units.
Show answer and check
Scale width about 1.5 cm (half of 3 cm). Scale height about 1 cm (half of 2 cm). Shading band width about 2 mm (hypothetical example).
Why: Halving the cell width gives the scale width. A shading band of about 2 mm is a small fraction of the scale height, suitable for a light shadow.
Check: Measure your drawn scales against the grid cells to confirm they are about half the cell width, and check that the shading band is narrow and even.
Exercise 4
In a 4-row patch with downward overlap, which rows should have shading under their bottom edges? Assume every scale except those in the bottom row is overlapped by a scale above.
Show answer and check
Under downward overlap, row 1 scales cover row 2 scales, row 2 covers row 3, and row 3 covers row 4. Shading bands sit on the scale being covered, just below the covering edge: row 2 scales receive shading under the bottom edges of row 1 scales, row 3 scales receive shading under the bottom edges of row 2 scales, and row 4 scales receive shading under the bottom edges of row 3 scales. Row 1 is the top row and is not covered from above, so it receives no shading.
Why: Shading marks the shadow cast by an overlapping scale onto the scale below. Only scales that are overlapped receive this shadow, so the lower rows (2 through 4) get shading while the top row does not.
Check: Confirm shading appears on rows 2, 3, and 4, placed just under the bottom edges of rows 1, 2, and 3 respectively, and that row 1 has no shading.
Common mistakes
- Changing overlap direction between rows. Pick one direction (upper rows overlap lower rows) and mark it with an arrow. Check each new row against the arrow before drawing.
- Shading the entire lower scale instead of just the edge. Limit shading to a narrow band directly under the overlapping edge. Keep the rest of the scale light.
- Making scales touch or merge without clear edges. Leave a small gap between scales in the same row and keep each scale outline distinct.
- Using inconsistent scale sizes within a row. Decide on an approximate width and height for the row and keep scales close to that size.
Self-check rubric
- Overlap direction is consistent across all rows (upper rows overlap lower rows).
- Each scale in a lower row is partially covered by at least one scale above.
- Scale outlines are distinct, with small gaps between scales in the same row.
- Shading appears as a narrow band under each overlapping edge, not across the whole scale.
- Shading width and darkness are consistent across the patch.
- Scale sizes within a row are approximately uniform.
- Valid alternatives: scale shape may vary (rounded, shield-like, teardrop) as long as the bottom edge is clear and the overlap convention is followed.
Questions and answers
Do I need to draw a full dragon to practice scales?
No. This lesson focuses only on a patch of scales. You can practice the overlap and shading on a small grid without drawing a body.
How dark should the shading be?
Light and consistent. The shading is a subtle shadow, not a dark fill. Use the same pressure for every scale edge.
Can I use a different scale shape?
Yes. The convention is a rounded shape with a clear bottom edge. You can vary the exact outline as long as the overlap direction and shading placement stay consistent.
What if my grid cells are a different size?
Adjust the scale size and shading band width to fit your grid. The numerical examples are hypothetical; measure your own paper and keep proportions consistent.