Free original lessons
Realistic Lips Drawing: Tonal Shading, Highlights, and Crease Lines
Learn to draw realistic lips using tonal zones, highlight placement, and crease shading. Includes a worked example, four practice tasks, and a convention-based rubric.
Free lesson
Four exercises
Worked answers
Object Drawing Lessons
Realistic lips depend on observing how light wraps around curved forms. This lesson teaches a repeatable method: map the lip shape, establish tonal zones for shadow and midtone, place highlights according to a defined light direction, and add crease lines that follow the lip surface. You will use a simple convention for x-height and lettering where needed, and a rubric that accepts valid stylistic alternatives. All measurements are checkable and use consistent units. The practice tasks are self-contained; where a diagram would help, it is described in words so you can draw it yourself.
Practice materials: Printable downloads are not available for this lesson yet. Use the instructions and four exercises below.
Reference illustration
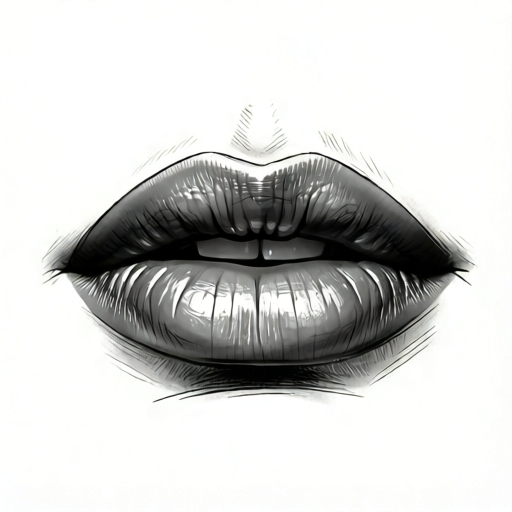
Use the stated measurements and conventions for each exercise.
Mapping the Lip Form and Tonal Zones
Begin by drawing the lip outline as two curved bands: the upper lip often has a central dip (the cupid's bow) and the lower lip is fuller. Mark the lip line where the lips meet. Define a single light direction, for example from the upper left at about 45 degrees. This direction determines where highlights and shadows fall.
Divide the lips into four tonal zones: (1) the upper lip body, which usually receives less direct light and appears darker; (2) the lower lip body, which often catches more light and appears lighter; (3) the crease line between the lips, which is a narrow dark band; and (4) the corners, which are small shadow pockets. These zones are relative, not fixed values; adjust them to your chosen light direction.
- Draw the outer lip contour and the central lip line with a light pencil.
- Mark the light direction with a small arrow outside the lips.
- Label the four tonal zones lightly: upper body, lower body, crease, corners.
- Check that the cupid's bow and lower lip curve are symmetrical enough for your intended style; asymmetry is acceptable if deliberate.
Shading with Highlight and Crease Placement
Shade the upper lip body first using a midtone, then darken the crease line and corners. Keep the lower lip body lighter than the upper lip unless your light direction says otherwise. The highlight is the lightest area; place it on the lower lip where the surface faces the light source, typically a small oval or soft streak. Do not outline the highlight; instead, leave the paper light or erase back to it.
Crease lines are thin, slightly curved lines that follow the lip surface. They should be darker than the surrounding midtone but lighter than the central crease. Space them unevenly and keep them short; they suggest volume without flattening the lip. Blend edges softly except at the central crease, which can stay sharper.
- Apply a midtone to the upper lip body, avoiding the highlight area.
- Darken the central crease and the corners with a darker pencil.
- Place the highlight on the lower lip as a soft oval facing the light direction.
- Add two or three short crease lines on the lower lip, following its curve.
- Check values by squinting: the highlight should be the lightest, the crease the darkest, and the lip bodies in between.
Using a Convention for X-Height and Lettering
When adding a small label or signature near the drawing, use a defined convention: x-height is the distance from the baseline to the top of lowercase letters without ascenders, such as 'a', 'o', or 'x'. Letter styles vary, so this convention does not dictate a single correct look. For example, a lowercase 'a' may be round or oval; both are valid if the x-height is consistent. Measure with a ruler in millimetres and record the value you choose. Any numerical example here is hypothetical and should be replaced by measuring your actual paper and tools.
Apply the same convention to any guide marks you add. If you draw a small lowercase 'h' for highlight, note that its ascender rises above the x-height; measure x-height only from the baseline to the top of the letter's body, not to the top of the ascender. This makes your annotations checkable without forcing a particular handwriting style.
- Draw a baseline and a midline for your label area.
- Measure the x-height in millimetres with a ruler, from the baseline to the top of a lowercase letter without an ascender; write the value down.
- Write the label so lowercase letters without ascenders sit between the baseline and the x-height line.
- Check consistency by comparing two labels; valid alternatives include different letter shapes with the same x-height.
Checking Your Drawing with Simple Arithmetic
Use simple checkable arithmetic to verify proportions. For example, measure the width of the lips and the height of the lower lip in millimetres. If the lower lip height is about one third of the total lip width, that is a common proportion, but it is not a rule. Record your measurements and compare them to your intended design. Keep units consistent: use millimetres for all measurements.
Check tonal order by listing values from lightest to darkest: highlight, lower lip body, upper lip body, crease lines, central crease, corners. If your drawing does not follow this order, adjust the shading. This check is qualitative but uses a clear sequence.
- Measure lip width and lower lip height in millimetres.
- Calculate the ratio of lower lip height to lip width; record it.
- List your tonal zones from lightest to darkest and compare with the intended order.
- Adjust any zone that breaks the order, then re-check.
Worked example
Draw a pair of lips with light from the upper left. Use a midtone for the upper lip, a lighter tone for the lower lip, a soft highlight on the lower lip facing upper left, and a dark central crease. Add two short crease lines on the lower lip. Measure lip width and lower lip height in millimetres and record the ratio.
Worked answer
The drawing shows a symmetric lip outline with a cupid's bow. The upper lip body is shaded midtone, the lower lip body is lighter, and the central crease is the darkest line. A soft oval highlight sits on the lower lip toward the upper left. Two short curved crease lines follow the lower lip surface. Hypothetical measurements: lip width 60 mm, lower lip height 20 mm, ratio 1:3. Tonal order from lightest to darkest: highlight, lower lip body, upper lip body, crease lines, central crease, corners.
Four practice exercises
Exercise 1
Draw lips with light from the upper right. Shade the upper lip darker than the lower lip, place a highlight on the lower lip toward the upper right, and add a dark central crease. Measure lip width and lower lip height in millimetres and state the ratio.
Show answer and check
A drawing with upper lip midtone to dark, lower lip lighter, highlight on the lower lip upper right, and a dark central crease. Hypothetical measurements: width 50 mm, lower lip height 15 mm, ratio 1:3.33 (or 15:50).
Why: The light direction determines highlight placement; the upper lip is darker because it faces away from the light. The ratio is calculated by dividing lower lip height by lip width.
Check: Squint to confirm the highlight is lightest and the crease darkest. Recalculate the ratio from the recorded millimetre values.
Exercise 2
Draw lips with light from directly above. Place the highlight on the upper lip near the center and keep the lower lip in midtone. Add two short crease lines on the lower lip. Write a small label 'lip' and measure the x-height in millimetres, from the baseline to the top of the lowercase letters without ascenders; record it.
Show answer and check
A drawing with a central highlight on the upper lip, lower lip midtone, and two short curved crease lines. Hypothetical x-height: 4 mm, measured from the baseline to the top of the lowercase letters without ascenders.
Why: Overhead light puts the highlight on the upper lip; the lower lip receives less direct light. The x-height convention ensures consistent label size regardless of letter style.
Check: Verify the highlight is centered and the crease lines follow the lip curve. Measure the x-height again from the baseline to the top of the lowercase letters without ascenders to confirm consistency.
Exercise 3
Draw lips with light from the lower left. Make the lower lip lighter than the upper lip and place the highlight on the lower lip toward the lower left. Add a dark central crease and one corner shadow. Measure lip width and lower lip height in millimetres; if the ratio is not between 1:2 and 1:4, adjust the drawing and re-measure.
Show answer and check
A drawing with lower lip lighter, highlight toward lower left, dark central crease, and one corner shadow. Hypothetical measurements after adjustment: width 55 mm, lower lip height 18 mm, ratio about 1:3.06.
Why: The light direction dictates the highlight and relative values. The ratio check provides a simple arithmetic way to verify proportion.
Check: Calculate the ratio from measurements; confirm it falls between 1:2 and 1:4. Check tonal order from lightest to darkest.
Exercise 4
Draw lips with light from the upper left. Use a midtone for both lip bodies, then darken the upper lip slightly. Place a soft highlight on the lower lip upper left and add three short crease lines. Write a lowercase label 'h' for highlight using the x-height convention and measure its x-height in millimetres, from the baseline to the top of the letter's body (not the ascender).
Show answer and check
A drawing with midtone lip bodies, slightly darker upper lip, soft highlight upper left on the lower lip, and three short crease lines. Hypothetical x-height for the lowercase 'h': 5 mm from the baseline to the top of the letter's body, excluding the ascender.
Why: The method allows relative values to be adjusted while keeping the highlight consistent with light direction. The label convention makes the annotation checkable.
Check: Confirm the highlight is the lightest area and the crease lines are short and curved. Measure the x-height from the baseline to the top of the letter's body and compare with any other labels.
Common mistakes
- Outlining the highlight with a hard line. Leave the highlight as unpainted paper or erase softly; blend its edges into the midtone.
- Making the upper lip lighter than the lower lip regardless of light direction. Decide the light direction first, then assign values; the upper lip is often darker but not always.
- Drawing crease lines as long straight strokes across the lip. Keep crease lines short and curved, following the lip surface, and vary their spacing.
- Using inconsistent units when measuring proportions. Measure everything in millimetres and record the values; convert only if necessary.
Self-check rubric
- Lip outline is clear and includes a central lip line.
- Four tonal zones are distinguishable: upper body, lower body, crease, corners.
- Highlight is the lightest area and is placed consistently with the chosen light direction.
- Central crease is darker than surrounding midtones and is not outlined with a hard border.
- Crease lines are short, curved, and unevenly spaced.
- Measurements are recorded in millimetres and the ratio is calculated correctly.
- Labels, if used, follow the x-height convention measured from the baseline to the top of lowercase letters without ascenders; letter shapes may vary.
- Valid alternatives are accepted: different light directions, different lip shapes, and different letter styles with consistent x-height.
Questions and answers
Do I need a specific pencil grade?
No. Use what you have. A midtone pencil and a darker pencil are enough; adjust pressure to change value.
Can I use a different light direction?
Yes. The method works for any direction; just move the highlight and shadows accordingly and keep them consistent.
How many crease lines should I add?
Two or three short lines are usually enough. More can flatten the lip; fewer may look too smooth.
Is there a single correct x-height for labels?
No. Measure and record your chosen x-height in millimetres; any consistent value is valid.