Free original lessons
Realistic Flower Drawing: Petal Overlap, Proportion, and Tonal Shading
Learn to draw a realistic flower study by planning petal overlap, checking proportion, and building tonal shading with a clear value guide.
Free lesson
Four exercises
Worked answers
Object Drawing Lessons
This lesson teaches a realistic flower study focused on petal overlap, proportion, and tonal shading. You will use a simple sizing convention: draw a light frame, mark its center and midline, and label a head-to-stem ratio on the margin as your guide. The goal is a believable flower with layered petals and controlled values, not a fantasy bloom or a pen-texture exercise. Work on a single sheet with a light outline, then build tone in stages. Measure your own paper and tools; any numerical values here are hypothetical examples for practice.
Practice materials: Printable downloads are not available for this lesson yet. Use the instructions and four exercises below.
Reference illustration
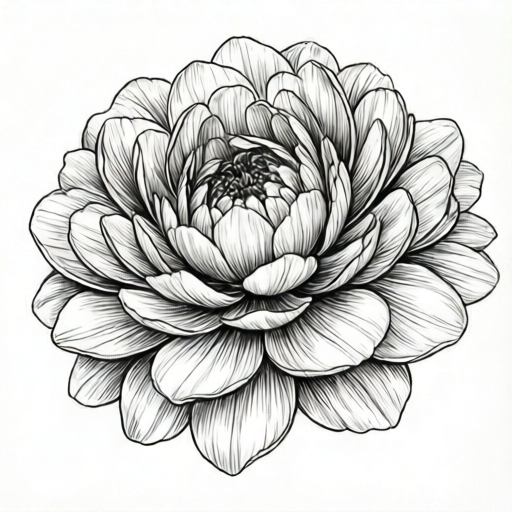
Use the stated measurements and conventions for each exercise.
Plan the flower frame and proportion
Begin by drawing a light rectangular frame on your paper. Mark a center vertical line and a horizontal midline. Decide the flower head diameter and the stem length as simple ratios, for example a head diameter of 8 units and a stem length of 12 units. These numbers are hypothetical examples; measure your actual paper to choose workable values.
Place the flower head so its center sits slightly above the frame midline. Sketch an oval for the overall head shape, then divide it into concentric zones: center, middle ring, and outer ring. This zoning helps you place petals in a believable order and keeps proportion checkable.
- Draw a light frame and mark center and midline.
- Choose a head diameter and stem length ratio; label the values on the margin.
- Sketch an oval for the head and a tapered line for the stem.
- Divide the head into center, middle, and outer zones with light lines.
Build petal overlap from back to front
Petal overlap is the key to realism. Start with the petals farthest from the viewer, usually the outer ring, and work inward. Each new petal should cross over the previous one at a clear point. Draw the full outline of a petal only where it is visible; where it tucks under another petal, stop the line at the overlap edge.
Use a consistent overlap direction, such as clockwise, so the flower reads as a single object. Vary petal width and length slightly to avoid a mechanical look. Check that no petal floats without a connection to the center or to a neighboring petal.
- Draw the outer-ring petals first, leaving gaps where inner petals will sit.
- Add middle-ring petals that cross over the outer petals at defined points.
- Add center petals last, overlapping the middle ring.
- Trace each overlap edge lightly to confirm the layering order.
Apply tonal shading with a value guide
Create a simple value guide with four patches: light, medium-light, medium-dark, and dark. Use your pencil at different pressures to match these patches. Shade the flower in the same order you drew it: back petals first, then front petals. Keep the light source consistent, for example from the upper left, so shadows fall to the lower right.
Where petals overlap, place a narrow dark band just under the upper petal edge. This cast shadow separates the layers. Keep the center of the flower slightly darker than the outer petals to suggest depth. Check your values by squinting; the flower should still read as a single shape with clear layers.
- Make a four-patch value guide on the margin.
- Shade back petals with medium-light values.
- Add cast shadows under each overlap edge.
- Darken the center and refine the front petals with medium-dark and dark values.
Refine edges and check the study
Soften outer petal edges where they turn away from the light, and keep overlap edges crisp. Remove stray construction lines with a light eraser. Compare your drawing to your planned ratios: measure the head diameter and stem length on the page and confirm they match your chosen values within a small tolerance you set yourself.
Finally, check that every petal has a clear front or back position. If a petal looks flat, add a cast shadow at its base or adjust its overlap edge. The study is complete when the layering and values read clearly at a glance.
- Soften turning edges and keep overlap edges sharp.
- Erase construction lines carefully.
- Measure head and stem against your planned ratios.
- Adjust any flat petal with a cast shadow or clearer overlap.
Worked example
A flower head is planned with a diameter of 8 units and a stem length of 12 units. The outer ring has 8 petals, the middle ring has 6, and the center has 5. Describe the overlap order and one shading check.
Worked answer
Draw the 8 outer petals first, then the 6 middle petals crossing over them, then the 5 center petals crossing the middle ring. Shade back petals with medium-light values, add cast shadows under each overlap edge, and darken the center. Check by squinting: the flower should read as one layered shape with a consistent light source.
Four practice exercises
Exercise 1
Plan a flower head with a diameter of 10 units and a stem length of 15 units. State the head-to-stem ratio in simplest form and describe where you would place the head center relative to the frame midline.
Show answer and check
The ratio is 10:15, which simplifies to 2:3. Place the head center slightly above the frame midline so the stem has room below.
Why: Dividing both values by 5 gives 2:3. Placing the center above the midline balances the composition and leaves space for the stem.
Check: Measure the drawn head and stem on your page and confirm they reduce to 2:3 within your chosen tolerance.
Exercise 2
A flower has 7 outer petals and 5 middle petals. You draw the middle petals first. Explain why this order causes overlap problems and give a corrected order.
Show answer and check
Drawing middle petals first makes it unclear which petals sit in front, because outer petals should usually sit behind the middle ring. Correct order: draw the 7 outer petals first, then the 5 middle petals crossing over them.
Why: Overlap order must match depth. Outer petals are typically farther from the viewer, so they are drawn first and crossed by inner petals.
Check: Trace each overlap edge and confirm every middle petal crosses over an outer petal at a defined point.
Exercise 3
Your four-patch value guide has light, medium-light, medium-dark, and dark. You shade the back petals medium-dark and the front petals light. Explain the problem and give a corrected assignment.
Show answer and check
The back petals are too dark and the front petals too light, which flattens the depth. Correct: back petals medium-light, front petals medium-dark, with dark cast shadows under overlap edges.
Why: Back petals receive less direct light in this plan, but they should still be lighter than front petals to keep the layering readable.
Check: Squint at the drawing; the front petals should appear darker than the back petals, and each overlap edge should show a dark band.
Exercise 4
You planned a head diameter of 9 units but your drawn head measures 12 units on the page. State the difference and one adjustment you would make before shading.
Show answer and check
The difference is 3 units. Reduce the head outline by 3 units, or relabel the plan to 12 units and adjust the stem to keep the chosen ratio.
Why: Proportion checks compare planned and drawn values. Either the drawing or the plan must change so the ratio stays consistent.
Check: Measure the head again after adjustment and confirm the new value matches the plan or the relabeled ratio.
Common mistakes
- Drawing all petals as separate outlines without overlap points. Stop each petal line where another petal crosses it, and add a cast shadow under the upper petal.
- Using the same value for every petal. Match each petal to your four-patch value guide and keep back petals lighter than front petals.
- Changing the light direction midway. Mark the light direction on the frame margin and check every cast shadow against it.
- Ignoring the planned head-to-stem ratio. Measure the drawn head and stem and compare them to your labeled ratio before refining.
Self-check rubric
- Petal overlap: every petal has a clear front or back position and overlap edges are visible.
- Proportion: head diameter and stem length match the labeled ratio within the tolerance you set.
- Tonal shading: at least three distinct values from the four-patch guide are used consistently.
- Light source: cast shadows follow one marked direction.
- Edge control: overlap edges are crisp and turning edges are softened.
- Alternative conventions allowed: any consistent overlap direction, petal count, or light direction is valid if applied throughout.
Questions and answers
Do I need a specific pencil grade?
No. Use whatever pencil you have and build your own four-patch value guide with pressure changes. Measure your actual tools rather than assuming a standard.
How many petals should the flower have?
Choose a count that fits your frame, such as 8 outer, 6 middle, and 5 center petals as a hypothetical example. The count is less important than clear overlap and consistent proportion.
Can I use a different light direction?
Yes. Pick one direction, mark it on the margin, and keep all cast shadows consistent with it.
How do I choose a head-to-stem ratio?
Pick two simple whole numbers that fit your paper, such as a head diameter of 8 units and a stem length of 12 units (a hypothetical 2:3 ratio). Label the values on the margin, then measure your drawn head and stem to confirm they match your labeled ratio within a tolerance you set yourself.