Free original lessons
Realistic Horse Drawing: Proportion and Muscle Shading Guide
Learn to draw a realistic horse with accurate proportion landmarks and muscle shading zones. Includes a worked example, four practice tasks, and a validation plan.
Free lesson
Four exercises
Worked answers
Object Drawing Lessons
This instructional set teaches a repeatable method for drawing a realistic horse in side view, focusing on body proportion and muscle shading. You will use a simple landmark system based on head length, then place shading zones that suggest the large muscle groups without turning the drawing into a cartoon. The approach is deliberately checkable: every proportion is expressed as a ratio or a count of head lengths, and every shading zone is tied to a named anatomical region. Because horse breeds and individual builds vary, the method defines a convention rather than a single universal answer. You will measure your own reference or your own drawing, label any numerical values you choose as hypothetical examples, and use the rubric to judge whether your result is plausible and internally consistent. The planned printable resources described at the end are not yet built; they are proposed supports for this method.
Practice materials: Printable downloads are not available for this lesson yet. Use the instructions and four exercises below.
Reference illustration
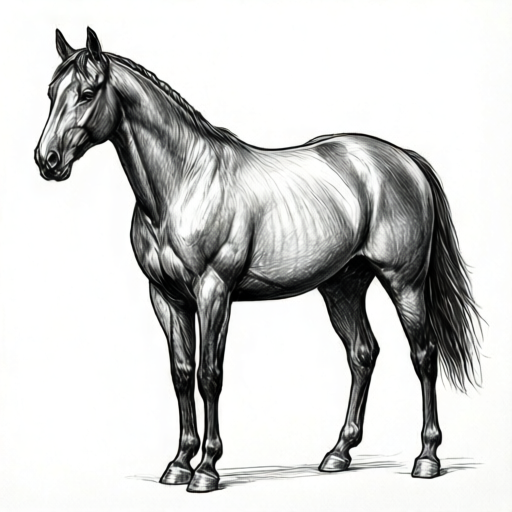
Use the stated measurements and conventions for each exercise.
Establishing Proportion with Head-Length Units
Begin by defining one head-length unit (HL) as the distance from the top of the horse's head to the bottom of its muzzle in your chosen side view. All major body proportions are then expressed in HL. A common working convention for a mature horse is a body length of about 2.5 HL from chest to rump and a height at the withers of about 2.2 HL from ground to the top of the shoulder. Treat these numbers as hypothetical examples, not fixed standards, and adjust them to your reference.
Place landmark points before drawing any outline: withers, point of shoulder, elbow, knee or hock, fetlock, and ground line. Check that the leg joints stack in a plausible vertical order and that the belly line sits roughly halfway between the ground and the withers. If your measured ratios differ from the example values, record your own measurements and keep them consistent throughout the drawing.
- Draw a horizontal ground line and mark a vertical height line at the withers.
- Measure your head length on the reference and mark it as one HL.
- Mark chest-to-rump length as about 2.5 HL and withers height as about 2.2 HL, labeling these as hypothetical examples.
- Place joint landmarks for shoulder, elbow, knee or hock, and fetlock before outlining the body.
- Check that the belly line falls near the midpoint between ground and withers.
Mapping Muscle Shading Zones
Muscle shading is not random darkening. Assign each shaded zone to a named region: the shoulder mass behind the point of shoulder, the large hindquarter mass over the croup and thigh, the neck crest along the upper neck, and the forearm and gaskin as narrower vertical masses. Shade the underside of each mass and leave the upper surface lighter, so the form reads as rounded rather than flat.
Use a consistent light direction, for example from the upper left, and state it before you begin. Keep the darkest values in the deepest creases between muscle groups and the lightest values on the highest points of each mass. Avoid outlining every muscle; instead, let adjacent values describe the transition. This convention allows valid alternatives: a heavier draft build and a lighter riding build will place the same zones with different widths, and both can be correct if the landmarks and light direction remain consistent.
- State your light direction in one sentence before shading.
- Block in the shoulder, hindquarter, neck crest, forearm, and gaskin masses with light pencil outlines.
- Shade the underside of each mass, keeping the upper surface lighter.
- Deepen values only in creases between adjacent muscle groups.
- Check that no shaded zone lacks a named anatomical region.
Checking the Drawing Against the Rubric
A realistic horse drawing is judged by internal consistency, not by matching a single ideal. Use the rubric to check proportion ratios, landmark placement, shading logic, and anatomical naming. If a ratio is off, correct the landmark rather than stretching the outline. If a shading zone is unnamed, either name it or remove it.
Record your measurements and light direction beside the drawing so a reviewer can verify your choices. This makes the work checkable and separates deliberate stylistic choices from accidental errors.
- Re-measure body length and withers height in HL and compare with your recorded values.
- Confirm every joint landmark is placed and stacked plausibly.
- Confirm every shaded zone has a named muscle region and a consistent light direction.
- Note any deliberate build variation and explain it in one line.
Worked example
A side-view horse measures 20 cm from top of head to bottom of muzzle. Using the hypothetical example ratios, find body length and withers height, then state one shading check.
Worked answer
One HL equals 20 cm. Body length is about 2.5 HL, so 2.5 times 20 cm equals 50 cm. Withers height is about 2.2 HL, so 2.2 times 20 cm equals 44 cm. Shading check: every shaded zone must name a muscle region and follow the stated light direction.
Four practice exercises
Exercise 1
A side-view horse has a head length of 18 cm. Using the hypothetical example ratios, calculate body length and withers height in centimeters.
Show answer and check
Body length is about 45 cm and withers height is about 39.6 cm.
Why: One HL equals 18 cm. Body length is 2.5 HL, so 2.5 times 18 equals 45 cm. Withers height is 2.2 HL, so 2.2 times 18 equals 39.6 cm.
Check: Re-multiply 18 by 2.5 and by 2.2, and confirm the units are centimeters.
Exercise 2
A drawing shows a shaded patch on the upper neck but no named region and no stated light direction. Identify the problem and give a fix.
Show answer and check
The shading is unnamed and directionless. Name the patch as the neck crest and state one light direction, then shade its underside and leave the upper surface lighter.
Why: The rubric requires every shaded zone to name an anatomical region and follow one stated light direction, so an unnamed patch cannot be checked.
Check: Confirm the patch has a region name and that the light direction is written beside the drawing.
Exercise 3
A horse drawing has a body length of 60 cm and a head length of 20 cm. Calculate the body length in HL and state whether it matches the hypothetical example ratio of 2.5 HL.
Show answer and check
Body length is 3.0 HL, which does not match the hypothetical example of 2.5 HL.
Why: 60 cm divided by 20 cm equals 3.0 HL. The example ratio is 2.5 HL, so the drawing is longer than the example.
Check: Divide body length by head length and compare the result with the recorded example ratio.
Exercise 4
You choose a light direction from the upper right. Describe where to place the darkest values on the hindquarter mass and how to check the result.
Show answer and check
Place the darkest values on the lower and left underside of the hindquarter mass, keeping the upper right surface lighter. Check that the shading follows the stated upper-right light direction and that the zone is named as the hindquarter.
Why: With light from the upper right, the opposite lower-left underside receives less light, so the darkest values belong there while the lit upper right stays lighter.
Check: Confirm the darkest values sit opposite the stated light direction and that the zone carries an anatomical name.
Common mistakes
- Drawing the head too large relative to the body. Measure head length first, then mark body length as about 2.5 HL and withers height as about 2.2 HL, labeling these as hypothetical examples.
- Shading muscles as flat dark patches without a light direction. State one light direction and shade the underside of each named muscle mass, leaving the upper surface lighter.
- Placing leg joints without checking vertical stacking. Mark shoulder, elbow, knee or hock, and fetlock in order, then confirm the stack is plausible before outlining.
- Treating one breed's proportions as the only correct answer. Record your own measurements and explain any build variation in one line so the choice is deliberate and checkable.
Self-check rubric
- Head-length unit is defined and used consistently.
- Body length and withers height are measured and recorded, with chosen values labeled as hypothetical examples.
- Joint landmarks are placed and stacked plausibly before outlining.
- Every shaded zone names an anatomical region and follows one stated light direction.
- Deliberate build variation is explained in one line.
- Measurements and light direction are recorded beside the drawing for review.
Questions and answers
Do I need a live horse to use this method?
No. You can measure a clear side-view reference or your own drawing. The method only requires that you define one head-length unit and keep your measurements consistent.
Are the ratio values fixed standards?
No. Values such as 2.5 HL body length and 2.2 HL withers height are hypothetical examples. Measure your actual reference and label your chosen values as examples.
How do I know if my muscle shading is correct?
Every shaded zone should name an anatomical region and follow one stated light direction. The rubric checks naming and consistency rather than a single universal appearance.
Can a heavier build still pass the rubric?
Yes. A heavier build widens the same named zones while keeping landmarks and light direction consistent, which the rubric accepts as a valid alternative.