Free original lessons
Draw a Reindeer: Antler Branching and Leg Construction
Learn to draw a reindeer with clear antler branching and sturdy leg structure using simple proportions, step-by-step construction, and a practice rubric.
Free lesson
Four exercises
Worked answers
Object Drawing Lessons
This lesson focuses on two parts of a reindeer that most often go wrong: the branching antlers and the legs. You will use a simple body proportion guide, build antlers from a main beam with forward and upward tines, and construct legs with clear joints and hooves. The drawing convention is baseline to midline for x-height when labeling letter styles, but for the reindeer itself you will measure shapes in head-lengths. All numerical examples are hypothetical and should be checked against your own paper and tools.
Practice materials: Printable downloads are not available for this lesson yet. Use the instructions and four exercises below.
Reference illustration
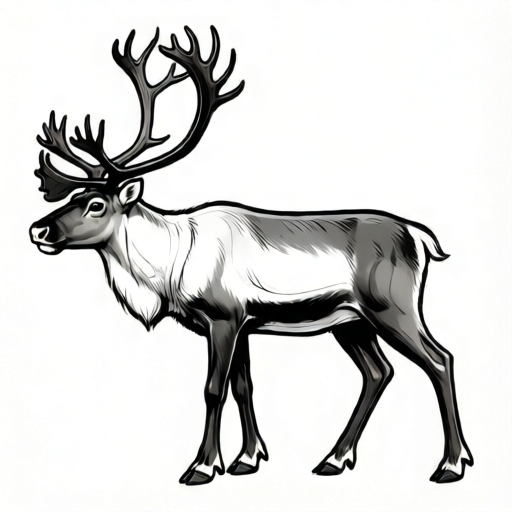
Use the stated measurements and conventions for each exercise.
Body Proportion Guide
Start with a light oval for the body. A reindeer body is roughly two head-lengths long from chest to rump and about one head-length tall at the shoulder. Mark a head-length unit on scrap paper first so your proportions stay consistent.
Place the head at the front of the body, slightly lower than the shoulder line. The neck connects the head to the chest with a gentle curve. Keep the back line nearly level, then slope down to the tail.
Use a baseline for the ground. The hooves should meet this baseline. If you draw a side view, the far legs can be slightly shorter or offset to show depth.
- Draw a head-length unit on scrap paper and label it H.
- Lightly sketch a body oval about 2H long and 1H tall.
- Add a head oval about 0.7H long at the front, slightly below shoulder height.
- Connect head to chest with a curved neck, then add a small tail.
- Mark a ground baseline and check that all four hooves can reach it.
Antler Branching
Antlers grow from the top of the head. Draw a main beam that curves up and slightly back. From this beam, add tines that branch forward and upward. A simple reindeer antler can have three forward tines and two upward tines per side, but real antlers vary, so treat this as one valid convention.
Keep branch angles clear. Each tine should leave the main beam at a distinct point, not from the same spot. Leave small gaps between branches so the shape reads clearly.
Mirror the antlers loosely rather than exactly. Slight differences look natural and are allowed by the rubric.
- Draw two short pedicles on top of the head.
- From each pedicle, draw a main beam curving up and back.
- Add three forward tines along the lower half of each beam.
- Add two upward tines near the top of each beam.
- Check that no two tines start from the same point and that gaps are visible.
Leg Construction
Each leg has an upper segment, a lower segment, and a hoof. Use simple lines: shoulder to elbow, elbow to knee, knee to hoof. The front legs are straighter; the back legs have a slight angle at the hock.
Draw the near legs first, then the far legs. Offset the far legs slightly to show depth. Keep hoof shapes small and wedge-like, meeting the ground baseline.
Check joint placement: elbows should sit below the chest line, and hocks should sit above the ground by about one-quarter of the leg length.
- Mark shoulder and hip points on the body oval.
- Draw upper leg lines from shoulder and hip downward.
- Add elbow and knee joints, then lower leg lines to the baseline.
- Draw small wedge hooves at the baseline.
- Add far legs with a slight offset and check all hooves touch the baseline.
Putting It Together
Combine the body, head, antlers, and legs in light pencil first. Check that the antlers sit on the pedicles and that the legs support the body without crossing awkwardly.
Refine the outline, then erase construction lines. Add a simple eye and ear, but keep the focus on antler branching and leg structure.
Use the rubric to self-check before finalizing. Valid alternatives include different tine counts, slightly different leg angles, and loose mirroring of antlers.
- Lightly combine all parts and check proportions in head-lengths.
- Adjust antler branch gaps and leg joint positions.
- Refine the outline and erase construction lines.
- Add minimal details: eye, ear, and hoof lines.
- Score your drawing with the rubric and note one improvement.
Worked example
A student draws a side-view reindeer with a body 2H long, a head 0.7H long, and four legs. The antlers have three forward tines and two upward tines per side. The hooves are 1 cm above the baseline. Identify one fix and one check.
Worked answer
Fix: lower the leg lines so all hooves meet the baseline. Check: measure the body length against the H unit to confirm it is about 2H.
Four practice exercises
Exercise 1
Draw a reindeer side view using a body 2H long and 1H tall. Add antlers with three forward tines and two upward tines per side. Draw four legs with hooves on the baseline.
Show answer and check
A completed side-view drawing with a 2H by 1H body, branched antlers, and four legs touching the baseline.
Why: The body proportion guide keeps the shape consistent, and the antler and leg steps ensure clear branching and joint structure.
Check: Measure body length against your H unit, count tine starting points, and confirm every hoof touches the baseline.
Exercise 2
Draw only the antlers from a front view. Use a main beam on each side with two forward tines and two upward tines. Leave gaps between all branches.
Show answer and check
Two mirrored main beams with four distinct tines each and visible gaps.
Why: Front-view antlers test branching clarity without body distractions.
Check: Trace each tine to its starting point on the beam and check that no two start from the same spot.
Exercise 3
Draw a back leg with an upper segment, lower segment, hock joint, and hoof. Mark the hock about one-quarter of the leg length above the baseline.
Show answer and check
A back leg with a clear hock joint and a hoof on the baseline.
Why: The hock position is the main structural feature of the back leg.
Check: Measure the hock height against total leg length and confirm the hoof meets the baseline.
Exercise 4
Draw a full reindeer with a body 2H long. Use three forward tines per antler and offset the far legs slightly. Check that all hooves reach the baseline.
Show answer and check
A full reindeer with branched antlers, offset far legs, and all hooves on the baseline.
Why: This combines proportion, branching, and leg depth in one drawing.
Check: Use the rubric: body length, tine spacing, joint clarity, and baseline contact.
Common mistakes
- Antler tines all start from the same point on the main beam. Space tine starting points along the beam and leave visible gaps between branches.
- Legs are drawn as straight sticks with no joints. Mark elbow, knee, and hock points, then draw upper and lower segments with slight angles.
- Hooves float above or sink below the ground baseline. Draw the baseline first and check every hoof meets it.
- Body is much longer or shorter than two head-lengths. Measure with your H unit and adjust the body oval before adding details.
Self-check rubric
- Body length is about two head-lengths and height about one head-length at the shoulder.
- Antlers have a main beam with at least three distinct tines per side, spaced with visible gaps.
- Legs show upper and lower segments with elbow, knee, and hock points.
- All visible hooves meet the ground baseline.
- Valid alternatives are accepted: different tine counts, loose antler mirroring, and varied leg angles.
Questions and answers
How many tines should each antler have?
A simple convention is three forward and two upward tines per side, but real antlers vary. The rubric accepts any clear branching with distinct starting points and visible gaps.
Do I need to draw all four legs?
Yes, but far legs can be offset or partly hidden. The key is that the visible legs show joints and hooves meeting the baseline.
What does baseline to midline mean here?
It is a handwriting convention for x-height, not a reindeer proportion rule. For the reindeer, use head-length units instead.
Can I use different leg angles?
Yes. The rubric allows valid alternatives as long as joints are clear and hooves reach the baseline.