Free original lessons
Drawing a Restaurant Facade: Signage and Seating Layout
Plan and sketch a restaurant front with clear signage and outdoor seating using measured guides, a simple convention, and checkable layout steps.
Free lesson
Four exercises
Worked answers
Object Drawing Lessons
This lesson teaches a repeatable way to draw a restaurant facade that reads clearly: a storefront wall, a sign band, an entrance, and outdoor seating arranged so guests can move. You will use a simple drawing convention: the baseline is the ground line, and the midline is the typical seated eye level, roughly 1.2 m above the baseline in a hypothetical example. Letter heights are measured from baseline to midline only when you choose that convention; real lettering varies, so treat x-height as a guide, not a universal rule. All measurements are hypothetical examples; measure your own paper and tools. The goal is a legible sketch, not a photorealistic rendering.
Practice materials: Printable downloads are not available for this lesson yet. Use the instructions and four exercises below.
Reference illustration
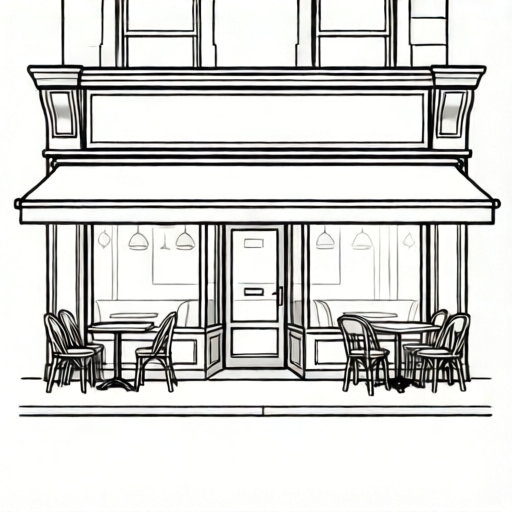
Use the stated measurements and conventions for each exercise.
Set the facade frame and ground line
Start with a rectangle that represents the visible storefront. Choose a scale you can check, for example 1 cm on paper equals 1 m in the hypothetical scene. Mark a baseline across the lower third of the frame; this is the ground where the facade meets the pavement. Mark a midline above it for seated eye level. Keep these two lines light so they can be erased or left as construction guides.
Decide the facade width and height before adding details. A hypothetical facade 8 m wide and 4 m high becomes 8 cm by 4 cm at the chosen scale. Check that the entrance and sign band fit inside this rectangle without crowding the edges.
- Draw the outer rectangle lightly.
- Mark the baseline and label it ground.
- Mark the midline and label it seated eye level.
- Write the scale at the corner, for example 1 cm = 1 m (hypothetical).
Place the sign band and lettering guide
The sign band is a horizontal strip above the entrance. Place it so the bottom edge sits above the door height and the top edge stays inside the facade. A hypothetical door height of 2.1 m and a sign band from 2.4 m to 3.2 m leaves a clear gap. Draw two light horizontal lines for the band, then a lettering guide line inside it.
Use the baseline-to-midline convention only if it suits your lettering style. For a sign, choose a consistent cap height, for example 0.4 m in the hypothetical scene, and mark it with two light lines. Letter styles vary, so the rubric rewards consistent height and spacing rather than one exact alphabet.
- Draw the sign band as a rectangle inside the facade.
- Add a lettering guide line for cap height.
- Sketch the restaurant name in simple block letters.
- Check that letters sit on the guide and do not touch the band edges.
Lay out the entrance and outdoor seating
Center or offset the entrance, then reserve a clear path from the door to the pavement. Outdoor seating goes to one or both sides of the path. Use simple circles for table tops and small rectangles for chairs. A hypothetical table diameter of 0.8 m becomes 0.8 cm at the chosen scale. Leave at least 0.9 m (0.9 cm) between table edges for a walking gap; this is a hypothetical example, not a standard.
Check the layout by counting seats and measuring gaps. If two tables and four chairs fit without overlapping the path, the arrangement is readable. Draw chairs slightly tucked under tables so the seating area looks intentional.
- Mark the door opening and the clear path.
- Place table circles at even spacing.
- Add chairs as small rectangles around each table.
- Measure the walking gap and adjust if it is too narrow.
Refine line weight and labels
Use heavier lines for the facade outline and lighter lines for construction guides. Label the sign band, entrance, and seating area with short notes. Keep labels outside the drawing or in a margin so they do not cover the sketch. A final check is to read the facade from left to right: sign, entrance, seating, and clear path should all be visible.
If a detail is unclear, simplify rather than add clutter. The rubric values legibility, consistent scale, and a checkable layout over decorative detail.
- Darken the facade outline and sign band edges.
- Erase or lighten unnecessary guides.
- Add short labels in the margin.
- Do a final read-through of the layout.
Worked example
At a scale of 1 cm = 1 m, draw a facade 6 cm wide and 3 cm high. Place a sign band from 1.8 cm to 2.4 cm above the baseline, a door 1.5 cm wide and 2.1 cm high, and two tables of 0.8 cm diameter with a 0.9 cm walking gap.
Worked answer
The facade rectangle is 6 cm by 3 cm. The sign band is a 6 cm by 0.6 cm strip between 1.8 cm and 2.4 cm above the baseline. The door sits on the baseline, 1.5 cm wide and 2.1 cm high, leaving 0.3 cm between the door top and the sign band bottom. Two table circles of 0.8 cm diameter are placed to one side with a 0.9 cm gap between their edges and the door path. Chairs are small rectangles around each table. The layout reads left to right: seating, clear path, door, sign band.
Four practice exercises
Exercise 1
At 1 cm = 1 m, draw a facade 7 cm wide and 3.5 cm high. Place a sign band from 2.2 cm to 2.8 cm above the baseline and a door 1.6 cm wide and 2.1 cm high. State the gap between the door top and the sign band bottom.
Show answer and check
The door top is at 2.1 cm. The sign band bottom is at 2.2 cm, so the gap is 2.2 minus 2.1 = 0.1 cm.
Why: Subtract the door height from the band bottom height. A positive result is the clear gap; a negative result would mean overlap, so the band would need to be raised.
Check: Measure the door height and band bottom on the drawing and subtract; the result should be positive and match 0.1 cm at the stated scale.
Exercise 2
At 1 cm = 1 m, place three table circles of 0.8 cm diameter in a row with 0.9 cm gaps between edges. What total width do they occupy?
Show answer and check
Three tables occupy 3 times 0.8 cm = 2.4 cm. Two gaps occupy 2 times 0.9 cm = 1.8 cm. Total width is 2.4 + 1.8 = 4.2 cm.
Why: Add the table diameters and the gaps between them.
Check: Measure the row on the drawing; it should be about 4.2 cm wide at the stated scale.
Exercise 3
A sign band is 5 cm wide. You want six letters with equal spacing and a 0.2 cm margin on each side. What is the available width for letters and gaps, and what is one possible letter width if gaps are 0.1 cm?
Show answer and check
Available width is 5 minus 0.2 minus 0.2 = 4.6 cm. Five gaps of 0.1 cm use 0.5 cm, leaving 4.1 cm for six letters, so each letter is about 0.68 cm wide.
Why: Subtract margins, subtract total gap width, then divide by the number of letters.
Check: Add margins, gaps, and letter widths back together; the total should equal 5 cm.
Exercise 4
At 1 cm = 1 m, a seating area is 3 cm wide. You place two tables of 0.8 cm diameter with a 0.9 cm gap between them and a 0.5 cm gap to each edge. Does it fit? Show the arithmetic.
Show answer and check
Total width is 0.5 + 0.8 + 0.9 + 0.8 + 0.5 = 3.5 cm. This exceeds 3 cm, so it does not fit. One fix: keep both edge gaps at 0.5 cm and reduce the gap between tables to 0.4 cm, giving 0.5 + 0.8 + 0.4 + 0.8 + 0.5 = 3.0 cm, which fits exactly. Another fix: use one table with 0.5 cm edge gaps, giving 0.5 + 0.8 + 0.5 = 1.8 cm, which fits with room to spare.
Why: Add all horizontal elements and compare with the available width.
Check: Measure the seating row on the drawing and compare with the 3 cm area width.
Common mistakes
- Drawing the sign band too low so it overlaps the door. Raise the band above the door height and recheck the gap with the scale.
- Placing tables so they block the entrance path. Reserve a clear path first, then place tables to the sides.
- Using inconsistent letter heights on the sign. Mark a cap-height guide and keep all letters between the same two lines.
- Mixing scales between the facade and the seating. Write the scale at the corner and measure every element with the same unit.
Self-check rubric
- Facade rectangle is drawn with a labeled baseline and a stated scale.
- Sign band is placed above the door with a measurable gap.
- Lettering uses a consistent cap-height guide or a clearly stated alternative convention.
- Entrance path is clear and measurable.
- Seating includes at least two tables and chairs with a measurable walking gap.
- Line weights distinguish outline from construction guides.
- Labels are short and placed outside the main drawing area.
Questions and answers
Do I need to use the baseline-to-midline convention for all lettering?
No. It is one convention for measuring x-height. Letter styles vary, so use it only if it helps you keep heights consistent.
How wide should the walking gap be?
Use a hypothetical example such as 0.9 m at your chosen scale, then measure your own drawing. The rubric checks that a gap exists and is measurable, not a universal standard.
Can the entrance be off-center?
Yes. Off-center entrances are valid if the sign band and seating still read clearly and the path is unobstructed.
What if my paper is a different size?
Choose a scale that fits your paper, write it at the corner, and keep all measurements consistent with that scale.