Free original lessons
Simple Pen Animal Drawings: Contour and Hatching Basics
Learn to draw a simple animal in pen using clean contour lines and directional hatching. Includes a worked example, four practice tasks, and a fair rubric.
Free lesson
Four exercises
Worked answers
Object Drawing Lessons
This lesson teaches a reliable pen-drawing method for simple animal studies. You will build the animal from a few contour lines, then add hatching to suggest form without realistic fur. The convention is explicit: contour lines define the outer edge and major internal divisions; hatching is a set of parallel or gently curved strokes that follow a chosen direction to darken an area. X-height is measured from baseline to midline for any lettering you add, and letter styles may vary. All numerical values here are hypothetical examples for practice, not equipment standards. Measure your own pen and paper if you need exact sizes.
Practice materials: Printable downloads are not available for this lesson yet. Use the instructions and four exercises below.
Reference illustration
Use the stated measurements and conventions for each exercise.
Contour first, hatching second
Begin with a light contour: one continuous outline for the body, plus a few internal lines for the head, ear, leg, or tail. Keep the pen moving and accept small wobbles; a simple animal reads clearly when the main shape is closed and the proportions are plausible.
Only after the contour is complete should you add hatching. Choose one light direction, such as from upper left to lower right, and keep most strokes parallel. Where the form turns away from the light, add a second layer at a slightly different angle to darken that area.
- Draw the body outline as one closed contour, then add the head and one visible ear.
- Add two leg lines and a tail line, checking that each joins the body contour.
- Mark a light direction with a small arrow outside the drawing.
- Hatch the shadow side with evenly spaced strokes, leaving the lit side mostly open.
- Add a second hatch layer only in the darkest small area, then stop.
Hatching direction guide
Hatching direction should follow the form, not the page edge. On a rounded back, curve the strokes slightly with the body. On a flat leg, keep strokes straight and parallel. Avoid crossing strokes at wide angles unless you intend a darker patch.
Spacing controls value: wider spacing gives a lighter tone, closer spacing gives a darker tone. A practical hypothetical example is strokes about 2 mm apart for light areas and about 1 mm apart for darker areas on a 15 cm drawing. Check your actual pen width before relying on any number.
- Draw five test strokes at 2 mm spacing on scrap paper.
- Draw five more at 1 mm spacing beside them.
- Compare which spacing matches the light and dark areas of your animal.
- Use the wider spacing first, then add the closer spacing only where needed.
Keeping the animal simple and readable
A simple animal study does not need every toe or whisker. Choose three or four features that identify the animal, such as ear shape, muzzle length, tail curve, and leg proportion. Leave the rest out.
If the contour becomes crowded, redraw on a fresh area rather than adding more lines. Pen cannot be erased, so a clean second attempt is often faster than repairing a confused first one.
- List the three features that make your animal recognizable.
- Draw only those features plus the body outline.
- Check the silhouette by looking at the drawing from a step back.
- Add hatching to one shadow area and leave at least half the drawing open.
Worked example
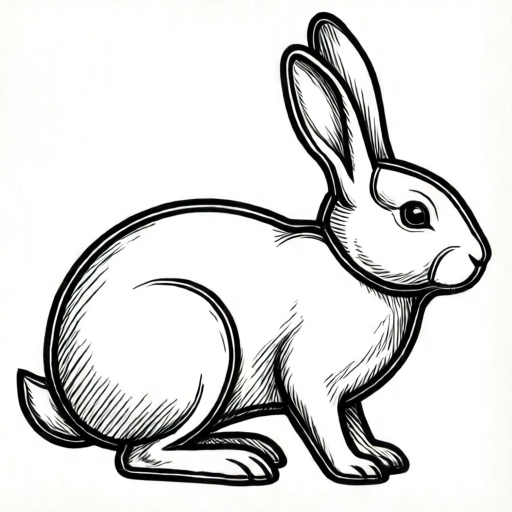
Draw a simple side-view rabbit in pen using one closed body contour, one ear contour, two leg lines, and directional hatching. Use a hypothetical light direction from upper left. Keep the drawing about 12 cm wide on your paper.
Worked answer
The finished study shows a closed oval body contour with a smaller head contour joined at the neck. One long ear contour rises from the head, and two straight leg lines join the lower body. A short tail line joins the rear. Hatching runs from upper left to lower right on the lower right side of the body and under the head. The upper left side is left open. A second hatch layer appears only in a small patch behind the front leg. The silhouette reads as a rabbit from a step back, and the hatching direction is consistent.
Four practice exercises
Exercise 1
Draw a simple side-view cat about 10 cm wide. Use one closed body contour, a head contour, two ear triangles, one tail curve, and two leg lines. Add hatching from upper right to lower left on the lower left side only. Leave the upper right side open.
Show answer and check
A recognizable cat silhouette with a closed body, joined head, two ear triangles, a curved tail, and two leg lines. Hatching appears only on the lower left side and runs consistently from upper right to lower left. The upper right side remains mostly open.
Why: The task tests contour closure, feature selection, and a single hatch direction. Keeping hatching on one side prevents a noisy result and makes the light direction readable.
Check: Look from a step back: is the animal recognizable? Are all contour lines joined? Do at least eighty percent of hatch strokes run in the stated direction? Is the upper right side mostly open?
Exercise 2
Draw a simple side-view bird about 8 cm wide. Use a closed body contour, a head circle joined to the body, a beak triangle, one wing line, and two leg lines. Hatch the underside of the body with strokes about 2 mm apart, then add a second layer about 1 mm apart in a small patch near the tail. These spacing values are hypothetical examples.
Show answer and check
A simple bird with a closed body, joined head, beak triangle, wing line, and two legs. The underside shows wider hatching first, then a small darker patch near the tail with closer spacing. The back remains open.
Why: The exercise practices two hatch spacings and limits the darker layer to a small area. The bird shape stays readable because the contour is simple and the hatching is confined.
Check: Measure a few hatch gaps with a ruler: are they close to the stated hypothetical values? Is the darker patch small? Does the bird silhouette read clearly from a step back?
Exercise 3
Draw a simple side-view fish about 9 cm wide. Use one closed body contour, a tail triangle, one fin line, and one eye dot. Hatch the lower half with gently curved strokes that follow the body curve. Keep the upper half open. Do not add scales.
Show answer and check
A simple fish with a closed body, tail triangle, fin line, and eye dot. The lower half has curved hatching that follows the body, while the upper half is open. No scale pattern is present.
Why: Curved hatching tests whether strokes follow form rather than the page edge. Omitting scales keeps the study in the contour-and-hatching boundary.
Check: Do the hatch strokes curve with the body outline? Is the upper half mostly open? Is there any scale pattern? Is the fish silhouette recognizable?
Exercise 4
Draw a simple side-view mouse about 7 cm wide. Use a closed body contour, a head contour, two ear circles, one tail curve, and two leg lines. Choose one light direction and state it beside the drawing. Hatch only the shadow side. Then check your drawing against the rubric.
Show answer and check
A recognizable mouse with joined contours, two ear circles, a tail curve, and two legs. A stated light direction appears beside the drawing, and hatching is limited to the shadow side with a consistent direction.
Why: This task adds an explicit light-direction decision, which makes the hatching choice checkable. The small size encourages simple contour and restrained hatching.
Check: Is the stated light direction consistent with the hatched side? Are the contours closed? Does the drawing meet at least four rubric items? Are valid alternative ear or tail shapes accepted if the silhouette reads clearly?
Common mistakes
- Hatching in many directions at once, which makes the animal look noisy. Choose one main hatch direction and keep at least eighty percent of strokes parallel or gently curved with the form.
- Drawing hatching before the contour is closed. Finish and check the outline first; then hatch only inside or just outside the shadow edge.
- Making the hatching too dark everywhere. Leave the lit side open and add a second layer only in one small dark area.
- Adding realistic fur detail that hides the simple shape. Use short hatch strokes as tone, not as individual hairs; keep the contour readable.
Self-check rubric
- Contour is closed and the animal silhouette is recognizable from a step back.
- At least three identifying features are present, such as ear, muzzle, tail, or leg proportion.
- Hatching follows one main direction and is mostly parallel or gently curved with the form.
- Lit side is mostly open and dark areas are limited to one or two small patches.
- Line spacing is deliberate and checkable against the chosen pen width.
- Valid alternative styles are accepted if the contour and hatch direction remain clear.
Questions and answers
Can I use a different pen width?
Yes. Measure your pen line width on scrap paper and adjust hatch spacing so the strokes remain distinct. The 1 mm and 2 mm values are hypothetical examples only.
What if my contour line is not perfectly smooth?
Small wobbles are acceptable if the shape is closed and the main proportions read correctly. A simple animal does not require a mechanically perfect line.
How do I decide where to hatch?
Pick one light direction, then hatch the side facing away from it. Keep the lit side mostly open and add a second layer only in the darkest small area.
Is lettering required?
No. If you add a label, use any clear letter style. X-height is measured from baseline to midline, and styles may vary.