Free original lessons
Draw the Titanic Sinking: Tilted Deck, Lifeboats, and Wave Breakup
Learn to compose a Titanic sinking scene with a measured deck tilt, clear lifeboat placement, and breaking waves using a simple drawing convention.
Free lesson
Four exercises
Worked answers
Object Drawing Lessons
This lesson teaches a repeatable way to draw the Titanic sinking scene. You will set a deck tilt angle, place lifeboats along the sloping deck, and show wave breakup around the hull. The method uses a simple convention: the ship's midline is the reference for tilt, and the waterline is drawn as a broken line where waves cross the hull. Lettering and small details may vary; the rubric rewards clear structure and consistent measurement rather than a single perfect copy. All measurements are hypothetical examples you can adjust to your paper size.
Practice materials: Printable downloads are not available for this lesson yet. Use the instructions and four exercises below.
Reference illustration
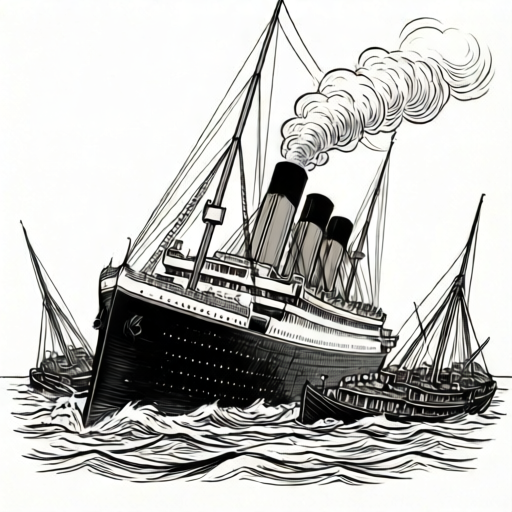
Use the stated measurements and conventions for each exercise.
Setting the tilted deck angle
Begin by drawing a light horizontal waterline across the lower third of your page. Mark a point on the waterline where the ship's bow will meet the water. From that point, draw the deck line upward at a chosen angle. For this lesson, use a hypothetical tilt of 20 degrees above the waterline. Measure the angle with a protractor or by counting grid squares: a 20-degree rise means about 1 unit up for every 2.75 units along (or roughly 1 unit up for every 3 units along gives about 18 degrees). Label the angle near the bow so you can check it later.
The deck line is the ship's midline. All superstructure, funnels, and lifeboat davits sit relative to this line. Keep the deck line straight; the sinking tilt is a single rotation, not a curve. If your paper is small, a 15-degree tilt is easier to see; the exact number is your choice, but write it down and keep it consistent.
- Draw a horizontal waterline and mark the bow contact point.
- From the bow point, draw the deck line at your chosen angle (example: 20 degrees).
- Label the angle and note the rise-to-run ratio you used.
- Check that the deck line is straight and that the stern end is higher than the bow.
Placing lifeboats along the sloping deck
Lifeboats hang from davits along the deck edge. Because the deck is tilted, each boat's hanging line stays vertical while the deck slopes beneath it. Draw three or four small boat shapes as ovals or rounded rectangles. Place them at intervals along the deck line, but drop each boat slightly below the deck edge to show it hanging. The gap between boat and deck should grow toward the stern if the ship is tilting bow-down, because the stern rises away from the water.
Use a simple placement guide: divide the visible deck into four equal segments and put one boat near each division, skipping the segment closest to the bow if it is already underwater. Keep boats roughly the same size; variation in size suggests distance, not importance. Draw thin vertical lines from davit to boat to show hanging.
- Mark four equal segments along the visible deck line.
- Choose three or four segment positions for lifeboats.
- Draw each boat as a small oval below the deck edge.
- Add a vertical davit line from deck to boat.
- Check that all davit lines are vertical, not tilted with the deck.
Showing wave breakup around the hull
Waves break against the hull where it meets the water. Draw the waterline as a broken, jagged line rather than a smooth curve. Where the hull cuts the water, add short white gaps or splash marks. Use a repeating pattern: a wave crest, a gap, then a splash. Keep the pattern irregular but consistent in scale. The bow area should show more breakup because it is lower and meeting more water.
A simple convention is to draw three wave crests on each side of the hull, with one splash mark between each pair. This is a hypothetical guide, not a rule. The goal is to make the waterline read as active and broken, not calm.
- Replace the smooth waterline near the hull with a jagged line.
- Add three crest-and-splash groups along each side.
- Increase splash density near the bow.
- Check that the waterline still reads as roughly horizontal overall.
Composing the full scene
Combine the deck line, lifeboats, and wave breakup inside a blank scene frame. Leave space above the stern for sky and below the bow for water. The stern should be the highest point of the ship. Lifeboats should sit between deck and water, never above the stern. Use light pencil for construction lines and darker pencil for final lines. Erase construction lines only after checking the angle and boat placement.
A useful check is to trace the deck line with your finger and confirm every boat hangs below it. Then trace the waterline and confirm the hull crosses it at the bow. If the stern is not the highest point, adjust the deck angle before adding detail.
- Draw a blank scene frame with sky above and water below.
- Place the deck line so the stern is highest.
- Add lifeboats below the deck edge.
- Add wave breakup at the hull-water contact.
- Check stern height, boat hanging, and waterline continuity.
Worked example
A student draws a deck line rising 2 cm over 6 cm from the bow. They place three lifeboats at equal intervals along the deck. The waterline is smooth. Identify two improvements and state a check.
Worked answer
First, break the smooth waterline into crests and splash marks near the hull. Second, confirm each lifeboat hangs vertically below the deck edge rather than tilting with it. Check by tracing the deck line: the rise is 2 cm over 6 cm, which is about 18 degrees, close to the example 20 degrees. The stern should be the highest point.
Four practice exercises
Exercise 1
Draw a deck line rising 1 unit over 4 units from the bow. Label the rise-to-run ratio. Place two lifeboats below the deck edge. Describe where the stern is.
Show answer and check
The deck line rises 1 unit for every 4 units along. Two lifeboats hang below the deck edge at intervals. The stern is the highest point of the deck line.
Why: A 1:4 rise-to-run gives a shallow tilt that is easy to check. Hanging boats below the deck edge shows the vertical davit convention. The stern must be highest in a bow-down scene.
Check: Trace the deck line and confirm it rises 1 unit for every 4 units. Confirm both boats are below the deck edge and the stern is highest.
Exercise 2
A scene shows a smooth waterline and three lifeboats tilted with the deck. State two fixes and one check.
Show answer and check
Fix one: break the waterline into crests and splash marks. Fix two: redraw lifeboats hanging vertically below the deck edge. Check: all davit lines are vertical.
Why: Smooth waterline hides wave breakup. Tilted boats contradict the hanging convention. Vertical davit lines are the simplest check.
Check: Hold a straight edge vertically beside each davit line; it should align. Confirm the waterline has at least three breaks near the hull.
Exercise 3
Plan a scene frame with sky above and water below. The deck line starts at the bow on the waterline and rises 3 cm over 9 cm. How many equal deck segments can you mark if each segment is 3 cm along the deck?
Show answer and check
Three equal segments of 3 cm each along the 9 cm deck line.
Why: 9 cm divided by 3 cm per segment equals 3 segments. This is simple arithmetic with consistent units.
Check: Measure the deck line length and divide by segment length. Confirm the result is a whole number.
Exercise 4
Draw three wave crest groups on each side of the hull. Each group has one crest and one splash. How many splash marks are there in total? Describe one valid alternative pattern.
Show answer and check
Six splash marks total, three per side. A valid alternative is two crest groups per side with one splash between groups, giving four splash marks.
Why: Three groups per side times two sides equals six groups, each with one splash. Alternatives are valid if the pattern is consistent and reads as breakup.
Check: Count splash marks and confirm they are distributed on both sides. Confirm the pattern is regular enough to read as waves.
Common mistakes
- Tilting the lifeboats with the deck instead of hanging them vertically. Draw davit lines straight down from the deck edge and hang each boat below the line.
- Making the waterline perfectly smooth around the hull. Break the waterline into crests and gaps, adding splash marks where the hull meets water.
- Placing the stern lower than the bow. Check the deck angle: the stern must be the highest point in a bow-down sinking scene.
- Using different tilt angles for different parts of the ship. Keep one straight deck line and rotate all superstructure relative to it.
Self-check rubric
- Deck line is straight and tilted with the stern highest.
- Tilt angle is labeled or recorded and used consistently.
- Three or four lifeboats hang vertically below the deck edge.
- Waterline is broken with crests and splash marks near the hull.
- Scene frame includes sky above and water below.
- Construction lines are light and final lines are clear.
- Valid alternatives are accepted if structure and measurement are consistent.
Questions and answers
What angle should the deck be?
Any clear angle works. This lesson uses a hypothetical 20 degrees as an example. Measure your own angle and keep it consistent.
How many lifeboats should I draw?
Three or four is enough to read clearly. Place them along the visible deck, skipping areas already underwater.
Do I need to draw every wave?
No. A repeating crest-and-splash pattern near the hull is enough to show breakup.
Can I use a ruler for the deck line?
Yes. A ruler helps keep the deck line straight, which makes the tilt easier to check.