Free original lessons
Dragon Wing Drawing: Bone Struts, Membrane Panels, and Folded vs Spread Forms
Learn to draw a single dragon wing by mapping leading-edge bone, finger struts, and membrane panels, then compare folded and spread variants using a clear structural convention.
Free lesson
Four exercises
Worked answers
Object Drawing Lessons
This lesson treats a dragon wing as a foldable membrane structure supported by a leading-edge bone and several finger struts. You will first map the struts and attachment points, then draw a spread wing and a folded wing from the same structural plan. The goal is consistent anatomy across both variants, not a single decorative style. Use the convention below: x-height means the distance from baseline to midline in your own lettering; letter styles vary, so keep your labels legible rather than uniform. All measurements are hypothetical examples unless you measure your own paper and tools.
Practice materials: Printable downloads are not available for this lesson yet. Use the instructions and four exercises below.
Reference illustration
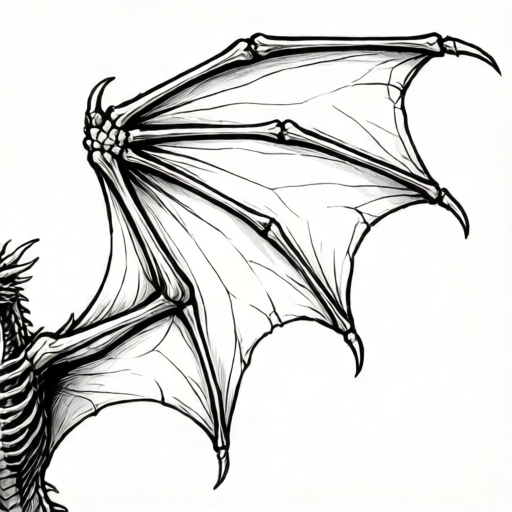
Use the stated measurements and conventions for each exercise.
Map the structural anatomy before drawing the outline
A dragon wing is easiest to draw when you separate structure from surface. Structure is the leading-edge bone, the finger struts, the wrist joint, and the membrane attachment points. Surface is the membrane itself, including how it sags between struts and how it gathers when folded.
Draw a light centerline for the leading-edge bone from shoulder to wrist. Add three or four finger struts radiating from the wrist. Mark membrane attachment points along the leading edge and at the tip of each strut. These points control where membrane panels meet bone.
Use a simple convention for labels: write at x-height between baseline and midline so labels stay compact. If your lettering style differs, keep the same relative size so the diagram remains readable.
- Draw the leading-edge bone as a gentle curve from shoulder to wrist.
- Add a wrist joint and three finger struts fanning outward.
- Mark attachment points at the wrist, along the leading edge, and at each strut tip.
- Number the membrane panels between adjacent struts so you can track them in both variants.
Draw the spread wing with membrane panels
In the spread variant, the struts fan wide and the membrane panels are under tension. Draw each panel as a shallow curve between two struts, sagging slightly toward the trailing edge. The panel nearest the body is usually widest; the outer panels narrow toward the tip.
Shade the membrane with a light gradient that follows the panel direction, not the strut direction. This helps the viewer read the membrane as a surface stretched between bones. Keep the leading edge visually heavier than the trailing edge.
Check that every strut tip connects to a membrane attachment point and that no panel crosses a strut without a joint.
- Draw the spread strut fan from the wrist.
- Connect strut tips with shallow membrane curves.
- Add panel numbers between adjacent struts.
- Shade each panel with strokes parallel to its sag direction.
Draw the folded wing from the same plan
In the folded variant, the struts rotate toward the body and the membrane panels gather into overlapping folds. The leading-edge bone stays prominent, but the finger struts appear shorter because they are angled toward the viewer or tucked behind the body.
Draw the folded wing by keeping the same attachment points but moving the strut tips closer together. Membrane panels should overlap in a consistent order: the panel nearest the body folds first, then the outer panels stack behind it.
Use a dashed line to show a strut that is hidden behind a membrane fold. This keeps the structure readable without pretending the bone disappeared.
- Start with the same leading-edge bone and wrist joint.
- Rotate strut tips toward the body to create the folded fan.
- Draw membrane folds as overlapping curves, keeping panel numbers visible.
- Use dashed lines for struts hidden behind membrane.
Compare variants and refine the membrane shading
Place the spread and folded drawings side by side. Check that the same number of struts and panels appears in both. The folded version may hide a strut, but the attachment points should still correspond.
Refine shading by darkening the crease lines in the folded wing and lightening the stretched areas in the spread wing. Avoid shading that contradicts the panel direction.
If you measure your paper, record the actual width and height in the same units. For example, a hypothetical 20 cm by 15 cm panel gives a simple area check: 20 times 15 equals 300 square cm.
- Compare strut count and panel count between variants.
- Darken fold creases and lighten stretched membrane.
- Label any measured dimensions with units.
- Check that shading follows panel sag, not bone direction.
Worked example
A learner draws a spread wing with four struts and three membrane panels, then a folded wing with only two visible struts. They want to check whether the folded wing is structurally consistent.
Worked answer
The folded wing is consistent if the two hidden struts are shown with dashed lines behind membrane folds and the same three panel numbers appear. Count struts: four total, two visible, two dashed. Count panels: three, with the outer panels overlapping. If the learner measured a hypothetical 18 cm leading edge and 12 cm trailing span, the area check is 18 times 12 equals 216 square cm, labeled as a hypothetical example.
Four practice exercises
Exercise 1
Draw a spread wing with three struts and two membrane panels. Label the leading-edge bone, wrist joint, and both panels. Describe where each panel sags.
Show answer and check
A valid drawing shows a leading-edge bone from shoulder to wrist, three struts fanning from the wrist, and two panels between adjacent struts. Each panel sags shallowly toward the trailing edge. Panel 1 sits between strut 1 and strut 2; panel 2 sits between strut 2 and strut 3.
Why: The structure requires a leading edge, a wrist joint, and struts that define panel boundaries. Sag direction follows the trailing edge, not the struts.
Check: Count struts (three) and panels (two). Confirm each panel touches two struts and the trailing membrane edge. Check that no panel crosses a strut without a joint.
Exercise 2
Convert the spread wing from the previous exercise into a folded wing. Keep the same three struts and two panels. Show one strut hidden behind a membrane fold using a dashed line.
Show answer and check
A valid folded wing rotates the strut tips toward the body, overlaps panel 1 over panel 2, and shows the middle strut as a dashed line behind the fold. The leading-edge bone and wrist joint remain in the same relative position.
Why: Folding changes strut angles and panel overlap, not the underlying count or attachment points. Dashed lines preserve structural traceability.
Check: Verify three struts total (two solid, one dashed) and two numbered panels. Confirm the dashed strut connects to the same wrist and attachment point as in the spread version.
Exercise 3
A learner shades a spread wing with strokes running from wrist to tip along the struts. Explain why this shading is inconsistent and describe a better direction.
Show answer and check
Shading along struts makes the membrane look rigid and bone-like. A better direction is parallel to each panel's sag, which runs roughly from leading edge toward trailing edge between adjacent struts.
Why: Membrane shading should describe surface tension and sag, not the underlying bone direction. Panel-based shading keeps the membrane readable.
Check: Compare shading strokes to panel sag lines. If strokes cross panel boundaries without following sag, revise them.
Exercise 4
Using a hypothetical 16 cm leading edge and 10 cm trailing span, calculate a simple area check for one rectangular membrane panel. State the units and label the values as hypothetical.
Show answer and check
16 cm times 10 cm equals 160 square cm. Label the result as a hypothetical example because the dimensions are chosen, not measured from actual equipment.
Why: Area equals length times width when the panel is treated as a rectangle for a simple check. Consistent units keep the arithmetic checkable.
Check: Recompute 16 times 10 to confirm 160. Confirm both dimensions use centimeters and the result uses square centimeters.
Common mistakes
- Drawing membrane panels as straight lines between struts. Use shallow curves that sag toward the trailing edge so the membrane reads as flexible.
- Changing the number of struts between spread and folded variants. Keep the same strut count and attachment points; only rotate or hide struts in the folded version.
- Shading across panels instead of along them. Shade parallel to each panel's sag direction and keep crease lines darker in folds.
- Letting membrane cross a strut without a joint. Mark every strut tip and leading-edge attachment point before drawing membrane curves.
Self-check rubric
- Leading-edge bone is clearly drawn from shoulder to wrist.
- Three or four finger struts radiate from the wrist and connect to membrane attachment points.
- Membrane panels sag between struts and do not cross struts without joints.
- Spread and folded variants use the same strut count and panel numbering.
- Folded wing shows hidden struts with dashed lines and consistent fold order.
- Shading follows panel sag direction, with darker creases in folds.
- Labels sit between baseline and midline at x-height; alternative lettering styles are acceptable if readable.
- Any numerical measurements use consistent units and are labeled as hypothetical examples unless measured from actual equipment.
Questions and answers
How many finger struts should a dragon wing have?
Use three or four for this lesson. The exact number is a design choice; what matters is keeping the same count in both variants.
Can I use a different lettering style for labels?
Yes. The convention only requires that labels sit between baseline and midline at x-height so they stay compact and readable.
Do I need to measure my paper?
Only if you want a numerical check. Measure your actual paper and label any chosen values as hypothetical examples with consistent units.
How do I show a strut hidden in the folded wing?
Use a dashed line behind the membrane fold so the structure remains traceable without pretending the bone vanished.