Free original lessons
Line Drawing a Leaf: Midrib, Veins, and Serrated Edge
Learn to draw a single leaf in line: build the midrib, branch secondary veins, shape a serrated margin, and check contour and vein logic with simple steps.
Free lesson
Four exercises
Worked answers
Object Drawing Lessons
This lesson teaches a reliable order for drawing one leaf in line. You will place a midrib, branch secondary veins at consistent angles, shape a serrated edge, and finish a clean contour. The method works for many leaf shapes because it separates structure from outline: first the spine, then the branching, then the edge. Use a pencil and paper. Keep line weight light until the final contour. The convention for judging line art here is explicit: x-height means the distance from baseline to midline in your own lettering or labeling, and letter styles vary, so labels may be printed, cursive, or mixed as long as they are legible. No single universal leaf outline is required; valid alternatives are accepted when the vein logic and edge rhythm are consistent.
Practice materials: Printable downloads are not available for this lesson yet. Use the instructions and four exercises below.
Reference illustration
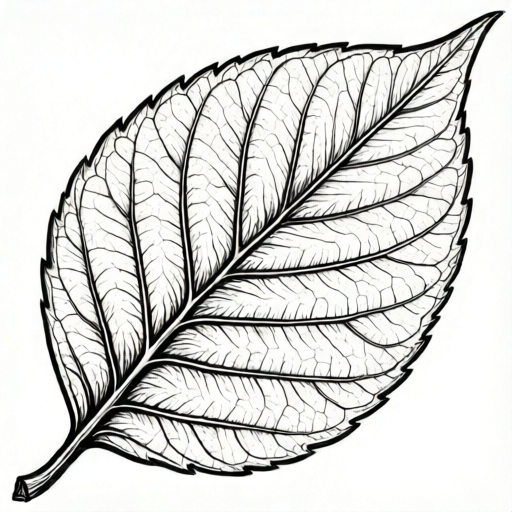
Use the stated measurements and conventions for each exercise.
Build the midrib first
Start with a light straight or gently curved line for the midrib. Its length sets the leaf's overall size. Mark a petiole stub at the base, about one-tenth of the midrib length, so the leaf has a clear attachment point.
Choose a midpoint and mark it faintly. This helps you balance secondary veins on both sides. Keep the midrib slightly curved if your reference leaf curves; a straight midrib is also valid when the leaf is symmetric.
- Draw a light midrib line from base to tip.
- Add a short petiole stub at the base.
- Mark the midpoint and the tip with small ticks.
- Check that the midrib is not thicker than the final contour will be.
Branch secondary veins with a consistent angle
Secondary veins leave the midrib and travel toward the margin. Pick a working angle, for example about 45 degrees from the midrib, and keep it roughly consistent. Veins near the base may be longer; veins near the tip shorter. Space them evenly enough that the pattern reads as a network rather than random scratches.
Alternate sides as you go: one vein left, one right, moving from base to tip. Stop each secondary vein just short of the margin so the edge contour remains clear. A few tertiary branches can split from secondary veins, but keep them shorter and lighter.
- Mark four to six vein start points along the midrib.
- Draw each secondary vein at a similar angle, alternating sides.
- Stop veins a small gap before the intended margin.
- Add one or two short tertiary branches where the pattern looks sparse.
Shape the serrated margin and contour
The margin is the leaf's outer edge. Serration means small tooth-like projections. Decide a tooth rhythm: for example, one tooth per secondary vein end, with a shallow notch between teeth. Keep tooth depth modest so the leaf does not look like a saw blade.
Draw the contour last, connecting the vein ends with gentle curves and small teeth. The contour should pass near, not through, the vein tips. Check that the left and right sides have similar tooth counts; exact symmetry is not required, but the rhythm should be readable.
- Lightly mark tooth tips opposite each secondary vein end.
- Connect marks with shallow notches to form the serrated edge.
- Refine the contour so it flows from petiole to tip.
- Darken the final contour and midrib slightly more than the veins.
Check vein logic and edge rhythm
A finished line leaf should read clearly at a glance. Check three things: the midrib runs base to tip without breaks, secondary veins branch from the midrib rather than floating, and the margin teeth follow a repeatable rhythm. If a vein crosses the contour, shorten it. If teeth are uneven in size, adjust two or three rather than redrawing everything.
Labeling is optional. If you label parts, use legible lettering; x-height is baseline to midline, and letter styles vary. A printed label and a cursive label are both acceptable when readable.
- Trace each secondary vein back to the midrib.
- Confirm no vein crosses the final contour.
- Count teeth on each side and adjust outliers.
- Erase construction ticks and keep the final line clean.
Worked example
Draw a simple leaf 10 cm long with a straight midrib, five secondary veins per side at about 45 degrees, and a shallow serrated margin with one tooth per vein end.
Worked answer
A light midrib 10 cm long with a 1 cm petiole stub. Five vein start points per side spaced along the midrib; each secondary vein about 45 degrees, stopping 3 mm before the margin. Tooth tips marked opposite vein ends, connected by shallow notches. Final contour flows from petiole to tip; midrib and contour slightly darker than veins. Check: every vein traces to the midrib, no vein crosses the contour, and each side has five teeth.
Four practice exercises
Exercise 1
Draw a leaf 8 cm long with a gently curved midrib, four secondary veins per side at about 40 degrees, and a serrated margin with one tooth per vein end. Describe your construction order.
Show answer and check
A curved midrib 8 cm long with a 0.8 cm petiole stub. Four vein start points per side; secondary veins at about 40 degrees stopping 2 mm before the margin. Tooth tips opposite vein ends, shallow notches, final contour from petiole to tip. Construction order: midrib, petiole, vein starts, secondary veins, tooth marks, contour, darken main lines.
Why: The curved midrib sets size and direction. Four veins per side keep the pattern readable at 8 cm. Stopping veins before the margin preserves a clean contour. One tooth per vein end gives a repeatable rhythm.
Check: Trace each secondary vein to the midrib; confirm no vein crosses the contour; count four teeth per side; check petiole stub is about one-tenth of midrib length.
Exercise 2
A learner draws a leaf with six veins on the left and three on the right, and two veins cross the outline. Identify the problems and state two fixes.
Show answer and check
Problem one: uneven vein count makes the pattern read as unbalanced. Problem two: veins crossing the contour break the edge logic. Fix one: add two or three veins on the right at the same working angle. Fix two: shorten the crossing veins so they stop a small gap before the margin.
Why: Vein counts need not be perfectly equal, but a large difference weakens the network. Veins should support the contour, not pierce it. Adjusting locally is faster than redrawing.
Check: Count veins per side and compare; trace crossing veins back to the midrib and measure the gap to the contour; confirm the margin teeth still align with vein ends.
Exercise 3
Draw a leaf 12 cm long with a straight midrib, five secondary veins per side at about 50 degrees, and a margin with two teeth between adjacent vein ends. State one hypothetical numerical value you chose and why.
Show answer and check
A straight midrib 12 cm with a 1.2 cm petiole stub. Five vein starts per side; secondary veins at about 50 degrees stopping 3 mm before the margin. Two shallow teeth between adjacent vein ends, so ten teeth per side. Hypothetical example: tooth depth 2 mm, chosen to keep notches shallow relative to leaf width.
Why: A longer leaf allows more teeth without crowding. Two teeth per interval creates a finer rhythm. The 2 mm depth is a hypothetical example, not a standard; it keeps the edge readable.
Check: Count five vein starts per side and ten teeth per side; confirm each vein stops before the contour; check tooth depth is small compared with leaf width; trace veins to the midrib.
Exercise 4
Draw a leaf 9 cm long with a slightly curved midrib, four secondary veins per side at about 45 degrees, and one short tertiary branch from two of the secondary veins. Describe how you keep the tertiary branches from crowding the margin.
Show answer and check
A curved midrib 9 cm with a 0.9 cm petiole stub. Four secondary veins per side at about 45 degrees, stopping 2 mm before the margin. Add one short tertiary branch from two secondary veins, each tertiary branch ending well inside the margin. Keep tertiary lines lighter and shorter than secondary veins. Final contour with one tooth per vein end.
Why: Tertiary branches add network detail but can clutter the edge. Keeping them short and inside the margin preserves the contour. Lighter line weight keeps hierarchy clear.
Check: Confirm tertiary branches start from secondary veins, not the midrib; check they end inside the margin; count four teeth per side; trace all veins back to the midrib.
Common mistakes
- Drawing the outline first and forcing veins inside it. Build the midrib and vein pattern first, then shape the contour around the vein ends.
- Making secondary veins at wildly different angles. Choose one working angle and keep it roughly consistent, allowing small natural variation.
- Cutting teeth too deep so the leaf looks jagged. Use shallow notches and keep tooth depth modest relative to leaf width.
- Letting veins run past the margin. Stop each vein a small gap before the contour and check by tracing back to the midrib.
Self-check rubric
- Midrib runs continuously from petiole to tip and is clearly the main axis.
- Secondary veins branch from the midrib at a roughly consistent angle and alternate sides.
- Vein tips stop short of the margin; no vein crosses the final contour.
- Margin shows a readable serrated rhythm with shallow notches and similar tooth counts per side.
- Contour flows from petiole to tip without abrupt breaks.
- Line weight separates midrib and contour from lighter veins.
- Any labels are legible; x-height is baseline to midline and letter style may vary.
Questions and answers
Do I need a real leaf to draw from?
No. The steps work from a described shape. If you have a leaf, use it to guide curve and tooth rhythm, but the construction order stays the same.
How many secondary veins should I draw?
Four to six per side is a practical starting range. Fewer looks sparse; more can crowd the line drawing. Adjust to leaf size.
Must the leaf be perfectly symmetrical?
No. Valid alternatives include slight asymmetry. Keep the vein logic and tooth rhythm consistent rather than forcing mirror symmetry.
What does x-height mean here?
X-height is the distance from baseline to midline in your lettering. Letter styles vary, so labels may be printed or cursive as long as they are legible.