Free original lessons
Draw a Generic Mammal with Mass Shapes and Joint Landmarks
Build any four-legged mammal from ovoid body masses, labeled joint circles, and fur-direction arrows using a repeatable construction method.
Free lesson
Four exercises
Worked answers
Object Drawing Lessons
This lesson teaches a general construction method for a four-legged mammal. You will not copy a particular species. Instead, you will place a few ovoid masses for the head, chest, abdomen, and hindquarters, then locate the main limb joints as circles, and finally add fur-direction arrows that follow the body's curvature. The method works for many mammals because it focuses on mass distribution and joint landmarks rather than species-specific anatomy. Work on plain paper with a pencil. Keep your lines light at first so you can adjust proportions. Measure your own paper and drawing tools if you need numerical values; any numbers given here are hypothetical examples for practice, not standards. The goal is a clear, readable mammal figure that you can adapt by changing mass sizes and joint positions.
Practice materials: Printable downloads are not available for this lesson yet. Use the instructions and four exercises below.
Reference illustration
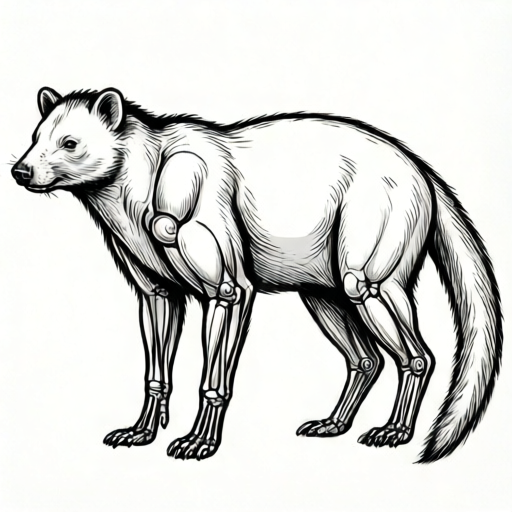
Use the stated measurements and conventions for each exercise.
Set up the page and place body masses
Begin by deciding the overall size of your mammal on the page. Leave room for the legs and tail. Draw a light horizontal line for the ground. Place the largest ovoid for the abdomen slightly above the ground line, then add a chest ovoid in front and a hindquarter ovoid behind. Overlap the ovoids so they read as one continuous body. Add a smaller head ovoid at the front, connected by a short neck mass. Keep all masses light and adjustable.
Use simple ovoids rather than detailed outlines. The abdomen is usually the largest mass, the chest is slightly smaller and higher, and the hindquarters are similar in size to the chest. The head is the smallest mass. These relationships are general, not fixed rules. If your mammal looks too front-heavy, shift the chest ovoid slightly back or reduce its size. If it looks too long, shorten the abdomen ovoid.
- Draw a light ground line and mark the total length you want.
- Place the abdomen ovoid above the ground line, centered between front and back.
- Add the chest ovoid in front, overlapping the abdomen.
- Add the hindquarter ovoid behind, overlapping the abdomen.
- Place the head ovoid at the front and connect it with a short neck mass.
Locate limb joints as circles
Each leg has three main joint landmarks: shoulder or hip, elbow or knee, and wrist or ankle. Draw a small circle at each landmark. For the front leg, place the shoulder circle where the chest mass meets the leg, the elbow circle below and slightly back, and the wrist circle near the ground. For the hind leg, place the hip circle where the hindquarter mass meets the leg, the knee circle below and slightly forward, and the ankle circle near the ground. Connect the circles with light lines to suggest the limb.
Joint circles are landmarks, not final details. They help you keep the leg segments proportional and the joints aligned. Check that the front and hind legs reach the ground line at similar heights. If one leg is too short, move its lowest joint circle down. If a joint looks misplaced, erase and redraw the circle before adding any fur cues.
- Mark the shoulder circle on the front leg and the hip circle on the hind leg.
- Add the elbow circle below the shoulder and the knee circle below the hip.
- Add the wrist and ankle circles near the ground line.
- Connect the circles with light lines to form each limb.
- Check that all four feet reach the ground line at similar heights.
Add fur-direction arrows
Fur direction follows the body's curvature and the pull of gravity. Draw short arrows on the body masses to show which way the fur would lie. On the back, arrows generally point from front to back. On the chest and abdomen, arrows curve downward and backward. On the legs, arrows point down toward the feet. On the tail, arrows point away from the body. These are general cues, not a single correct pattern. Different mammals have different fur patterns, so treat the arrows as a guide for consistent direction rather than a fixed answer.
Keep the arrows short and evenly spaced. They should suggest flow without becoming a texture pattern. If an arrow crosses a joint circle, shorten it so the joint remains readable. Use the arrows to check that your masses and joints make sense together: fur should flow smoothly over the body and down the limbs.
- Draw short arrows along the back pointing from front to back.
- Curve arrows downward and backward over the chest and abdomen.
- Point arrows down the legs toward the feet.
- Point arrows away from the body along the tail.
- Check that arrows do not obscure joint circles.
Refine and check the construction
Once the masses, joints, and fur arrows are in place, darken the lines you want to keep. Erase the light construction lines that are no longer needed, but keep the joint circles visible as reference points. Check that the body masses overlap smoothly, that the legs are balanced, and that the fur arrows follow a consistent direction. If the mammal looks unstable, adjust the ground contact points or shift a mass slightly.
Use a simple rubric to evaluate your drawing. The rubric should reward clear mass shapes, readable joint landmarks, consistent fur direction, and overall balance. Valid alternatives are allowed: a heavier abdomen, a longer neck, or a shorter tail can all be correct for a generic mammal. The goal is a coherent construction, not a single universal answer.
- Darken the final lines and erase unnecessary construction marks.
- Keep joint circles visible as reference points.
- Check mass overlap, leg balance, and fur direction.
- Adjust any unstable or unclear areas.
- Evaluate the drawing against the rubric.
Worked example
A learner draws a generic mammal on a page with a ground line. They place an abdomen ovoid 6 cm long, a chest ovoid 4 cm long, a hindquarter ovoid 4 cm long, and a head ovoid 2 cm long. They mark shoulder, elbow, and wrist circles on the front leg and hip, knee, and ankle circles on the hind leg. The front wrist circle is 1 cm above the ground line and the hind ankle circle is 2 cm above the ground line. The learner adds fur arrows pointing from front to back on the back and downward on the legs. Check the construction and suggest one adjustment.
Worked answer
The masses overlap to form a continuous body, and the joint circles are placed at the main landmarks. The front wrist circle is 1 cm above the ground line while the hind ankle circle is 2 cm above it, so the front leg appears shorter. Move the front wrist circle down by 1 cm so both feet reach the ground line at the same height. The fur arrows are consistent: front-to-back on the back and downward on the legs. After the adjustment, the mammal is balanced and readable. This is a valid generic construction, not a species-specific drawing.
Four practice exercises
Exercise 1
A learner places an abdomen ovoid 8 cm long, a chest ovoid 5 cm long, and a hindquarter ovoid 5 cm long. The head ovoid is 3 cm long. They mark the shoulder circle 2 cm below the top of the chest and the hip circle 2 cm below the top of the hindquarter. The front wrist circle is on the ground line and the hind ankle circle is 1 cm above the ground line. Describe one adjustment to balance the legs and explain why.
Show answer and check
Move the hind ankle circle down by 1 cm so it reaches the ground line. Both feet should contact the ground at similar heights for a balanced stance.
Why: The front leg already reaches the ground line, but the hind leg is 1 cm short. Lowering the hind ankle circle equalizes ground contact without changing the body masses.
Check: Measure the distance from each lowest joint circle to the ground line. Both should be zero or equal within your drawing's tolerance.
Exercise 2
A learner draws fur arrows on the back pointing from back to front, on the chest pointing upward, and on the legs pointing upward. They ask whether the fur direction is consistent. Describe a correction using general fur-direction cues.
Show answer and check
Change the back arrows to point from front to back, the chest arrows to curve downward and backward, and the leg arrows to point down toward the feet. These general cues create a consistent flow.
Why: Fur direction generally follows body curvature and gravity. Front-to-back on the back, downward and backward on the chest, and downward on the legs are consistent general cues.
Check: Trace each arrow and confirm it follows the body's curvature without reversing direction abruptly at a joint circle.
Exercise 3
A learner marks only two joint circles per leg: shoulder and wrist on the front leg, hip and ankle on the hind leg. They connect the circles with straight lines. Explain why adding the elbow and knee circles improves the construction.
Show answer and check
Add elbow and knee circles between the upper and lower landmarks. These middle joints help keep the limb segments proportional and make the leg read as a jointed limb rather than a straight stick.
Why: The elbow and knee are main landmarks that divide the leg into upper and lower segments. Without them, the limb loses proportional control and looks stiff.
Check: Count the joint circles per leg. Each leg should have three main landmarks: shoulder or hip, elbow or knee, and wrist or ankle.
Exercise 4
A learner draws a generic mammal with a very large abdomen ovoid and a very small chest ovoid. The head ovoid is placed far forward, leaving a long gap between the head and chest. Suggest two adjustments to improve the construction and explain how to check them.
Show answer and check
Reduce the abdomen ovoid slightly or enlarge the chest ovoid to balance the body masses. Move the head ovoid closer to the chest and add a short neck mass to connect them. Check that the masses overlap smoothly and that the head is supported by the neck.
Why: A very large abdomen with a small chest makes the mammal front-light and unstable. A long gap between head and chest breaks the continuous body mass. Balancing the masses and connecting the head with a neck mass improves coherence.
Check: Trace the outline of the body masses and confirm they overlap without gaps. Measure the distance between the head and chest ovoids; it should be bridged by a neck mass.
Common mistakes
- Drawing detailed outlines before placing body masses. Start with light ovoids for the head, chest, abdomen, and hindquarters. Add details only after the masses and joints are balanced.
- Placing joint circles without checking ground contact. Draw the ground line first and make sure all four feet reach it at similar heights. Move the lowest joint circles if needed.
- Making fur arrows cross joint circles and obscure landmarks. Shorten or reposition arrows so joint circles remain readable. Fur cues should support the construction, not hide it.
- Treating one fur-direction pattern as the only correct answer. Use arrows to show consistent flow, not a fixed pattern. Different mammals have different fur directions, so allow valid alternatives.
Self-check rubric
- Body masses are clear ovoids for head, chest, abdomen, and hindquarters, with smooth overlap.
- Joint circles mark shoulder or hip, elbow or knee, and wrist or ankle on each leg.
- All four feet reach the ground line at similar heights.
- Fur-direction arrows follow a consistent flow and do not obscure joint circles.
- The drawing is balanced and readable as a generic mammal, with valid alternatives allowed for mass sizes and fur patterns.
Questions and answers
Do I need to draw a specific mammal?
No. This method is for a generic four-legged mammal. You can adapt the mass sizes and joint positions to suggest different body types without copying a particular species.
How many joint circles should I draw per leg?
Three main landmarks per leg: shoulder or hip, elbow or knee, and wrist or ankle. These are enough to keep the limb segments proportional and readable.
What if my fur arrows look uneven?
Keep them short and evenly spaced. If an arrow crosses a joint circle, shorten it. Consistency matters more than perfect uniformity.
Can I use numerical measurements?
Yes, but measure your own paper and tools. Any numbers in this lesson are hypothetical examples for practice, not standards or tolerances.