Free original lessons
Gesture Drawing from a Posed Model: Action Line and Weight Shift
Learn to capture a posed model with a clear gesture line, identify the weight-bearing leg, and map limb angles using simple, checkable steps.
Free lesson
Four exercises
Worked answers
Object Drawing Lessons
Gesture drawing from a posed model is not about copying outlines; it is about reading the body's mechanics. This lesson teaches you to find the action line that runs through the torso and limbs, locate the weight-bearing leg and the shift of the pelvis, and record limb angles with a few deliberate marks. You will work from a single reference pose, using a defined convention for x-height (baseline to midline) and accepting that letter styles and body proportions vary. All measurements are hypothetical examples; measure your own equipment and model. The goal is a readable gesture skeleton that another person could use to reconstruct the pose.
Practice materials: Printable downloads are not available for this lesson yet. Use the instructions and four exercises below.
Reference illustration
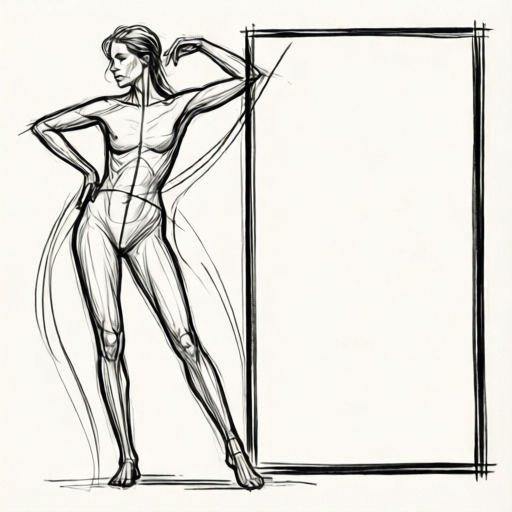
Use the stated measurements and conventions for each exercise.
Finding the Action Line
The action line is a single curved or straight stroke that summarizes the pose's direction and energy. It usually begins near the head or upper spine, passes through the torso, and continues toward the weight-bearing foot or the most extended limb. Do not trace the silhouette; instead, look for the longest continuous flow of the body.
Start by observing the model for ten seconds without drawing. Ask: where does the body lean, twist, or compress? Mark the action line lightly with a soft pencil or a thin marker. Keep it simple: one line, no branches. If the pose is symmetrical, the action line may be nearly vertical; if the model shifts weight, it will tilt.
Use the action line as a spine for the gesture skeleton. All later marks—pelvis tilt, shoulder angle, limb directions—should relate to it. A common error is drawing the action line after the outline; instead, draw it first so it guides every subsequent decision.
- Observe the model for ten seconds and identify the overall lean or twist.
- Draw one light action line from the head area through the torso toward the supporting side.
- Check that the line passes through the center of mass, not along an edge.
- Keep the line visible but light so it can be adjusted.
Locating the Weight-Bearing Leg and Pelvis Shift
The weight-bearing leg is the one that supports the body's mass. In a standing pose, it is usually the leg under the pelvis's higher side, but confirm by looking at the model's feet: the supporting foot is often flatter and the knee is straighter. The pelvis tilts so that the hip on the weight-bearing side is higher; the shoulder line often tilts in the opposite direction.
Mark the pelvis as a short line or a flattened oval. Its tilt tells you which hip is higher. Then mark the weight-bearing leg with a slightly firmer line from hip to ankle. The free leg can be lighter and more relaxed. This contrast helps the viewer read the pose.
Avoid guessing: if the model's weight is evenly distributed, the pelvis tilt may be subtle. In that case, note the feet's placement and the knees' relative bend. Use a simple check: draw a vertical line from the center of the pelvis downward; it should fall closer to the weight-bearing foot.
- Identify the supporting foot by its flatter contact and straighter knee.
- Draw a short pelvis line tilted so the weight-bearing hip is higher.
- Mark the weight-bearing leg from hip to ankle with a firmer stroke.
- Draw the free leg with a lighter stroke, noting its angle.
- Check that a vertical from the pelvis center falls nearer the supporting foot.
Mapping Limb Angles and Building the Gesture Skeleton
Limb angles are the directions of the arms and legs relative to the torso. Use simple straight lines for each limb segment: upper arm, forearm, thigh, and lower leg. Record the angle of each segment by comparing it to the action line or to vertical. For example, if the upper arm points 30 degrees away from vertical, note that as a hypothetical example and keep it consistent.
Build the gesture skeleton in this order: action line, pelvis tilt, weight-bearing leg, free leg, shoulder line, arms, then head and neck. Keep all lines light until the skeleton reads correctly. The head can be a simple oval; the neck a short line. Do not add facial features or clothing—this lesson excludes portrait detail and clothing.
Check the skeleton by asking: could someone reconstruct the pose from these lines alone? If a limb angle is ambiguous, redraw it with a clearer direction. Use the x-height convention for any lettering on your drawing: x-height is measured from baseline to midline, and letter styles vary, so do not force a single universal letter shape.
- Draw the shoulder line, tilting it opposite the pelvis if the pose shows a weight shift.
- Mark each arm as two segments: upper arm and forearm, with a simple angle.
- Mark each leg as two segments: thigh and lower leg, keeping the weight-bearing leg firmer.
- Add a simple head oval and neck line.
- Review the skeleton for readability and adjust any ambiguous angle.
Using a Convention for X-Height and Valid Alternatives
When you label your drawing or add notes, use an explicitly defined convention: x-height is the distance from the baseline to the midline of lowercase letters. Letter styles vary, so a rounded 'a' and an angular 'a' can both be valid if their x-height is consistent. This convention allows valid alternatives rather than a single universal answer.
Apply the same flexibility to body proportions. Models vary in limb length and torso shape; your gesture skeleton should reflect the observed pose, not an idealized figure. The rubric rewards clear action line, correct weight-bearing leg, readable limb angles, and consistent use of the x-height convention for any lettering.
- Define your baseline and midline before adding any lettering.
- Keep lowercase x-height consistent across notes.
- Accept different letter styles if x-height is respected.
- Compare your skeleton to the model's proportions without forcing a standard figure.
Worked example
A model stands with weight on the left leg, right knee slightly bent, left arm raised forward, right arm relaxed down. Describe the gesture skeleton you would draw, including action line, pelvis tilt, weight-bearing leg, and limb angles.
Worked answer
Draw a light action line from the head, curving slightly left through the torso toward the left foot. Mark the pelvis as a short line tilted so the left hip is higher. Draw the left leg from hip to ankle with a firmer stroke, nearly vertical. Draw the right leg lighter, with the thigh angled slightly forward and the lower leg angled back. Mark the shoulder line tilted opposite the pelvis, so the right shoulder is slightly higher. Draw the left arm as two segments: upper arm forward and slightly up, forearm continuing forward. Draw the right arm relaxed down, close to the torso. Add a simple head oval and neck line. Check that a vertical from the pelvis center falls nearer the left foot.
Four practice exercises
Exercise 1
A model stands with weight on the right leg, left leg relaxed and slightly forward. The pelvis tilts so the right hip is higher. Describe the action line and the weight-bearing leg marks you would draw.
Show answer and check
Action line from head through torso toward the right foot; pelvis line tilted with right hip higher; right leg drawn firmer from hip to ankle; left leg lighter and angled slightly forward.
Why: The supporting foot is flatter and the right knee straighter, so the right leg bears weight. The pelvis tilt confirms the right hip is higher. The action line should lead toward the supporting side.
Check: Draw a vertical from the pelvis center; it should fall nearer the right foot. Confirm the right leg stroke is firmer than the left.
Exercise 2
A model sits on a stool with weight on the left hip, torso leaning right, left arm resting on the left thigh, right arm hanging down. Describe the gesture skeleton order and the limb angles you would record.
Show answer and check
Action line from head curving right through torso toward left hip; pelvis line tilted with left hip higher; left leg firmer from hip to knee; right leg lighter; shoulder line tilted opposite pelvis; left arm two segments angled down to thigh; right arm two segments hanging near vertical; head oval and neck line.
Why: Sitting still involves a weight-bearing side; the left hip supports more mass. The torso lean right creates a counter-curve. Limb angles are recorded as simple segment directions relative to vertical or the action line.
Check: Check that the left leg stroke is firmer and the pelvis tilt matches the left hip. Confirm each arm has two segments and the skeleton reads without clothing or facial detail.
Exercise 3
A model stands with feet evenly placed and no visible weight shift. How would you mark the pelvis and legs, and what check would you use?
Show answer and check
Pelvis line nearly horizontal; both legs drawn with similar firmness; action line nearly vertical; check by drawing a vertical from pelvis center, which should fall between the feet.
Why: Even weight distribution means no strong pelvis tilt. The gesture skeleton should reflect neutrality rather than forcing a shift. Similar stroke firmness is appropriate.
Check: Verify the pelvis line is close to horizontal and the vertical from pelvis center falls between the feet. Confirm no limb is arbitrarily darkened.
Exercise 4
A model stands with weight on the left leg, right arm raised diagonally up and left, left arm down. The upper arm angle is a hypothetical 40 degrees from vertical. Describe the shoulder line, arm segments, and a consistency check.
Show answer and check
Shoulder line tilted opposite pelvis so right shoulder is higher; right arm two segments: upper arm about 40 degrees from vertical up and left, forearm continuing; left arm two segments down near torso; check that the 40-degree value is labeled hypothetical and that both arm segments are readable.
Why: The raised arm changes the shoulder line and creates a clear limb angle. The value is a hypothetical example, not a standard. Consistency means the angle is recorded once and the segments connect logically.
Check: Confirm the shoulder tilt opposes the pelvis tilt, the upper arm angle is noted as hypothetical, and the forearm continues from the upper arm without ambiguity.
Common mistakes
- Drawing the outline first and adding the action line afterward. Draw the action line first, then build the skeleton around it.
- Marking the wrong leg as weight-bearing because the pelvis tilt is subtle. Check the supporting foot's contact and the knee's straightness; use a vertical from the pelvis center as a test.
- Making all limb lines equally dark, so the weight-bearing leg does not stand out. Use a firmer stroke for the weight-bearing leg and a lighter stroke for the free leg.
- Adding facial features or clothing before the gesture skeleton is readable. Complete and check the skeleton first; this lesson excludes portrait detail and clothing.
- Using inconsistent x-height in lettering notes. Set a baseline and midline, and keep lowercase x-height consistent even if letter styles vary.
Self-check rubric
- Action line is present, single, and clearly summarizes the pose's direction.
- Weight-bearing leg is identified with a firmer stroke and matches the pelvis tilt and foot contact.
- Pelvis tilt and shoulder line show a readable weight shift or are correctly neutral.
- Limb angles are recorded as simple segments and are consistent with the observed pose.
- Gesture skeleton is readable without portrait detail or clothing.
- Any lettering uses a defined baseline and midline with consistent x-height; valid letter-style alternatives are accepted.
- Numerical values, if used, are labeled as hypothetical examples and units are consistent.
Questions and answers
What is an action line in gesture drawing?
An action line is a single stroke that summarizes the pose's direction and energy, usually running from the head through the torso toward the supporting side.
How do I know which leg is weight-bearing?
Look for the flatter foot and straighter knee; the pelvis usually tilts so the weight-bearing hip is higher. A vertical from the pelvis center should fall nearer the supporting foot.
Do I need to draw the model's face or clothing?
No. This lesson focuses on gesture, weight shift, and limb angles; portrait detail and clothing are excluded.
What does x-height mean here?
X-height is the distance from baseline to midline for lowercase letters. Letter styles vary, so different shapes are valid if x-height is consistent.
Are the numerical angles in this lesson exact standards?
No. Any numbers are hypothetical examples; measure your own model and equipment, and keep units consistent.