Free original lessons
Realistic Elephant Drawing: Skin Texture, Shading and Mass
Learn to draw a realistic elephant with wrinkled skin, shaded ears and trunk, and convincing body mass using a clear tonal convention and checkable steps.
Free lesson
Four exercises
Worked answers
Object Drawing Lessons
This lesson focuses on the specific visual problems that make an elephant read as real: the direction and density of skin wrinkles, the way shading wraps the ear edge and trunk taper, and the weight of the body mass. You will use a simple tonal convention—pencil pressure from light to dark—and a wrinkle-direction convention described below. All numerical values are hypothetical examples; measure your own paper and tools. The goal is not a single correct drawing but a drawing that passes the stated checks for texture, shading and mass.
Practice materials: Printable downloads are not available for this lesson yet. Use the instructions and four exercises below.
Reference illustration
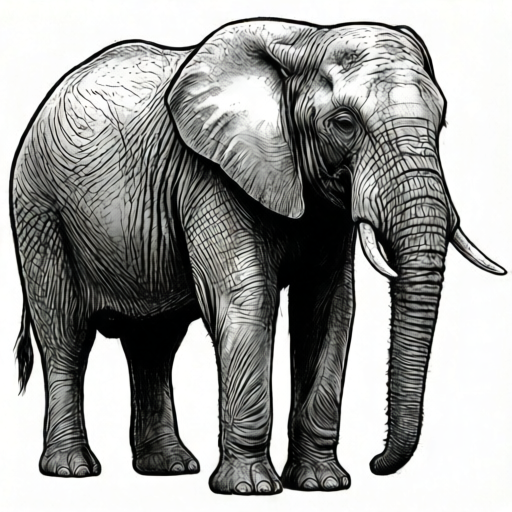
Use the stated measurements and conventions for each exercise.
Set a tonal and wrinkle convention
Define a five-step tonal scale on a scrap strip: 1 is bare paper, 2 is light pressure, 3 is medium, 4 is dark, 5 is near-black. Label the strip so you can compare your drawing to it. This convention lets you check whether ear-edge shading and trunk shading are consistent.
Define wrinkle direction as the long axis of each crease. On the head, wrinkles generally run across the forehead in gentle arcs and down the cheeks; on the trunk, they run in rings that tighten toward the tip. Draw short strokes along these axes, not across them. Vary stroke length and spacing to suggest age and skin fold depth.
- Make a five-step tonal strip and label each step.
- Draw three short wrinkle strokes on scrap paper: one forehead arc, one cheek crease, one trunk ring.
- Check that each stroke follows the stated long axis and that its tone matches a labeled step.
Block the head, ear and trunk taper
Block the head as a rounded rectangle with a domed forehead. Place the ear as a large fan shape whose outer edge curves back and whose inner edge meets the head behind the eye. The trunk begins at the base of the face and tapers to a smaller tip; mark the taper with two converging guide lines.
Keep the ear edge and trunk taper as separate guide lines until shading begins. This separation prevents the ear from merging into the head and keeps the trunk from looking cylindrical.
- Draw the head block and dome.
- Add the ear fan and mark its outer and inner edges.
- Draw two converging trunk guide lines from base to tip.
- Check that the trunk tip is narrower than the base by a visible margin.
Shade the ear edge and trunk
Shade the ear edge with a gradient from tone 2 at the outer rim to tone 4 near the inner fold. This suggests the ear curling forward and catching less light at the fold. On the trunk, place tone 3 along the shadow side and tone 2 along the light side, then add ring wrinkles as tone 4 strokes that follow the taper.
Check shading by comparing each area to your tonal strip. If the ear edge and trunk shadow use the same tone, adjust one so the ear reads as a separate form.
- Shade the ear edge from tone 2 to tone 4.
- Shade the trunk shadow side at tone 3 and light side at tone 2.
- Add ring wrinkles at tone 4 along the taper.
- Compare each area to the tonal strip and adjust.
Build body mass with wrinkle density
Block the body as a large oval behind the head, with the back line slightly higher than the head dome. Use fewer, wider wrinkles on the body and more, tighter wrinkles near joints and the trunk. This density difference signals mass: large smooth areas read as heavy volume, while clustered wrinkles read as skin under tension.
Add a ground shadow under the body at tone 3 to anchor the mass. Keep the shadow simple and check that it does not compete with the ear or trunk shading.
- Block the body oval and back line.
- Place wide, sparse wrinkles on the body and tight wrinkles near joints.
- Add a simple ground shadow at tone 3.
- Check that the body reads heavier than the head and trunk.
Worked example
A student blocks an elephant head with a domed forehead, an ear fan, and a trunk with two converging guide lines. They shade the ear edge from tone 2 to tone 4 and the trunk shadow at tone 3, then add ring wrinkles at tone 4. The body is a large oval with sparse wide wrinkles and a ground shadow at tone 3. Check the drawing against the conventions.
Worked answer
The drawing passes if: the ear edge gradient uses two distinct tones from the strip; the trunk tip is visibly narrower than the base; ring wrinkles follow the taper; the body has fewer wrinkles than the trunk; and the ground shadow is tone 3. If the ear and trunk shadows are the same tone, adjust one. If the body is densely wrinkled, remove some strokes to restore mass.
Four practice exercises
Exercise 1
On scrap paper, draw a five-step tonal strip and label each step. Then draw three forehead wrinkle arcs that follow the stated long axis and assign each a tone from your strip.
Show answer and check
A labeled five-step strip and three arcs whose long axes run across the forehead in gentle curves, each marked with a tone number from the strip.
Why: The strip establishes the convention; the arcs test whether you can apply the wrinkle-direction rule and tonal labeling together.
Check: Compare each arc to the stated axis and each tone label to the strip. If an arc crosses the forehead vertically, redraw it as a gentle horizontal arc.
Exercise 2
Draw an ear fan and a trunk with two converging guide lines. Shade the ear edge from tone 2 to tone 4 and the trunk shadow at tone 3. Check that the ear and trunk do not merge.
Show answer and check
An ear fan with a visible gradient from tone 2 at the rim to tone 4 at the fold, and a trunk with a tone 3 shadow side and a visibly narrower tip. The ear and trunk read as separate forms.
Why: Separating the ear edge and trunk shadow by tone prevents merging and tests the shading convention.
Check: Hold the drawing at arm's length. If the ear edge and trunk shadow look like one dark shape, adjust one area to a different tone from the strip.
Exercise 3
Block a body oval behind a head. Add five wide wrinkles on the body and ten tight ring wrinkles on the trunk. Add a ground shadow at tone 3. Check that the body reads heavier than the trunk.
Show answer and check
A body oval with five wide, sparse wrinkles, a trunk with ten tight rings, and a tone 3 ground shadow. The body's large smooth areas make it read as heavier than the trunk.
Why: Wrinkle density signals mass: sparse wide wrinkles on large forms, tight rings on smaller forms.
Check: Count the wrinkles in each area. If the body has more wrinkles than the trunk, remove some body wrinkles and recheck the mass impression.
Exercise 4
Draw a complete elephant head, ear, trunk and body using the conventions. Then write a three-line self-check: one line for wrinkle direction, one for ear and trunk shading separation, one for body mass.
Show answer and check
A complete drawing that follows the wrinkle axes, uses distinct tones for ear edge and trunk shadow, and shows body mass through sparse wrinkles and a ground shadow. The self-check lines name the specific evidence for each criterion.
Why: The complete drawing integrates all conventions, and the self-check makes the rubric criteria explicit and checkable.
Check: Use the rubric: verify each self-check line points to visible evidence in the drawing. If a line cannot be verified, revise the drawing or the line.
Common mistakes
- Drawing wrinkles as random scribbles across the skin. Follow the stated long axis for each crease: arcs on the forehead, down the cheeks, rings on the trunk. Check each stroke against the convention.
- Shading the ear edge and trunk with the same tone so they merge. Use the tonal strip to separate them: ear edge from tone 2 to tone 4, trunk shadow at tone 3. Adjust one area until the forms read separately.
- Making the trunk a cylinder with no taper. Use two converging guide lines and check that the tip is visibly narrower than the base before shading.
- Covering the body with dense wrinkles so it looks light instead of heavy. Use fewer, wider wrinkles on the body and reserve tight wrinkles for joints and the trunk. Check that large smooth areas remain.
Self-check rubric
- Wrinkle strokes follow the stated long axes: forehead arcs, cheek creases, trunk rings.
- Ear edge shading uses a gradient with at least two distinct tones from the labeled strip.
- Trunk taper is visible: tip narrower than base by a clear margin.
- Body mass reads through sparse wide wrinkles and a simple ground shadow.
- Tonal choices are consistent with the five-step strip.
- Valid alternatives are accepted if the conventions are followed and the checks pass.
Questions and answers
Do I need a specific pencil grade?
No. Use whatever pencil you have and build the five-step tonal strip with pressure. The convention is pressure-based, not grade-based.
How do I know if my wrinkle direction is correct?
Check that each stroke follows the long axis of the crease: forehead arcs, cheek creases downward, trunk rings around the taper. Valid alternatives exist, but the axis should match the body form.
Can I use a different tonal scale?
Yes, as long as you label it and use it consistently. The rubric checks consistency, not a fixed number of steps.
How much detail should the body have?
Enough to show mass: a few wide wrinkles and a simple ground shadow. Avoid dense texture that makes the body look light.