Free original lessons
Draw a Realistic Snake: S-Curve, Scale Rows, and Shading
Learn to draw a realistic snake using an S-curve body guide, directional scale rows, and layered shading. Includes practice tasks, rubric, and a worked example.
Free lesson
Four exercises
Worked answers
Object Drawing Lessons
A realistic snake drawing depends on three controllable elements: a clear body curve that reads as weight and motion, scale rows that follow the body's form, and shading that turns a flat outline into a rounded cylinder. This lesson treats the snake as a simple tube bent along an S-curve, then adds scale direction and light logic. You will use a defined convention for scale rows and a rubric that accepts valid stylistic variation. All measurements are hypothetical examples; measure your own paper and tools before drawing.
Practice materials: Printable downloads are not available for this lesson yet. Use the instructions and four exercises below.
Reference illustration
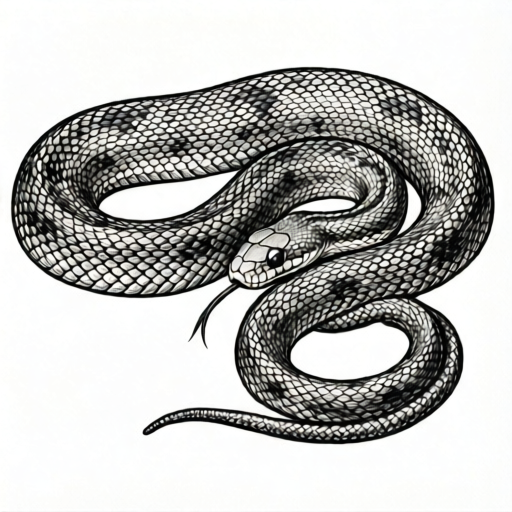
Use the stated measurements and conventions for each exercise.
Build the S-Curve Body Guide
Start with a light pencil S-curve on your paper. The curve should have two bends: a gentle upper bend and a lower bend that reverses direction. Keep the curve smooth; sharp corners make the snake look stiff. Mark the head end and tail end so you know the direction of taper.
Next, define the body width along the curve. The body is widest just behind the head and narrows gradually toward the tail. A simple method is to draw two parallel curves offset from the center line, then taper the offset near the tail. Check that the width changes gradually, not in steps.
Add a center line along the body to guide scale placement. This line is not a scale row; it is a construction aid. Erase it lightly before final shading so it does not compete with the scale pattern.
- Draw a light S-curve with two bends and label head and tail ends.
- Offset two parallel curves to set body width, tapering toward the tail.
- Add a light center line along the body as a placement guide.
- Check that width changes gradually and the curve has no sharp corners.
Place Scale Rows That Follow the Body
Use this convention: scale rows run in bands that wrap around the body, and each band is drawn as a series of overlapping oval or diamond shapes. The row direction follows the body curve, not the page edge. On the outer side of a bend, rows spread slightly; on the inner side, they compress. This compression and spreading is what makes the body look cylindrical.
Draw three to five guide bands first, spaced evenly along the body. Then fill each band with individual scales, keeping the scale size consistent within a band. Near the tail, scales become smaller and rows become closer together. Near the head, scales are larger and rows are more open.
Valid alternatives: scales may be drawn as rounded ovals, pointed diamonds, or soft rectangles, as long as the row direction follows the body and the size changes gradually. Do not mix scale shapes randomly within one band; choose one shape per band for clarity.
- Draw three to five light guide bands across the body, following the curve.
- Choose one scale shape per band: oval, diamond, or soft rectangle.
- Fill each band with scales, compressing rows on the inner side of bends.
- Reduce scale size and row spacing gradually toward the tail.
Shade for Roundness and Depth
Decide on one light direction before shading. A simple choice is light from the upper left. The upper-left side of the body receives highlight, the lower-right side receives shadow, and the underside receives the darkest tone. Keep this logic consistent along the whole body.
Shade in layers. First, apply a light even tone over the shadow side. Second, darken the deepest shadow along the lower edge and under each bend. Third, add small highlights on the top of scales where light hits. Avoid shading every scale equally; group scales into light and shadow zones so the body reads as one form.
Use the scale rows to reinforce roundness: scales on the shadow side can be shaded darker, and scales on the highlight side can be left lighter. Do not outline every scale with a dark line; let shading and spacing define the pattern.
- Choose one light direction and mark it lightly on the page edge.
- Apply a light tone to the shadow side of the body.
- Darken the lower edge and the inside of bends for depth.
- Add small highlights on upper scales and keep outlines soft.
Refine the Head and Tail Without Changing the Brief
The head should be a simple tapered shape that continues the body curve. Keep the head in a neutral, non-strike pose. Draw the eye as a small oval and the mouth line as a gentle curve. Do not add fangs or a wide-open mouth; this lesson excludes strike poses.
The tail should taper to a fine point. Reduce scale size and row spacing near the tail, and keep the shading consistent with the body. Check that the tail does not become a straight line; it should continue the S-curve's final bend.
Before finishing, erase construction lines lightly and check that the scale rows still follow the body. If a row drifts toward the page edge, redraw that band to follow the curve.
- Draw a tapered head that continues the body curve in a neutral pose.
- Add a small oval eye and a gentle mouth line.
- Taper the tail to a point and reduce scale size near the end.
- Erase construction lines and check that scale rows follow the body.
Worked example
On a sheet of paper, draw a light S-curve about 15 cm long with two bends. Mark the head end at the top and the tail end at the bottom. Offset the body width so it is widest near the head and narrows to a point at the tail. Draw three guide bands across the body, then fill each band with oval scales that follow the curve. Shade the lower-right side darker and leave the upper-left lighter. Check that the scale rows compress on the inside of each bend.
Worked answer
The finished drawing shows a smooth S-curve with a tapered body. Three scale bands follow the curve, with oval scales compressed on the inner side of bends and spread on the outer side. The lower-right side is shaded darker, and the upper-left side is lighter. The head is neutral with a small eye and closed mouth, and the tail tapers to a point. Construction lines are erased lightly.
Four practice exercises
Exercise 1
Draw a light S-curve 12 cm long with two bends. Mark head and tail ends. Offset the body width so it is widest 3 cm from the head and narrows to a point at the tail. Draw two guide bands and fill them with diamond scales that follow the curve. Shade the lower edge darker.
Show answer and check
A smooth S-curve with a tapered body, two diamond-scale bands following the curve, and darker shading along the lower edge.
Why: The S-curve provides the body guide; offsetting the width creates taper; diamond scales follow the curve; lower-edge shading gives roundness.
Check: Trace the curve for smoothness, check that width changes gradually, and confirm that scale rows bend with the body rather than staying parallel to the page edge.
Exercise 2
Draw a 10 cm S-curve with one gentle upper bend and one lower bend. Draw three guide bands. Fill the middle band with oval scales and the other two bands with soft rectangle scales. Compress the rows on the inside of each bend. Add a light shadow on the right side.
Show answer and check
An S-curve body with three bands of scales, compressed on the inner side of bends, and a consistent right-side shadow.
Why: Different scale shapes per band are allowed; compression on the inner side of bends shows cylindrical form; a single shadow side keeps light logic consistent.
Check: Check that each band uses one scale shape, that rows compress on the inside of bends, and that the shadow stays on one side.
Exercise 3
Draw a 14 cm S-curve and taper the body to a fine tail point. Draw four guide bands. Reduce scale size and row spacing gradually from head to tail. Shade the lower-right side in three layers: light tone, darker lower edge, and small highlights on upper scales.
Show answer and check
A tapered S-curve body with four scale bands that shrink toward the tail, plus three-layer shading on the lower-right side and highlights on upper scales.
Why: Gradual reduction in scale size and spacing supports the taper; layered shading builds roundness; highlights reinforce the chosen light direction.
Check: Measure that scale size decreases from band to band, check that the tail tapers to a point, and confirm that shading layers are visible without dark outlines on every scale.
Exercise 4
Draw a 16 cm S-curve with a neutral head and closed mouth. Add a small oval eye. Draw three guide bands and fill them with oval scales. Erase construction lines lightly. Check that no scale row runs parallel to the page edge and that the head is not in a strike pose.
Show answer and check
A complete snake drawing with a neutral head, closed mouth, small eye, three oval-scale bands following the curve, and no strike pose.
Why: The neutral head stays within the brief; oval scales follow the body; erasing construction lines keeps the scale pattern readable.
Check: Confirm the mouth is closed, the eye is a small oval, scale rows follow the curve, and construction lines are faint or erased.
Common mistakes
- Drawing scale rows parallel to the page edge instead of following the body curve. Redraw each band as a curve that wraps around the body, compressing on the inner side of bends and spreading on the outer side.
- Making the body width change in sudden steps. Offset the body width gradually from head to tail and check the taper with a light center line.
- Shading every scale with the same dark outline. Group scales into light and shadow zones and keep outlines soft; use tone, not lines, to define the pattern.
- Using a strike pose or open mouth when the brief excludes it. Keep the head neutral with a closed mouth and a small eye; focus on curve, scale rows, and shading.
Self-check rubric
- S-curve has two smooth bends and no sharp corners.
- Body width tapers gradually from head to tail.
- Scale rows follow the body curve and compress on the inner side of bends.
- Scale size and row spacing decrease gradually toward the tail.
- Shading uses one consistent light direction and groups scales into light and shadow zones.
- Head is neutral, with a closed mouth and no strike pose.
- Valid alternatives: oval, diamond, or soft rectangle scales are accepted if row direction and size change are consistent.
Questions and answers
Do I need to draw every scale?
No. Draw enough scale rows to show direction and size change. Grouping scales into bands is more readable than drawing every individual scale.
Can I use a different scale shape?
Yes. Oval, diamond, and soft rectangle scales are all valid if the row direction follows the body and the size changes gradually.
How do I check the S-curve?
Trace the curve with your finger. It should have two smooth bends and no sharp corners. The body width should taper gradually toward the tail.
What light direction should I use?
Choose one direction and keep it consistent. Upper-left light is a simple default, but any single direction works if the shadow side stays consistent.