Free original lessons
Draw a Striped Bass: Body, Fins, and Lateral Stripes
Learn to construct an elongated striped bass with correct fin placement and a clear lateral stripe pattern using simple guides and a defined drawing convention.
Free lesson
Four exercises
Worked answers
Object Drawing Lessons
This lesson teaches a repeatable method for drawing a striped bass (striper) with an elongated body, dorsal and caudal fins, and the characteristic lateral stripe pattern. You will use a simple proportional framework, place fins by landmark positions, and apply a stripe-row convention that allows valid stylistic variation. All measurements are hypothetical examples; measure your own paper and tools. The focus is construction and stripe placement, not scale rendering or fishing scenes.
Practice materials: Printable downloads are not available for this lesson yet. Use the instructions and four exercises below.
Reference illustration
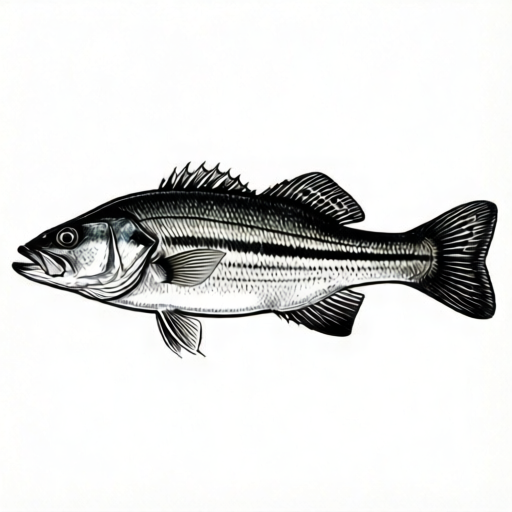
Use the stated measurements and conventions for each exercise.
Build the elongated body framework
Start with a horizontal centerline and a body-length unit. For example, choose a body length of 18 cm on your paper (hypothetical). Mark the snout at 0 cm and the caudal peduncle at 18 cm. The body depth at the deepest point is about one-quarter of body length, so 4.5 cm total depth, split 2.25 cm above and below the centerline. Place the deepest point roughly one-third of the way from snout to tail.
Draw a smooth top curve from snout to peduncle that rises to the deepest point and then tapers. Mirror the belly curve below the centerline, keeping the profile elongated rather than round. The head tapers to a pointed snout; the mouth line sits slightly below the centerline at the front. Keep the peduncle narrow, about 1.5 cm deep, before the caudal fin begins.
- Draw a horizontal centerline 18 cm long; mark 0 cm at the snout and 18 cm at the peduncle.
- Mark the deepest body point at about 6 cm from the snout; set total depth 4.5 cm (2.25 cm above and below the centerline).
- Draw the top profile as a smooth curve through the deepest point, tapering to the peduncle.
- Mirror the belly profile below the centerline, keeping the body elongated.
- Indicate the mouth line slightly below the centerline at the snout and narrow the peduncle to about 1.5 cm deep.
Place dorsal and caudal fins by landmarks
Striped bass have two dorsal fin sections: a spiny first dorsal and a softer second dorsal, separated by a small notch. Using the 18 cm body, place the first dorsal base from about 6 cm to 9 cm from the snout, and the second dorsal base from about 10 cm to 13 cm. The anal fin sits below the second dorsal, with its base from about 11 cm to 13 cm. The pelvic fins sit below the first dorsal, around 7 cm to 9 cm. These are hypothetical positions for practice; adjust to your reference.
The caudal fin is forked. At the peduncle (18 cm), draw the fin base about 1.5 cm tall. Extend the upper and lower lobes backward about 3 cm, with a concave rear edge. Keep the lobes symmetrical about the centerline. Pectoral fins attach just behind the head, around 4 cm from the snout, and angle slightly downward and backward.
- Mark the first dorsal base from 6 cm to 9 cm and the second dorsal base from 10 cm to 13 cm along the top profile.
- Draw the first dorsal as a set of short spines; draw the second dorsal as a softer, rounded fin with a small notch between them.
- Place the anal fin base below the second dorsal from 11 cm to 13 cm; place pelvic fins below the first dorsal from 7 cm to 9 cm.
- At the peduncle, draw a forked caudal fin with a 1.5 cm base and lobes extending about 3 cm, symmetrical about the centerline.
- Attach pectoral fins just behind the head at about 4 cm, angled slightly down and back.
Apply the lateral stripe convention
Use a stripe-row convention: define the lateral line as a horizontal guide from behind the head to the peduncle, slightly above the centerline. Draw seven horizontal stripe rows: three above the lateral line, the lateral line row itself, and three below. Each row is a broken band of dark marks, not a continuous solid line. Stripe thickness is about one-tenth of body depth (0.45 cm in the 4.5 cm example), with gaps roughly equal to stripe thickness. This convention is a teaching aid, not a universal biological rule; valid alternatives include more rows, varied gaps, or softer edges.
Keep stripes within the body outline and stop them before the fin bases. On the head, reduce stripe rows to short marks that follow the head curve. The caudal fin may carry a few short marks near the base, but do not render individual scales. Use consistent pressure so the stripe pattern reads clearly at a glance.
- Draw a lateral-line guide from behind the head to the peduncle, slightly above the centerline.
- Mark seven horizontal rows: three above, the lateral line row, and three below.
- Within each row, draw broken dark bands about 0.45 cm thick with gaps about equal to thickness.
- Stop stripes before fin bases and shorten marks on the head to follow its curve.
- Add a few short marks near the caudal fin base; avoid scale rendering.
Refine proportions and check the drawing
Check that the body length to depth ratio is about 4:1 (18 cm to 4.5 cm). Verify fin bases sit at the landmark distances and that the caudal fork is symmetrical. Confirm the stripe rows are horizontal and evenly spaced within the convention. Use a simple arithmetic check: if you chose 20 cm body length, depth should be about 5 cm, stripe thickness about 0.5 cm, and fin bases scale proportionally (first dorsal 6.7–10 cm, second dorsal 11.1–14.4 cm).
Valid alternatives are acceptable: a slightly deeper body, more stripe rows, or softer stripe edges can still meet the rubric if the elongated body, fin placement, and lateral stripe pattern are clear. Measure your actual paper and tools rather than assuming standard sizes.
- Measure body length and depth; confirm a ratio near 4:1.
- Check fin base positions against your chosen landmarks.
- Verify the caudal fork is symmetrical about the centerline.
- Confirm stripe rows are horizontal and spaced within the convention.
- Scale all values proportionally if you change body length.
Worked example
Draw a striped bass with an 18 cm body length, 4.5 cm depth, two dorsal sections, a forked caudal fin, and seven lateral stripe rows. Describe the construction and stripe placement.
Worked answer
Draw an 18 cm centerline. Mark the deepest point at 6 cm with 2.25 cm above and below the centerline. Draw smooth top and belly curves tapering to a 1.5 cm peduncle. Place the first dorsal base from 6–9 cm and the second from 10–13 cm with a small notch. Place the anal fin below the second dorsal from 11–13 cm and pelvic fins from 7–9 cm. Draw a forked caudal fin with a 1.5 cm base and 3 cm lobes. Add pectoral fins at 4 cm. Draw a lateral-line guide slightly above the centerline and mark seven rows: three above, the lateral line row, and three below. Use broken bands about 0.45 cm thick with equal gaps, stopping before fin bases.
Four practice exercises
Exercise 1
A student draws a striped bass with a 20 cm body length. What total body depth and stripe thickness should they use if they follow the 4:1 depth ratio and one-tenth depth stripe thickness?
Show answer and check
Depth = 20 ÷ 4 = 5 cm; stripe thickness = 5 ÷ 10 = 0.5 cm.
Why: The convention sets depth as one-quarter of body length and stripe thickness as one-tenth of depth. Scaling from the 18 cm example gives 5 cm depth and 0.5 cm stripes.
Check: Multiply depth by 4 to recover body length (5 × 4 = 20) and multiply stripe thickness by 10 to recover depth (0.5 × 10 = 5).
Exercise 2
On an 18 cm body, the first dorsal base is from 6 cm to 9 cm. If the body length is increased to 24 cm, what are the scaled first dorsal base positions?
Show answer and check
Scale factor = 24 ÷ 18 = 1.333; positions become 6 × 1.333 = 8 cm and 9 × 1.333 = 12 cm.
Why: All landmark distances scale proportionally with body length. Multiplying by the scale factor preserves the relative fin placement.
Check: Divide the new positions by the scale factor to recover the original 6 cm and 9 cm.
Exercise 3
A drawing has a body depth of 6 cm and a stripe thickness of 0.8 cm. Does this match the one-tenth depth convention? If not, what thickness would match?
Show answer and check
No. One-tenth of 6 cm is 0.6 cm, so 0.8 cm is too thick. A matching thickness is 0.6 cm.
Why: The convention defines stripe thickness as depth divided by 10. Comparing 0.8 cm to 0.6 cm shows a mismatch.
Check: Multiply 0.6 cm by 10 to recover 6 cm depth; 0.8 cm × 10 = 8 cm, which does not match the 6 cm depth.
Exercise 4
A striped bass drawing uses seven stripe rows on an 18 cm body. If the student keeps the same row spacing but changes the body length to 27 cm, how many rows should they plan if row spacing scales proportionally?
Show answer and check
Scale factor = 27 ÷ 18 = 1.5; the number of rows stays seven because row spacing scales with body length, not the count.
Why: Changing body length scales distances, not the number of rows in the convention. The seven-row pattern remains valid when spacing is scaled.
Check: Confirm that each row gap and stripe thickness is multiplied by 1.5, and that the total of seven rows still fits within the body outline.
Common mistakes
- Making the body too round or short. Use a 4:1 length-to-depth ratio and keep the deepest point around one-third from the snout.
- Placing the second dorsal directly against the first dorsal. Leave a small notch and separate the bases using the landmark distances (for example, 6–9 cm and 10–13 cm on an 18 cm body).
- Drawing stripes as continuous solid lines. Use broken bands within each row, with gaps about equal to stripe thickness.
- Rendering individual scales instead of the stripe pattern. Keep the focus on horizontal stripe rows and stop marks before fin bases.
- Making the caudal fin rounded instead of forked. Draw symmetrical upper and lower lobes with a concave rear edge and a narrow peduncle.
Self-check rubric
- Body is elongated with a length-to-depth ratio near 4:1 and a narrow peduncle.
- First and second dorsal fins are separated by a notch and placed by landmarks.
- Anal, pelvic, and pectoral fins are present and positioned consistently with the landmarks.
- Caudal fin is forked and symmetrical about the centerline.
- Lateral stripe pattern uses horizontal rows with broken bands; seven rows is the convention but valid alternatives are accepted.
- Stripes stop before fin bases and no scale rendering is present.
- All measurements are consistent and scaled proportionally if body length changes.
Questions and answers
Do I need to use exactly seven stripe rows?
No. Seven rows is a teaching convention. More rows or varied gaps are valid if the lateral stripe pattern remains clear and horizontal.
How do I know the fin positions are correct?
Use landmark distances along the body and check that the first and second dorsal are separated by a notch, the anal fin sits below the second dorsal, and the caudal fork is symmetrical.
Can I change the body length?
Yes. Scale all values proportionally. For a 20 cm body, depth is about 5 cm and stripe thickness about 0.5 cm.
Should I draw scales?
No. This lesson excludes scale rendering; focus on the elongated body, fins, and lateral stripe pattern.