Free original lessons
Sunflower Pencil Drawing: Radial Petal Layers and Shading
Learn to draw a sunflower head with ordered petal layers, a ringed seed disk, and pencil shading using a clear radial convention and checkable steps.
Free lesson
Four exercises
Worked answers
Object Drawing Lessons
This lesson solves one focused drawing problem: constructing a sunflower head in pencil so that petals radiate in clear layers and the seed disk reads as a textured center. You will use a simple radial convention, build petal layers from back to front, and apply shading that respects the flower's geometry. All measurements are hypothetical examples; measure your own paper and tools. The method is checkable with arithmetic and visual tests, and valid stylistic alternatives are allowed under the rubric.
Practice materials: Printable downloads are not available for this lesson yet. Use the instructions and four exercises below.
Reference illustration
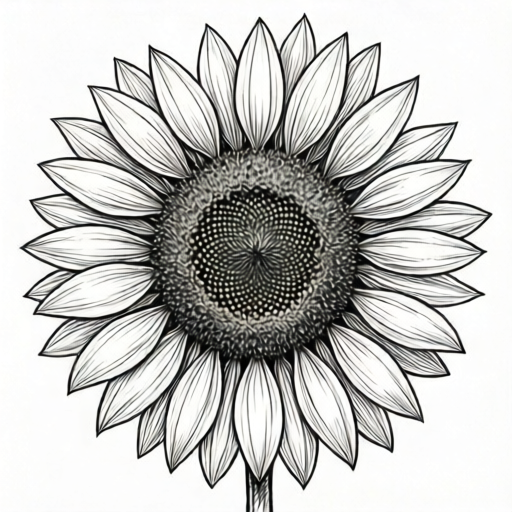
Use the stated measurements and conventions for each exercise.
Set the radial convention and center
Define a center point and a vertical axis. A radial convention means every petal is placed by an angle measured from the vertical axis and a distance from the center. Use a light crosshair to mark the center and axis. Choose a head radius, for example 6 cm on a 20 cm square sheet, and label it as a hypothetical value. The seed disk will occupy the inner portion, for example the inner 40 percent of the head radius, so its radius is 2.4 cm in this example.
Keep the axis visible until the final shading pass. Angles are easier to check when the center is fixed. If your paper is smaller, scale all values by the same factor so proportions stay consistent.
- Mark the center with a small dot and draw a light vertical axis through it.
- Draw a circle for the outer head boundary using your chosen radius.
- Draw a smaller concentric circle for the seed disk boundary.
- Label the outer radius and disk radius in your notes so later checks use the same units.
Build petal layers from back to front
Petals are arranged in layers. The back layer sits farthest from the center and is drawn first; front layers overlap it. Use a consistent petal length, for example 3 cm beyond the outer head circle, and a consistent width, for example 1.2 cm at the widest point. Place petals at regular angular spacing within each layer. A back layer might use 12 petals spaced 30 degrees apart; a middle layer might use 12 petals offset by 15 degrees; a front layer might use 8 petals offset again. These numbers are hypothetical examples, not standards.
Offsetting each layer prevents petals from stacking directly on top of one another and creates the layered look. Draw light construction lines first, then refine petal outlines. Keep petal tips pointed or rounded according to your chosen style, but keep the style consistent within the drawing.
- Draw the back layer petals first at the widest radius, using light lines.
- Draw the middle layer petals offset by half the angular spacing of the back layer.
- Draw the front layer petals offset again, with slightly shorter visible length because they overlap.
- Erase construction lines only after all layers are placed and checked.
Shade the seed disk and petals
The seed disk reads as a center when it has concentric rings and small radial marks. Draw two or three light concentric rings inside the disk, then add short radial ticks between rings. Shade the disk with small circular or cross-hatched strokes, keeping the outer edge slightly darker to suggest depth. For petals, shade from the base toward the tip: darker near the base where petals overlap, lighter toward the tip. Use a consistent light direction, for example from the upper left, and label it as a hypothetical choice.
Check shading by squinting: the disk should appear distinct from the petals, and the layered petals should show clear overlaps. Avoid uniform darkening; vary pressure gradually.
- Draw concentric rings inside the seed disk at equal radial intervals.
- Add short radial ticks between rings to suggest seeds.
- Shade the disk with small strokes, darker at the rim.
- Shade each petal from base to tip with a consistent light direction.
- Darken overlap shadows where front petals cross back petals.
Check proportions and finish
Use simple arithmetic to check the drawing. If the head radius is 6 cm and the disk radius is 2.4 cm, the disk-to-head ratio is 0.4. Measure your drawn radii with a ruler and compare. Count petals per layer and confirm the angular spacing matches your plan. For a 12-petal layer, spacing is 360 divided by 12, which equals 30 degrees. For an 8-petal layer, spacing is 45 degrees. These checks catch drift before final shading.
Finish by cleaning stray construction lines and strengthening the darkest overlaps. Keep the outer contour clear. The drawing is complete when the radial order, disk rings, and shading direction are all readable.
- Measure the drawn head and disk radii and compute their ratio.
- Count petals in each layer and verify angular spacing by division.
- Confirm one consistent light direction across disk and petals.
- Erase construction lines and reinforce key overlaps.
Worked example
A sunflower head has an outer radius of 5 cm and a seed disk radius of 2 cm. The back layer has 10 petals. Find the disk-to-head ratio and the angular spacing of the back layer.
Worked answer
Disk-to-head ratio is 2 divided by 5, which equals 0.4. Angular spacing is 360 divided by 10, which equals 36 degrees.
Why: The ratio compares the disk radius to the head radius using the same units. Angular spacing assumes petals are evenly distributed around the center, so 360 degrees is divided by the number of petals.
Check: Multiply 0.4 by 5 to recover 2 cm. Multiply 36 degrees by 10 to recover 360 degrees.
Four practice exercises
Exercise 1
A head radius is 7 cm and the disk radius is 2.8 cm. The middle layer has 14 petals. Compute the disk-to-head ratio and the angular spacing.
Show answer and check
Ratio is 0.4; spacing is about 25.7 degrees.
Why: 2.8 divided by 7 equals 0.4. 360 divided by 14 equals 25.714..., which rounds to about 25.7 degrees.
Check: Multiply 0.4 by 7 to get 2.8. Multiply 25.7 by 14 to get about 359.8, close to 360.
Exercise 2
A back layer has 12 petals and a front layer has 8 petals. State the angular spacing of each layer and the offset if the front layer is shifted by half of the back layer's spacing.
Show answer and check
Back spacing is 30 degrees; front spacing is 45 degrees; half-offset is 15 degrees.
Why: 360 divided by 12 equals 30. 360 divided by 8 equals 45. Half of 30 is 15.
Check: Multiply 30 by 12 to get 360; multiply 45 by 8 to get 360; confirm 15 is half of 30.
Exercise 3
A drawing uses a head radius of 6 cm and a petal length of 3 cm beyond the head circle. What is the total distance from the center to a petal tip, and what is the ratio of petal length to head radius?
Show answer and check
Total distance is 9 cm; ratio is 0.5.
Why: Add the head radius and petal length: 6 plus 3 equals 9 cm. Divide petal length by head radius: 3 divided by 6 equals 0.5.
Check: Subtract 6 from 9 to recover 3 cm. Multiply 0.5 by 6 to recover 3 cm.
Exercise 4
A seed disk has radius 2.4 cm and three concentric rings placed at equal radial intervals inside it. What is the radial interval between rings if the first ring is at the disk boundary and the third is at the center?
Show answer and check
The interval is 1.2 cm.
Why: From boundary to center is 2.4 cm. Three rings at equal intervals create two gaps, so 2.4 divided by 2 equals 1.2 cm.
Check: Add 1.2 twice to recover 2.4 cm; confirm two equal gaps match the three ring positions.
Common mistakes
- Drawing all petals at the same radius so layers collapse into one ring. Assign each layer a different base radius and offset its angular spacing by half a step.
- Making the seed disk too large or too small relative to the head. Choose a disk-to-head ratio, measure both radii, and adjust before shading.
- Shading petals uniformly dark from base to tip. Use a consistent light direction and keep tips lighter than bases.
- Skipping construction lines and guessing petal angles. Mark the center and axis, then place petals by measured angles.
Self-check rubric
- Center and axis are marked and used consistently.
- Outer head circle and seed disk circle are concentric and measured.
- At least two petal layers are present with offset angular spacing.
- Petal lengths and widths are consistent within each layer.
- Seed disk shows concentric rings and radial marks.
- Shading uses one stated light direction and varies from base to tip.
- Overlap shadows clarify front-to-back petal order.
- Valid stylistic alternatives are accepted if radial order and shading logic hold.
Questions and answers
Do I need a compass?
A compass helps with circles, but you can use a measured string or a traced round object. Measure your actual tool and record the radius you used.
How many petals should each layer have?
Any count that divides evenly into 360 degrees is easy to check. Twelve petals give 30-degree spacing; eight petals give 45-degree spacing. These are hypothetical examples.
Can I use a different petal shape?
Yes. The rubric allows valid alternatives as long as radial order, layer offsets, and consistent shading are maintained.
How do I know the shading is consistent?
State one light direction before shading and check that darker areas face away from it on both disk and petals.