Free original lessons
Head Proportions Drawing: Feature Placement Guides
Learn to construct a head with eye, nose, and ear placement guides using a simple proportional system and checkable steps.
Free lesson
Four exercises
Worked answers
Object Drawing Lessons
This lesson teaches a reliable construction method for placing eyes, nose, and ears on a drawn head oval. You will use a baseline-to-midline convention for x-height and a set of horizontal guide lines derived from the oval's height. The goal is not a finished portrait but a correct proportional scaffold. All measurements are relative to the head oval you draw, so the method works at any size. Work on plain paper with a pencil and a ruler. Mark lightly so guides can be adjusted. The sequence builds from the oval outward: first the vertical axis, then the horizontal divisions, then feature placement. Each step includes a simple arithmetic check so you can verify placement before committing to darker lines. A worked example and four practice tasks follow, each solvable from the text alone. Use the rubric to self-assess; valid alternatives are allowed where the convention permits variation.
Practice materials: Printable downloads are not available for this lesson yet. Use the instructions and four exercises below.
Reference illustration
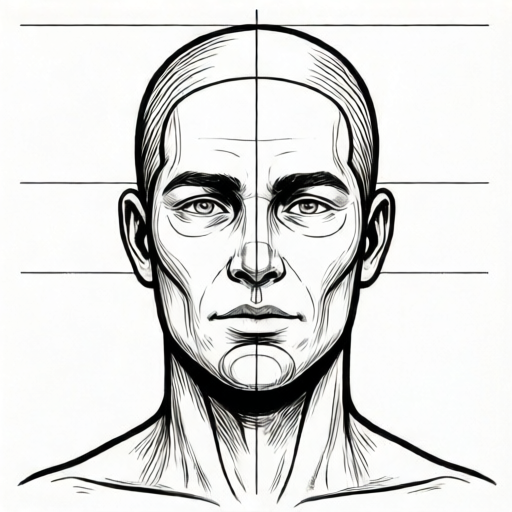
Use the stated measurements and conventions for each exercise.
Setting Up the Head Oval and Axes
Begin by drawing a head oval that is taller than it is wide. A common starting proportion is width to height of about 2:3, but any oval with a clear top, bottom, and vertical axis works. Draw a light vertical line through the center from the top of the oval to the bottom; this is the central axis. Next, mark the top and bottom of the oval on this axis. The distance between them is the head height H. All guide lines in this method are fractions of H, so measure H once with a ruler and record it.
Define the baseline as the bottom of the oval and the midline as the vertical midpoint of H. The x-height convention for this lesson is baseline to midline: the lower half of the oval is the x-height zone. Letter styles vary, so treat this as a construction convention, not a universal rule. Mark the midline with a light horizontal line. This midline will later serve as the eye line, and the ear tops will be marked at this same level; the nose line will be placed at 3H/4, halfway between the midline and the bottom.
- Draw a head oval taller than wide; label top T and bottom B.
- Draw a vertical axis from T to B through the oval center.
- Measure H = distance from T to B in millimeters; record it.
- Mark the midline M at H/2 from T (or from B); draw a light horizontal line.
- Label the lower half from M to B as the x-height zone for this convention.
Placing the Eye Line, Nose Line, and Ear Line
Divide the head height H into quarters along the vertical axis. The eye line is at H/2 from the top, which coincides with the midline in this construction. Draw a horizontal eye line across the oval at that level. The nose line is at 3H/4 from the top, or halfway between the eye line and the bottom B. Draw a horizontal nose line there. The ear line is also at the eye line level for the top of the ear, with the ear extending downward toward the nose line; mark the ear line as a short horizontal segment at H/2 on each side of the oval, then note that the ear bottom aligns near 3H/4.
Check arithmetic before drawing features: if H = 120 mm, eye line = 60 mm from top, nose line = 90 mm from top, and ear top = 60 mm from top with ear bottom near 90 mm. These numerical values are hypothetical examples; measure your own H and compute the fractions. Keep all units consistent (millimeters or centimeters). Lightly mark each guide so errors are easy to correct.
- Compute eye line = H/2 from top; draw a horizontal line across the oval.
- Compute nose line = 3H/4 from top; draw a horizontal line across the oval.
- Mark ear line at H/2 on both sides; note ear bottom near 3H/4.
- Verify each computed distance with a ruler against your recorded H.
- Adjust any guide that deviates by more than a few millimeters before proceeding.
Feature Placement Using the Guides
Place the eyes on the eye line. A common construction divides the eye line into five equal parts across the oval width: the central part is the space between the eyes, and the two outer parts on each side are the eye widths. This is a guide, not a universal rule; eye shapes and spacing vary. Mark the eye centers at the boundaries of the central fifth and the adjacent fifths. Place the nose on the central axis between the eye line and the nose line; the nose tip sits near the nose line. Place the ears between the ear line (top) and the nose line (bottom), on the outer edges of the oval.
Use the x-height zone (baseline to midline) to check lower-face proportions: the nose line at 3H/4 falls within this zone, and the ear bottom aligns near it. Because letter styles vary, accept small deviations that preserve the overall proportional relationships. The goal is a coherent scaffold, not a single correct drawing.
- Divide the eye line into five equal parts across the oval width.
- Mark eye centers at the inner boundaries of the second and fourth parts.
- Place the nose tip on the central axis near the nose line.
- Draw ear tops at the ear line and ear bottoms near the nose line on both sides.
- Check that eye line, nose line, and ear line remain horizontal and evenly spaced.
Checking and Refining the Construction
Before adding detail, verify the scaffold with simple checks. Measure the distance from top to eye line and from eye line to bottom; they should be equal within a few millimeters. Measure from eye line to nose line and from nose line to bottom; they should also be equal. Confirm that the ear top aligns with the eye line and the ear bottom aligns near the nose line. If any check fails, adjust the guide rather than the feature. Keep the drawing light until all checks pass.
Record your H and computed fractions on the page margin so you can reproduce the construction at another size. This makes the method checkable and transferable. The rubric below lists the proportional relationships to assess; valid alternatives include slight oval width variations and eye spacing adjustments that preserve the five-part guide logic.
- Measure top-to-eye and eye-to-bottom; confirm equality within a few millimeters.
- Measure eye-to-nose and nose-to-bottom; confirm equality within a few millimeters.
- Confirm ear top aligns with eye line and ear bottom near nose line.
- Adjust guides if checks fail; keep lines light until all pass.
- Record H and fractions for reproducibility.
Worked example
A head oval has H = 100 mm. Compute the eye line, nose line, and ear line positions from the top, and state where the ear bottom should align. Then describe how to divide the eye line for eye placement if the oval width at that height is 60 mm.
Worked answer
Eye line = 100/2 = 50 mm from top. Nose line = 3×100/4 = 75 mm from top. Ear line (top of ear) = 50 mm from top; ear bottom aligns near 75 mm from top. For eye placement, divide the 60 mm width into five equal parts: 60/5 = 12 mm each. The central part (12 mm) is the space between the eyes; eye centers sit at the boundaries 12 mm from the left and 12 mm from the right of the central part, giving eye widths of 12 mm each on the outer parts.
Four practice exercises
Exercise 1
A head oval has H = 80 mm. Compute the eye line and nose line positions from the top. State the ear top and ear bottom alignment. Show your arithmetic.
Show answer and check
Eye line = 80/2 = 40 mm from top. Nose line = 3×80/4 = 60 mm from top. Ear top aligns at 40 mm from top; ear bottom aligns near 60 mm from top.
Why: The construction uses fractions of H: eye line at H/2, nose line at 3H/4, ear top at H/2, ear bottom near 3H/4. Substituting H = 80 mm gives 40 mm and 60 mm.
Check: Measure from the oval top to each guide with a ruler; confirm 40 mm and 60 mm within a few millimeters. Confirm ear top and bottom align with those levels.
Exercise 2
A head oval has H = 120 mm. The oval width at the eye line is 72 mm. Divide the eye line into five equal parts and state the width of each part and the eye center positions from the left edge of the oval at that height.
Show answer and check
Each part = 72/5 = 14.4 mm. Eye centers sit at the boundaries of the central part: 14.4 mm from the left edge and 72 − 14.4 = 57.6 mm from the left edge. The central space between eyes is 14.4 mm, and each eye width is 14.4 mm.
Why: The five-part guide divides the oval width at the eye line into equal segments. The central segment is the inter-eye space; the adjacent segments define eye widths. Eye centers are at the inner boundaries of the second and fourth segments.
Check: Measure the oval width at the eye line and divide by five. Mark the boundaries and confirm the central space and eye widths are equal within a few millimeters.
Exercise 3
A student draws a head oval with H = 90 mm but places the eye line at 50 mm from the top and the nose line at 70 mm from the top. Using the construction fractions, state the correct positions and the deviations in millimeters.
Show answer and check
Correct eye line = 90/2 = 45 mm from top; deviation = 50 − 45 = 5 mm too low. Correct nose line = 3×90/4 = 67.5 mm from top; deviation = 70 − 67.5 = 2.5 mm too low. Ear top should be at 45 mm and ear bottom near 67.5 mm.
Why: Compare the student's placements to the computed fractions. Subtract the correct value from the drawn value to find the deviation and direction.
Check: Measure the student's guides from the oval top and compare to 45 mm and 67.5 mm. Confirm the deviations are 5 mm and 2.5 mm.
Exercise 4
A head oval has H = 150 mm. Compute the eye line, nose line, and ear line positions. Then state one valid alternative eye-spacing adjustment if the oval is noticeably wider than the 2:3 example, and explain why it is acceptable.
Show answer and check
Eye line = 150/2 = 75 mm from top. Nose line = 3×150/4 = 112.5 mm from top. Ear top = 75 mm from top; ear bottom near 112.5 mm from top. A valid alternative is to widen the central inter-eye space slightly while keeping the five-part division logic and preserving equal eye widths; this is acceptable because the convention allows variation in eye spacing as long as the proportional relationships and checkable divisions remain coherent.
Why: The vertical fractions are fixed by H. For a wider oval, the five-part guide still applies to the measured width at the eye line; adjusting the central space is a permitted variation that preserves the construction logic.
Check: Measure the vertical guides against 75 mm and 112.5 mm. For the eye line, measure the oval width, divide by five, and confirm the adjusted spacing still uses equal parts and symmetric eye centers.
Common mistakes
- Drawing the eye line at the vertical center of the page instead of the center of the head oval. Measure H from the oval top to bottom and place the eye line at H/2 from the top, not from the page edge.
- Placing the nose line at the midpoint between the eye line and the bottom without checking 3H/4. Compute 3H/4 from the top and compare; the nose line should be halfway between the eye line and the bottom only when the eye line is at H/2.
- Making the ears too long or too short because the ear line is treated as a single point. Mark ear top at H/2 and ear bottom near 3H/4; check both against the nose line.
- Dividing the eye line into equal parts without accounting for the oval width at that height. Measure the oval width at the eye line, divide that width into five equal parts, and mark eye centers from those boundaries.
Self-check rubric
- Head oval is taller than wide and has a clear vertical axis.
- Eye line is at H/2 from the top within a few millimeters.
- Nose line is at 3H/4 from the top within a few millimeters.
- Ear top aligns with the eye line and ear bottom is near the nose line.
- Eye line is divided into five equal parts across the oval width at that height.
- Guides are light and adjustable; arithmetic checks are recorded.
- Valid alternatives are accepted when proportional relationships are preserved.
Questions and answers
Do I need a ruler for this method?
A ruler makes the arithmetic checks easier, but you can use a folded paper strip to compare equal distances. Record H and compute fractions before drawing guides.
What if my head oval is wider than the 2:3 example?
The vertical fractions still apply. Measure the oval width at the eye line and divide that width into five equal parts for eye placement. Wider ovals may need slight eye spacing adjustments, which are valid alternatives.
Is the eye line always at the midline?
In this construction, yes: the eye line is at H/2 from the top, which is the midline. Other conventions exist, but this lesson uses the midline for consistency and checkability.
How do I know if my ear placement is acceptable?
Check that the ear top aligns with the eye line and the ear bottom is near the nose line (3H/4). Small deviations that preserve these relationships are acceptable.