Free original lessons
Pencil Drawing of Interlocked Holding Hands: Overlap, Shading, and Practice
Learn to draw two hands clasped with clear finger overlap order, knuckle crease shading, and a blank-panel practice method using pencil only.
Free lesson
Four exercises
Worked answers
Object Drawing Lessons
This lesson focuses on the specific problem of drawing two hands interlocked in a holding-hands pose. You will plan the overlap order of fingers, build a clean pencil construction, shade knuckle creases to show depth, and test your result with a simple self-check. The convention for hand proportion is defined below: x-height is the distance from the baseline of the palm to the midline of the knuckles; letter styles and hand shapes vary, so valid alternatives are allowed. All numerical values are hypothetical examples for measurement practice, not manufacturing standards. Measure your own paper and pencil before drawing.
Practice materials: Printable downloads are not available for this lesson yet. Use the instructions and four exercises below.
Reference illustration
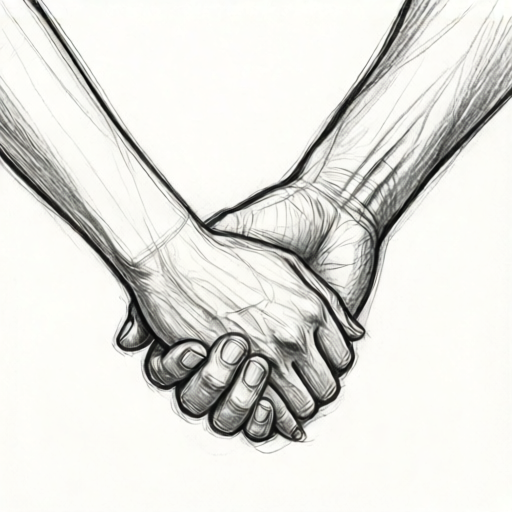
Use the stated measurements and conventions for each exercise.
Plan the overlap order before drawing
Interlocked hands fail most often because the artist draws fingers in the order they are seen rather than the order they overlap. Decide which hand is in front at each crossing. A simple convention: the hand entering from the left is Hand A, the hand entering from the right is Hand B. Mark each crossing as A-over-B or B-over-A on a planning sketch.
Use a light pencil and keep the palm baseline horizontal. Define x-height as the vertical distance from the palm baseline to the midline of the knuckles. For this exercise, a hypothetical x-height of 3 cm on A4 paper is a starting measurement; adjust to your actual hand size and paper.
- Draw two palm baselines 6 cm apart as a hypothetical spacing.
- Sketch four finger tubes per hand as simple rounded rectangles.
- Label every crossing point with A-over-B or B-over-A.
- Erase the hidden portions of the back finger at each crossing.
Build the construction with finger tubes
A finger tube is a long rounded rectangle with a slight taper toward the tip. Draw the front finger completely, then draw the back finger only up to the front finger's edge. This creates a clean overlap without guessing. Keep the knuckle midline visible as a light guide.
Check that each finger has three segments separated by two crease lines. The crease lines should curve gently toward the palm, not run straight across. If a finger looks flat, increase the taper by 1–2 mm at the tip as a hypothetical adjustment.
- Draw the front finger tube first at each crossing.
- Stop the back finger tube at the front finger's outline.
- Add two curved crease lines per finger.
- Compare tube widths: they should differ by no more than 2 mm unless the hands differ in size.
Shade knuckle creases for depth
Shade only the crease valleys and the underside of each overlapping finger. Use a soft pencil and short strokes that follow the finger's curve. Leave the top of each knuckle light. This contrast makes the overlap read as three-dimensional.
A simple value plan: lightest on the front finger's top, medium on the back finger's visible side, darkest in the crease valley. Test the values by squinting; the crease should be the darkest narrow band.
- Outline each crease valley with a light line.
- Fill the valley with short parallel strokes.
- Darken the underside of every front finger at a crossing.
- Erase any shading that spills onto the top of a knuckle.
Use the blank panel to draw a new pair
The planned printable includes a blank panel for a new hand pair. In the panel, repeat the same sequence with a different overlap order. This tests whether you can apply the method rather than copy one drawing. Keep the palm baselines and x-height consistent with your first drawing.
Before publication, the blank panel must be measured on the actual paper. A hypothetical panel size of 12 cm by 8 cm is only an example; confirm the real dimensions with a ruler.
- Draw two new palm baselines in the panel.
- Choose a new overlap order and label each crossing.
- Complete the finger tubes and crease lines.
- Shade the creases and compare with the first drawing.
Worked example
Two hands interlock with Hand A entering from the left. At the first crossing, A is over B. At the second crossing, B is over A. Draw the construction and shade the creases.
Worked answer
Draw two palm baselines 6 cm apart as a hypothetical spacing. Sketch Hand A's front finger completely at the first crossing, then stop Hand B's finger at A's edge. At the second crossing, reverse the order: draw B's finger completely and stop A's finger at B's edge. Add two curved crease lines per finger, then shade only the crease valleys and the undersides at each crossing. The result shows two clear overlaps with light knuckle tops and dark crease bands.
Four practice exercises
Exercise 1
On a planning sketch, two hands cross at three points. Hand A is over B at the first and third crossings; B is over A at the second. List the drawing order for each crossing.
Show answer and check
First crossing: draw A's finger completely, stop B at A's edge. Second crossing: draw B's finger completely, stop A at B's edge. Third crossing: draw A's finger completely, stop B at A's edge.
Why: The front finger is always drawn completely first; the back finger is drawn only up to the front finger's outline. The labels determine which finger is front at each crossing.
Check: Verify that each crossing has exactly one complete finger and one stopped finger, and that the labels match the order.
Exercise 2
A finger tube is 12 mm wide at the base and tapers to 10 mm at the tip. A second finger tube is 11 mm wide at the base and tapers to 9 mm at the tip. What is the width difference at the base and at the tip?
Show answer and check
Base difference: 12 − 11 = 1 mm. Tip difference: 10 − 9 = 1 mm.
Why: Subtract the smaller width from the larger width at each location. Both differences are 1 mm, which is within the hypothetical 2 mm limit.
Check: Re-measure both tubes with a ruler and confirm the differences are 1 mm at both points.
Exercise 3
You shade a crease valley with 6 short strokes and the knuckle top with 2 short strokes. If each stroke covers 3 mm of length, what total shaded length is in the crease and on the knuckle top?
Show answer and check
Crease: 6 × 3 = 18 mm. Knuckle top: 2 × 3 = 6 mm. Total: 24 mm.
Why: Multiply the number of strokes by the length per stroke, then add the two totals. The crease should have more shaded length than the knuckle top.
Check: Count the strokes again and multiply by 3 mm; confirm the crease total is larger.
Exercise 4
In a blank panel 12 cm by 8 cm, you draw two palm baselines 6 cm apart. What is the remaining vertical space above and below the baselines if the baselines are centered?
Show answer and check
Remaining vertical space: 8 − 6 = 2 cm total, so 1 cm above and 1 cm below.
Why: Subtract the baseline spacing from the panel height, then divide by two for centering. The units are consistent in centimeters.
Check: Measure the panel height and baseline spacing with a ruler; confirm 1 cm margins above and below.
Common mistakes
- Drawing fingers in visual order instead of overlap order. Label every crossing A-over-B or B-over-A before drawing any finger tube.
- Making all fingers the same width. Taper each finger by 1–2 mm at the tip as a hypothetical adjustment and compare widths.
- Shading the whole finger instead of the crease valley. Keep the knuckle top light and darken only the narrow crease band and the underside at crossings.
- Erasing the front finger's outline when removing hidden lines. Erase only the back finger's hidden segment, stopping at the front finger's edge.
Self-check rubric
- Every crossing is labeled A-over-B or B-over-A before drawing.
- Front finger tubes are complete; back finger tubes stop at the front finger's edge.
- Each finger has two curved crease lines and a visible taper.
- Crease valleys are the darkest narrow bands; knuckle tops remain light.
- The blank panel contains a new hand pair with a different overlap order.
- Valid alternatives in hand shape and letter style are accepted if overlap and shading are clear.
Questions and answers
How do I decide which hand is in front?
Choose one hand as the front hand for the whole drawing, then mark each crossing. Consistency matters more than which hand you choose.
What is x-height in this lesson?
X-height is the distance from the palm baseline to the midline of the knuckles. It is a local convention, not a universal standard.
Can I use a different hand shape?
Yes. Hand shapes and letter styles vary. The rubric allows valid alternatives as long as the overlap order and crease shading are clear.
How dark should the crease shading be?
The crease valley should be the darkest narrow band, with the knuckle top left light. Test by squinting.