Free original lessons
Pencil Lip Drawing: Contour and Shading Steps
Learn to draw lips in pencil using a clear contour sequence and layered shading for highlight, crease, and volume.
Free lesson
Four exercises
Worked answers
Object Drawing Lessons
This lesson teaches a repeatable pencil method for drawing lips: first build a simple contour from measured landmarks, then shade in ordered layers to show volume, a soft highlight, and the central crease. The convention used here is that the lip midline is the line where the upper and lower lip meet, and the mouth corners sit on a horizontal axis. All numerical values are hypothetical examples for practice; measure your own paper and pencil to set real limits. Work on smooth paper with a graphite pencil you can sharpen to a fine point, plus a soft eraser and a blending tool such as a paper stump or your fingertip wrapped in tissue.
Practice materials: Printable downloads are not available for this lesson yet. Use the instructions and four exercises below.
Reference illustration
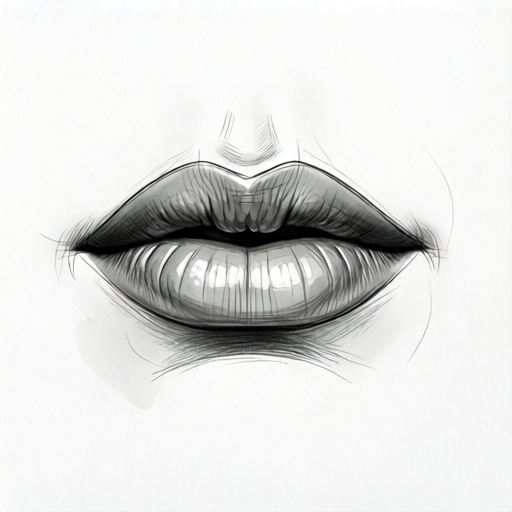
Use the stated measurements and conventions for each exercise.
Set the contour with landmarks
Begin by drawing a light horizontal axis for the mouth corners. Mark two corner points about 6 cm apart as a hypothetical example. Find the midline halfway between them and mark a gentle curve for the lip seam: the seam dips slightly at the center relative to the corner axis, then rises back toward each corner.
Add the upper lip contour above the seam and the lower lip contour below it. Keep the upper lip slightly thinner than the lower lip in this convention, and let the center of the lower lip curve outward. Check symmetry by comparing distances from each corner to the center dip; adjust lightly before darkening any line.
- Draw a faint horizontal axis and mark two corner points.
- Mark the center point and sketch the lip seam as a shallow curve.
- Sketch the upper lip contour from corner to center to corner.
- Sketch the lower lip contour with a fuller center curve.
- Compare left and right distances and erase to correct asymmetry.
Shade in ordered layers
Shading follows a simple order: base tone, crease, shadow under the lower lip, then highlight. First apply a light even tone over both lips with the side of the pencil, keeping the highlight area on the lower lip nearly clear. Next darken the lip seam and the small crease lines that radiate from the center, using short strokes that follow the lip surface.
Add a soft shadow just below the lower lip to separate it from the skin, then refine the corners with slightly darker graphite. Leave the highlight as bare paper or lift graphite with the eraser. Blend gently only where the form turns away from the light; keep the seam crisp so the lips read clearly.
- Apply a light base tone over both lips, avoiding the highlight zone.
- Darken the lip seam and central crease with short directional strokes.
- Add a soft shadow under the lower lip and at the corners.
- Blend the turning edges, then lift graphite to restore the highlight.
- Check value contrast: seam darkest, highlight lightest, lips mid-tone.
Refine edges and check the result
Refinement is about edge quality. The outer contour should be soft where the lip meets skin and sharper at the seam and corners. Use a fine point for the seam and a light touch for the outer edge. Step back from the drawing and compare the darkest value, the lightest value, and the midpoint value; if the highlight is not clearly lighter than the base tone, lift more graphite.
Finally, confirm the contour reads as lips without skin details. The drawing should show a clear seam, a fuller lower lip, a soft highlight, and a shadow beneath. If any step looks muddy, erase back to the contour and rebuild the shading in the same order.
- Soften the outer contour and sharpen the seam and corners.
- Compare darkest, lightest, and mid values from a short distance.
- Lift graphite if the highlight is not distinct.
- Erase and rebuild any muddy area in the same layer order.
Worked example
A learner draws a lip contour with corners 6 cm apart and a center dip 1 cm above the corner axis. They shade a light base tone, darken the seam, add a shadow under the lower lip, and leave a highlight on the lower lip. The highlight looks only slightly lighter than the base tone. What should they adjust, and in what order?
Worked answer
Lift more graphite from the highlight area first, then compare the seam and the shadow under the lower lip. If the highlight is still weak, darken the seam slightly with a fine point and deepen the shadow under the lower lip. Keep the outer contour soft. Recheck that the seam is darkest, the highlight is lightest, and the lips are mid-tone.
Four practice exercises
Exercise 1
On a blank sheet, mark two corner points 5 cm apart on a faint horizontal axis. Mark the center point and draw a lip seam that dips 0.8 cm above the axis at the center. Then sketch an upper lip contour and a lower lip contour using the convention that the lower lip is fuller at the center. Describe how you check symmetry.
Show answer and check
A contour with corners on the axis, a center dip about 0.8 cm above it, a thinner upper lip, and a fuller lower lip. Symmetry is checked by comparing the distance from each corner to the center dip and the left-right height of the contour at matching points.
Why: The landmark order fixes the corners and center before curves are added, so symmetry can be measured rather than guessed. The 5 cm and 0.8 cm values are hypothetical examples.
Check: Measure the two corner-to-center distances and confirm they are equal within your pencil width; compare left and right contour heights at two matching points.
Exercise 2
A drawing has a light base tone over both lips, a dark seam, and a shadow under the lower lip, but no highlight. The base tone and the shadow look almost the same value. List the next three shading actions in order and explain what each changes.
Show answer and check
First lift graphite from the planned highlight area on the lower lip to make it the lightest value. Second, darken the seam slightly with a fine point so it remains the darkest value. Third, adjust the shadow under the lower lip so it is darker than the base tone but lighter than the seam.
Why: The value order must be seam darkest, highlight lightest, lips and shadow in between. Fixing the highlight first prevents over-darkening the whole drawing.
Check: Squint at the drawing: the seam should read darkest, the highlight lightest, and the shadow should separate from the base tone.
Exercise 3
You have drawn a lip contour with corners at the same height, but the seam is blended until it is barely visible. State two repair steps that preserve the contour, and explain how you will check the repair.
Show answer and check
Erase back to the contour if needed, then redraw the seam with a fine point using short strokes and keep it unblended. Blend only the outer turning edges. Check by comparing the seam value with the highlight and base tone; the seam should be clearly darker.
Why: The seam carries the lip structure, so it must stay crisp. Blending only the turning edges keeps volume without losing the seam.
Check: Look at the drawing from a short distance and confirm the seam is the darkest line and the outer contour is softer.
Exercise 4
A learner shades a lip drawing and finds the lower lip looks flat. They have a base tone, a seam, and a highlight, but no shadow under the lower lip. Describe the missing step, where to place it, and how to check that the lower lip now reads as fuller.
Show answer and check
Add a soft shadow just below the lower lip, following its curve and keeping it lighter than the seam. Then compare the lower lip highlight with the shadow: the highlight should be lightest, the shadow should separate the lip from the skin, and the seam should remain darkest.
Why: The shadow under the lower lip creates separation and volume. Placing it below the contour, not on the lip itself, keeps the lip surface mid-tone.
Check: Check that the shadow is darker than the base tone but lighter than the seam, and that the highlight on the lower lip is still the lightest area.
Common mistakes
- Making the upper and lower lips exactly the same thickness. Use the convention that the upper lip is slightly thinner and the lower lip fuller at the center; check the center dip against the corners.
- Shading the highlight with graphite and then trying to erase it cleanly. Plan the highlight before shading and keep that area nearly clear; lift graphite early rather than scrubbing later.
- Blending the lip seam until it disappears. Keep the seam crisp by shading it last with a fine point and blending only the turning edges.
- Drawing the mouth corners at different heights. Start with a faint horizontal axis and measure equal distances from the center before adding contour curves.
Self-check rubric
- Contour uses a horizontal corner axis and a clear lip seam.
- Upper and lower lip proportions follow the chosen convention and are checked for symmetry.
- Shading follows the order: base tone, seam and crease, shadow under lower lip, highlight.
- Seam is the darkest value and the highlight is the lightest value.
- Outer contour is softer than the seam and corners.
- Valid alternative lip shapes are accepted if the landmark order and value order are clear.
Questions and answers
Do I need special pencils?
No. A graphite pencil you can sharpen to a fine point, a soft eraser, and a blending tool are enough. Measure your own pencil and paper to set practical limits.
How dark should the seam be?
The seam should be the darkest value in the drawing, but keep it controlled. Build it in short strokes and compare it with the highlight and base tone.
Can I use a different lip shape?
Yes. The convention here is a midline seam with corners on a horizontal axis, but lip thickness and curve vary. Keep the landmark order and adjust proportions to your subject.
What if my shading looks flat?
Check the three values: seam darkest, highlight lightest, lips mid-tone. Add the shadow under the lower lip and lift graphite from the highlight to increase contrast.