Free original lessons
Draw a Cage: Bar Spacing, Curved Top, and Depth
Learn to draw a cage with even bar spacing, a smooth curved top, and clear depth lines using a simple construction sequence and checkable measurements.
Free lesson
Four exercises
Worked answers
Object Drawing Lessons
This lesson teaches a reliable way to draw a cage as a constructed object rather than a decorative sketch. You will set a baseline, mark bar spacing with simple arithmetic, build a curved top from a center point and radius, and add depth lines that read as a second side. The convention is explicit: x-height means baseline to midline for lettering, but for cage bars we use a fixed spacing unit measured along the baseline. Letter styles vary, so the rubric accepts any consistent bar rhythm and any smooth curve that meets the stated check. All numerical values below are hypothetical examples; measure your own paper and tools before drawing.
Practice materials: Printable downloads are not available for this lesson yet. Use the instructions and four exercises below.
Reference illustration
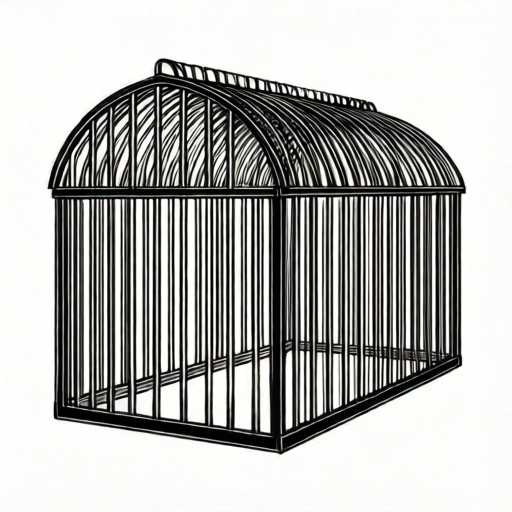
Use the stated measurements and conventions for each exercise.
Set the baseline and bar spacing
Start with a horizontal baseline for the cage floor. Choose a spacing unit, for example 10 mm, and mark it as a hypothetical value. Count the bars you want, for example seven vertical bars, and multiply: six gaps times 10 mm equals 60 mm of span. Mark the first and last bar positions, then divide the span into equal gaps using a ruler. Keep the bar tops at the same height for the front face.
Check spacing by measuring every gap, not just the total. If the total is 60 mm and there are six gaps, each gap should be 10 mm within your drawing tolerance. Record the actual measurements you take from your paper.
- Draw a light baseline and label the left end A and right end B.
- Mark the first bar at A and the last bar at B, then measure AB.
- Divide AB by the number of gaps to get the spacing unit.
- Mark each intermediate bar position with a small tick.
- Draw vertical bars from the baseline to the front-top height.
Construct the curved top
The curved top is a smooth arc joining the two outer bar tops. Mark the midpoint of the front-top span, then choose a rise, for example 15 mm above the bar tops. Draw a light center line and mark the rise point. Use a compass or a smooth freehand arc that passes through the left top, the rise point, and the right top. The curve must be continuous and must not dip below the bar tops.
A simple check is symmetry: the distance from the left top to the rise point should equal the distance from the rise point to the right top when measured along the arc. If you use a compass, set the radius so the arc passes through all three points; label the radius as a hypothetical value.
- Mark the midpoint of the front-top span.
- Measure the chosen rise above the bar tops and mark it.
- Draw a light arc through left top, rise point, and right top.
- Check that the arc is smooth and symmetric.
- Erase construction marks only after the arc is confirmed.
Add depth lines
Depth makes the cage read as a box. Choose a depth offset, for example 20 mm to the upper right at 30 degrees. From each front corner, draw a light depth line of equal length and direction. Connect the back corners with a second baseline and a second curved top. The back curve should be parallel in construction to the front curve, not a copy shifted without checking.
Check depth by measuring each depth line; they should all equal the chosen offset. The back baseline should be parallel to the front baseline. Keep depth lines lighter than the front bars so the front face remains dominant.
- Choose a depth offset and angle, and label them as hypothetical.
- Draw depth lines from the front corners.
- Connect the back corners to form the back baseline.
- Draw the back curved top using the same rise and span.
- Darken front bars and curve, leaving depth lines lighter.
Finalize and self-check
Review the drawing against three checks: equal bar gaps, a smooth symmetric curve, and equal depth lines. Measure the gaps and depth lines with a ruler and record the values. If a gap differs by more than your stated tolerance, adjust the tick before darkening. The rubric accepts valid alternatives: bars may be thicker or thinner, the curve may be flatter or steeper, and depth may go to either side, provided the stated checks pass.
- Measure every bar gap and note the largest difference.
- Check curve symmetry by comparing left and right arc lengths.
- Measure every depth line and compare.
- Adjust any failed check before final darkening.
- Label the drawing with spacing unit, rise, and depth offset.
Worked example
A cage front has five bars and four gaps. The span from first to last bar is 48 mm. The rise is 12 mm and the depth offset is 18 mm. State the spacing unit and describe the construction checks.
Worked answer
Spacing unit = 48 mm divided by 4 gaps = 12 mm per gap. Mark four equal gaps of 12 mm. Draw the curved top through the left top, a rise point 12 mm above the midpoint, and the right top. Draw depth lines of 18 mm from each front corner in one direction, then connect the back corners. Check: every gap measures 12 mm, the arc is smooth and symmetric, and every depth line measures 18 mm.
Four practice exercises
Exercise 1
A cage front has six bars and five gaps. The span is 50 mm. Calculate the spacing unit and state one check.
Show answer and check
Spacing unit = 50 mm divided by 5 gaps = 10 mm per gap. Check that every gap measures 10 mm within your drawing tolerance.
Why: The number of gaps is one less than the number of bars, so five gaps divide the 50 mm span equally.
Check: Measure each of the five gaps with a ruler and compare the largest difference to your stated tolerance.
Exercise 2
A curved top has a span of 60 mm and a rise of 15 mm. Describe how to mark the three points for the arc and one symmetry check.
Show answer and check
Mark the left top, the midpoint plus 15 mm rise, and the right top. Draw a smooth arc through all three. Check that the left-to-rise arc length equals the rise-to-right arc length within tolerance.
Why: Three points define a smooth arc; symmetry ensures the curve is not lopsided.
Check: Use a string or flexible ruler to compare the two arc lengths, or compare horizontal distances from the midpoint.
Exercise 3
A cage drawing uses a depth offset of 20 mm at 30 degrees. Four depth lines are drawn. State the expected measurement for each and one parallel check.
Show answer and check
Each depth line should measure 20 mm. Check that each depth line is parallel to the first by comparing angles or using a set square.
Why: Equal offset and angle keep the back face parallel to the front face.
Check: Measure each depth line and compare angles against a reference line.
Exercise 4
A student draws seven bars with gaps of 9, 10, 11, 10, 9, and 11 mm. The stated tolerance is 1 mm. Does the drawing pass the gap check? Explain.
Show answer and check
No. The gaps range from 9 mm to 11 mm, a difference of 2 mm, which exceeds the 1 mm tolerance. Adjust the ticks so all gaps are within 1 mm of the chosen unit.
Why: The check compares the largest and smallest gap against the stated tolerance, not just the average.
Check: Subtract the smallest gap from the largest gap and compare to the tolerance.
Common mistakes
- Marking bar positions by eye instead of dividing the span. Measure the total span, divide by the number of gaps, and mark ticks with a ruler.
- Drawing the curved top as a series of straight segments. Use a compass or a single smooth arc through three marked points.
- Making depth lines different lengths. Choose one depth offset and measure every depth line to that value.
- Darkening construction lines before checking. Keep construction light until gaps, curve, and depth all pass the checks.
Self-check rubric
- Bar gaps are equal within the stated drawing tolerance.
- The curved top is smooth and passes through the left top, rise point, and right top.
- The curve is symmetric about the midpoint within the stated tolerance.
- Depth lines are equal in length and parallel.
- Front bars and curve are visually dominant over depth lines.
- Labels state the spacing unit, rise, and depth offset as hypothetical values.
Questions and answers
Do I need a compass?
No. A smooth freehand arc through three marked points is acceptable if it passes the symmetry check.
Can the depth go to the left instead of the right?
Yes. Choose one direction and keep every depth line equal and parallel.
How many bars should I draw?
Any number that gives clear gaps. The example uses seven bars and six gaps.
What if my paper is a different size?
Measure your actual paper and choose a spacing unit that fits; label it as a hypothetical example.