Free original lessons
Charcoal Flower Drawing: Smudge, Blend and Erase for Petal Tones
Learn charcoal flower drawing by smudging, blending and erasing highlights on petals, with stem contrast, a worked example, four exercises and a marking rubric.
Free lesson
Four exercises
Worked answers
Object Drawing Lessons
Charcoal rewards touch: a fingertip smudge softens a petal edge, a kneaded eraser lifts a highlight, and a compressed stick deepens a stem. This study builds control of those tonal moves on a single flower. Work on a sheet you can tilt; keep a scrap of the same paper beside you for testing every mark before it touches the flower. The convention used here is simple: petal tone is judged by how much charcoal sits between the paper's white and the darkest stick mark, and a highlight is any area lighter than the tone around it, whether made by erasing or by leaving paper untouched. Letter styles and handwriting vary, so written labels are optional; the drawing itself carries the evidence.
Practice materials: Printable downloads are not available for this lesson yet. Use the instructions and four exercises below.
Reference illustration
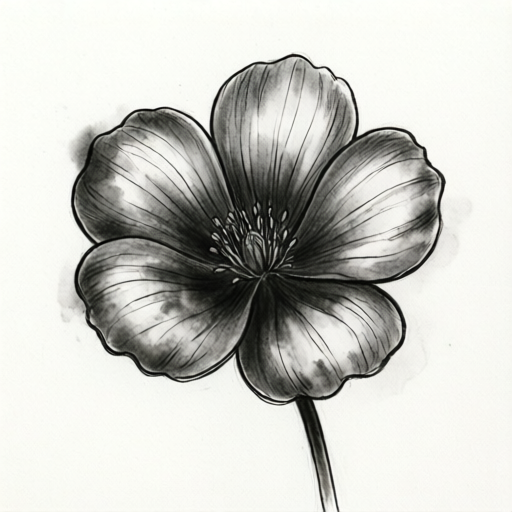
Use the stated measurements and conventions for each exercise.
Reading tone on a petal
Treat each petal as a small map of three zones: a shadow near the base or overlap, a mid tone across the body, and a light edge or vein. Charcoal lets you move between zones by adding, spreading or removing dust. Before drawing, test your sticks on scrap paper to see how dark each one goes and how easily it lifts.
Keep the flower large enough that a fingertip covers only part of a petal. Small flowers force you to smudge across edges and lose control. A bloom roughly the width of your hand gives room for separate zones.
- Draw the flower outline lightly with vine charcoal, checking petal overlaps first.
- Test one vine stick and one compressed stick on scrap paper; note their relative darkness.
- Mark the shadow zone on two petals only, leaving the rest of the paper white.
- Step back and confirm the outline still reads before adding more tone.
Smudging versus blending
Smudging spreads loose charcoal dust with a finger, cloth or paper stump; it produces a soft, slightly uneven tone. Blending works charcoal already on the paper into a smoother gradient, often with a stump or a soft brush. Use smudge to soften a hard edge or to lay a broad mid tone, and blend to transition from shadow to light without a visible seam.
Work from light to dark. If you smudge too dark too early, lifting tone back is slow and can damage the paper surface. Keep a clean finger or a fresh corner of cloth for lightening, and never smudge with a finger that already carries dark dust.
- Lay a light vine charcoal line inside one petal's shadow zone.
- Smudge outward toward the petal edge with one clean finger, stopping before the edge.
- Add a second, slightly darker line nearer the base and blend it into the first tone.
- Compare the petal with its neighbour; adjust only the darker one so the pair reads as a set.
Erasing to highlight
A highlight is not white paint; it is paper showing through. Kneaded eraser pressed and lifted removes tone gently, while a harder eraser can cut a crisp shape. For petal veins and rim light, press the kneaded eraser into a point, touch the petal, and lift straight up rather than rubbing sideways.
Erase after the tone is in place, not before. Decide where the light falls, then remove tone in that zone and soften its border with a light blend so the highlight does not look like a hole. Keep erased areas smaller than you expect; a little light reads strongly against charcoal.
- Identify one petal that should catch the most light.
- Shape a kneaded eraser to a point and press it onto the petal's light zone.
- Lift straight up; repeat in small touches rather than one large rub.
- Blend the highlight border lightly so it merges with the mid tone.
Stem contrast and finishing
The stem anchors the flower. Give it a darker, cooler tone than the petals by using compressed charcoal, and keep its edges firmer than petal edges. A single light line along one side of the stem, made by erasing, suggests roundness without extra shading.
Finish by checking the whole flower at arm's length. The darkest dark should sit at a petal overlap or the stem base, and the lightest light should be a small erased area on a petal. If every petal has the same tone, choose one to darken and one to lighten.
- Draw the stem with compressed charcoal, keeping edges crisp.
- Erase a thin light line along one side of the stem.
- Darken one petal overlap to create a focal shadow.
- Check the flower from a distance and adjust one tone only.
Worked example
A single open bloom with five petals is drawn at hand width. Petal 1 overlaps petal 2 at the base. The light comes from the upper left. Describe the tonal plan: where to smudge, where to blend, where to erase, and how the stem is treated.
Worked answer
Smudge a light mid tone across the lower half of petal 1 and the upper half of petal 2, working from the overlap outward. Blend the border between those two tones so the overlap reads as one shadow. Erase a small pointed highlight on the upper-left edge of petal 1 and a thin vein on petal 3, then blend each border lightly. Keep petals 4 and 5 mostly light with only a smudged base. Draw the stem with compressed charcoal, darker than any petal, and erase a thin light line along its left side. The darkest dark sits at the petal 1 and 2 overlap; the lightest light is the erased edge on petal 1.
Four practice exercises
Exercise 1
On a scrap sheet, draw two petal shapes side by side. Smudge a light tone across the left petal only, using a clean finger and short strokes from base to edge. Leave the right petal white. Describe what you see at the shared edge.
Show answer and check
The left petal shows a soft, slightly uneven tone; the right petal stays white; the shared edge is soft on the left and crisp on the right.
Why: Smudging spreads loose charcoal outward, so the tone softens toward the edge while the untouched petal keeps a clean boundary.
Check: Hold the scrap at arm's length: the left petal should read lighter than a compressed stick mark and the right petal should show no grey.
Exercise 2
Draw one petal with a dark base and a light edge. Blend the transition between them with a stump or soft brush. Then erase a small pointed highlight near the light edge. State the order of operations and why.
Show answer and check
Lay dark at the base, blend toward the light edge, then erase the highlight and lightly blend its border. Erasing last keeps the highlight from being filled in by later blending.
Why: Blending before erasing prevents the highlight from being smothered; a light blend after erasing keeps the highlight from looking like a hole.
Check: Check that the highlight is smaller than the mid tone and that no hard white patch sits on the petal.
Exercise 3
Draw a stem and a single petal attached to it. Make the stem darker than the petal using compressed charcoal, and erase a thin light line along one side of the stem. Describe how the stem contrast changes the flower.
Show answer and check
The darker stem with a thin erased light line reads as round and firm, and it makes the lighter petal appear softer by comparison.
Why: Contrast between firm, dark stem edges and soft petal edges separates the two forms and anchors the flower.
Check: Squint at the drawing: the stem should be the darkest element and the erased line should be visible but thin.
Exercise 4
Plan a five-petal bloom at hand width with light from the upper left. Name which petal gets the darkest overlap shadow, which gets the erased highlight, and which two petals stay mostly light. Then draw it and check your plan against the result.
Show answer and check
A valid plan names one petal for the darkest overlap, one for the erased highlight, and two mostly light petals, with the fifth carrying a smudged mid tone. The drawing should match the named plan.
Why: A written tonal plan forces distinct values before marks are made, which prevents uniform grey petals.
Check: Compare the finished drawing with the plan: the named darkest and lightest areas should be identifiable at arm's length.
Common mistakes
- Smudging with a dark, dirty finger across the whole petal. Use a clean finger or fresh cloth corner and smudge in short strokes from shadow toward light.
- Erasing a large white patch that looks like a hole. Press and lift a pointed kneaded eraser in small touches, then lightly blend the border.
- Making every petal the same mid tone. Choose one petal to darken at its overlap and one to lighten at its edge.
- Letting the stem be lighter than the petals. Use compressed charcoal for the stem and keep its edges firmer than petal edges.
Self-check rubric
- Petal tones show at least three distinct values: light, mid and dark.
- Smudged areas are soft and uneven; blended areas transition without a hard seam.
- At least one erased highlight is small, pointed and blended at its border.
- The stem is darker than the petals and has firmer edges.
- The darkest dark sits at an overlap or stem base, and the lightest light is on a petal.
- Valid alternatives are accepted: a highlight may be left as untouched paper instead of erased, and smudge tools may be finger, cloth or stump, provided the tonal result matches the plan.
Questions and answers
Can I use only vine charcoal?
Yes, but vine charcoal is light and lifts easily. Build tone in layers and test darkness on scrap paper first.
How do I keep smudging from looking muddy?
Smudge one zone at a time, keep a clean tool for lightening, and avoid carrying dark dust into light areas.
Should I erase before or after blending?
Erase after the tone is laid, then lightly blend the highlight border so it sits in the petal rather than on top.
What if my flower outline is too small?
Redraw it larger on a fresh sheet; a bloom about the width of your hand gives room for separate tonal zones.