Free original lessons
Clergy Figure Drawing: Vestment Layers and Posture
Learn to draw a clergy figure by building vestment layers over a posture guide, using a clear convention for proportion and a rubric that allows valid stylistic variation.
Free lesson
Four exercises
Worked answers
Object Drawing Lessons
This lesson teaches a repeatable method for drawing a clergy figure with vestment layers and posture. You will establish a posture guide, then add vestment layers in a logical order, and finally refine the silhouette. The convention used here is simple: x-height is measured from the hip/waist midline up to the shoulder line, and letter styles vary, so the rubric rewards structural clarity rather than a single universal shape. All measurements are hypothetical examples; measure your own paper and tools before drawing.
Practice materials: Printable downloads are not available for this lesson yet. Use the instructions and four exercises below.
Reference illustration
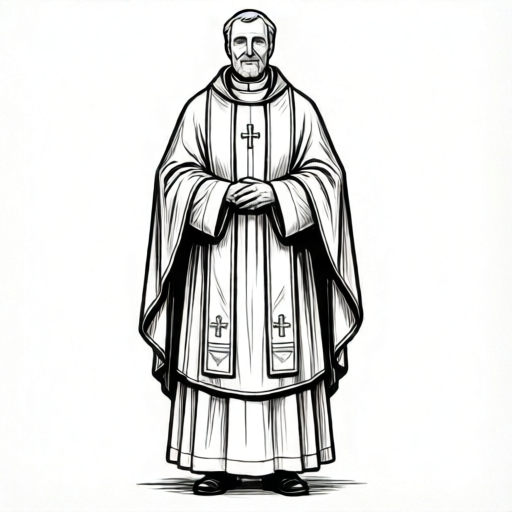
Use the stated measurements and conventions for each exercise.
Establishing the Posture Guide
Begin with a vertical center line and a baseline. Mark a midline at the hip/waist. The distance from the hip/waist midline up to the shoulder line is the x-height for the torso; the legs occupy the zone from the baseline to the midline. For example, if your paper is 20 cm wide, a hypothetical x-height of 6 cm gives a clear torso zone, with the shoulders 6 cm above the hip/waist midline. Draw a light oval for the head above the shoulders, then a tapered rectangle for the torso from the midline up to the shoulders.
Posture is defined by three checkpoints: head tilt, shoulder slope, and weight-bearing leg. Draw a small cross on the head oval to show tilt, a shallow curve for shoulders, and a slightly longer line for the weight-bearing leg. Keep all guide lines light so they can be erased or covered by vestments.
- Draw a vertical center line and a baseline.
- Mark a midline at the hip/waist; label the distance from midline to shoulders as x-height.
- Add a head oval above the shoulders with a tilt cross.
- Draw shoulder slope at the top of the x-height and a weight-bearing leg line between baseline and midline.
- Check that the figure fits within the paper margins.
Building Vestment Layers in Order
Vestments are drawn from the innermost visible layer to the outermost. Start with the alb: a long, narrow shape from the shoulders above the midline down to the ankles at the baseline, slightly wider at the hem. Next add the stole as two parallel bands crossing the chest or hanging straight, depending on posture. Then draw the chasuble or outer robe as a broad shape over the torso, leaving the stole visible at the edges.
Use overlapping lines to show layer order. The outermost layer should have the strongest contour, while inner layers use lighter lines. If the figure's arms are raised, adjust the stole bands to follow the arm direction; if arms are folded, keep the bands close to the torso. Label each layer lightly on your draft, then erase labels before finishing.
- Draw the alb from shoulders to ankles.
- Add stole bands following the posture.
- Draw the outer robe over the torso.
- Strengthen the outermost contour.
- Erase guide labels and check layer overlap.
Refining Silhouette and Proportion
Check the silhouette by stepping back from the drawing. The outer robe should create a stable triangular or bell shape, and the head should sit clearly above the shoulders. Measure the head height against the x-height; a hypothetical ratio of 1:3 (head height to torso x-height, i.e., head height is one-third of the x-height) is easy to check with a ruler. Hem width means the total horizontal width of the outer robe at its bottom edge; adjust it so the figure does not look top-heavy.
Handwriting and letter styles vary, so do not force a single vestment shape. Instead, verify that each layer is distinguishable and that posture checkpoints remain visible. Use a simple rubric: posture clarity, layer order, silhouette balance, and line consistency. A drawing can pass with different hem shapes or stole arrangements if these four criteria are met.
- Step back and view the silhouette.
- Measure head height against x-height.
- Adjust hem width for balance.
- Confirm each vestment layer is distinguishable.
- Apply the four-part rubric.
Worked example
Draw a standing clergy figure with arms folded, using a 6 cm hypothetical x-height on a 20 cm wide paper. Show alb, stole, and outer robe.
Worked answer
Center line and baseline drawn; hip/waist midline marked, with shoulders 6 cm above it (x-height = 6 cm). Head oval above the shoulders with slight tilt. Shoulders slope gently; weight-bearing leg line on the left between baseline and midline, ankles at the baseline. Alb drawn from shoulders down to ankles at the baseline, stole bands close to torso, outer robe as a broad bell shape over torso. Outermost contour strengthened; guide labels erased. Rubric check: posture clear, layer order correct, silhouette balanced, line weights consistent.
Four practice exercises
Exercise 1
Draw a clergy figure with arms raised. Use a hypothetical x-height of 5 cm. Show alb, stole, and outer robe.
Show answer and check
A figure with raised arms, alb from shoulders down to ankles at the baseline, stole bands following arm direction, outer robe over torso. Hip/waist midline marked with shoulders 5 cm above it (x-height = 5 cm). Posture checkpoints visible.
Why: Raised arms change stole direction; layer order remains inner to outer. The 5 cm x-height is a local proportion guide.
Check: Measure the distance from hip/waist midline to shoulders with a ruler to confirm the 5 cm x-height; confirm stole bands follow arms; check outermost contour is strongest.
Exercise 2
Draw a seated clergy figure with folded hands. Use a hypothetical head-to-x-height ratio of 1:3. Show two visible vestment layers.
Show answer and check
A seated figure with folded hands, alb and outer robe visible, head height about one-third of the x-height (head:x-height = 1:3). Posture checkpoints adapted for seated position.
Why: Seated posture changes shoulder slope and leg line; ratio check keeps proportion consistent.
Check: Measure head height and the distance from hip/waist midline to shoulders (x-height); confirm head height is about one-third of that x-height (ratio close to 1:3); check two layers are distinguishable.
Exercise 3
Draw a clergy figure from the side view with a stole hanging straight. Use a hypothetical hem width of 8 cm. Show layer overlap.
Show answer and check
Side-view figure with straight stole, alb and outer robe overlapping, total hem width about 8 cm. Outermost contour strong.
Why: Side view tests layer overlap and silhouette balance; hem width is a local measurement example.
Check: Measure hem width; confirm stole hangs straight; check overlap lines are logical.
Exercise 4
Draw a clergy figure with a slight head tilt and one hand holding a book. Use any x-height that fits your paper. Apply the rubric.
Show answer and check
Figure with head tilt cross, one hand holding a book, alb, stole, and outer robe. Rubric applied with valid alternatives allowed.
Why: Head tilt and hand position test posture clarity; rubric allows different vestment shapes.
Check: Check head tilt cross, shoulder slope, and weight-bearing leg; confirm the distance from hip/waist midline to shoulders is your chosen x-height; confirm four rubric criteria are met.
Common mistakes
- Drawing the outer robe before the alb and stole. Build from inner to outer layers so overlaps read correctly.
- Ignoring the posture guide after adding vestments. Keep guide lines visible until the final check, then compare shoulder slope and weight-bearing leg.
- Making all vestment lines the same weight. Use a stronger contour for the outermost layer and lighter lines for inner layers.
- Forcing one universal vestment shape. Use the rubric to allow valid alternatives in hem shape and stole arrangement.
Self-check rubric
- Posture clarity: head tilt, shoulder slope, and weight-bearing leg are visible.
- Layer order: alb, stole, and outer robe overlap logically.
- Silhouette balance: outer robe creates a stable shape without top-heavy distortion.
- Line consistency: outermost contour is strongest; inner layers are lighter.
- Valid alternatives: different hem shapes or stole arrangements pass if the four criteria above are met.
Questions and answers
What does x-height mean in this lesson?
X-height is the distance from the hip/waist midline up to the shoulder line of the torso. It is a local convention for proportion, not a universal standard.
Can I use different vestment shapes?
Yes. The rubric rewards clear layer order and posture, so different hem shapes or stole arrangements can pass.
How do I check posture without a model?
Use the three checkpoints: head tilt cross, shoulder slope, and weight-bearing leg line. Compare them before and after adding vestments.
Are the numerical examples required?
No. The 6 cm x-height and 1:3 ratio are hypothetical examples. Measure your own paper and choose values that fit.