Free original lessons
Realistic Hair Drawing: Strand Flow and Shine Studies
Learn to draw realistic hair by mapping strand direction, part lines, and shine bands. Includes a printable plate plan, practice boxes, and self-checking exercises.
Free lesson
Four exercises
Worked answers
Object Drawing Lessons
Realistic hair drawing depends on two controllable systems: strand direction and shine placement. Strands flow from a part or crown outward, changing direction at curves and layers. Shine appears where light reflects from the curved mass, usually as a band that follows strand flow rather than a single white streak. This lesson teaches you to observe and reproduce those systems using a consistent spacing unit: choose centimeters or a grid unit, measure your actual paper, and label any chosen numerical values as hypothetical examples. You will plan a printable hair plate, practice close-up strand and highlight studies, and check your work with arithmetic and visual tests. All resources described are planned and free; they are not yet built.
Practice materials: Printable downloads are not available for this lesson yet. Use the instructions and four exercises below.
Reference illustration
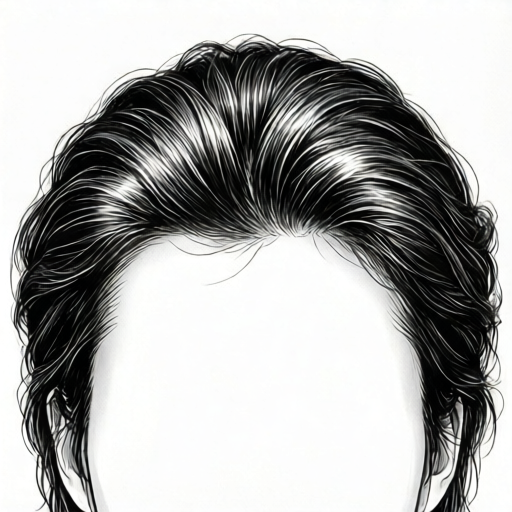
Use the stated measurements and conventions for each exercise.
Mapping Strand Direction from Part to Edge
Begin by locating the part line or crown. Strands radiate from that origin, then bend as they pass over the skull and fall toward the edge. Draw three to five guide curves first, spacing them evenly. Next, add shorter strands between guides, keeping each new line roughly parallel to its neighbor. Where hair changes layer or turns at a shoulder, let the guide curve shift direction gradually rather than kinking.
Use a consistent unit for spacing. For example, if your practice box is 10 cm wide, place guide curves every 2 cm as a hypothetical starting spacing. Measure your actual paper and adjust. The goal is not a fixed number but a checkable relationship: the distance between guides should shrink near curves and widen on flat areas.
- Mark the part line or crown point at the top of the box.
- Draw three to five guide curves from the origin to the lower edge, bending them over the imagined skull.
- Add intermediate strands between guides, keeping them parallel to the nearest guide.
- At layer changes, shift the guide direction by a small angle and continue the strands.
- Check that no strand crosses another without a visible reason such as a layer overlap.
Placing Shine Bands That Follow the Mass
Shine is a band, not a spot. On a curved mass of hair, the highlight usually runs across the width of the mass and follows the strand flow. Draw the band as a soft stripe that crosses several strands at once. Leave the band unshaded or lightly shaded, and darken the hair on either side to create contrast. Avoid drawing individual white hairs inside the band; instead, keep the band as a continuous zone.
Test the band by asking whether it follows the same curve as the guide strands. If the band cuts across strands at a sharp angle, it will look like a scratch rather than a reflection. Adjust the band until it runs parallel to the local strand direction.
- Identify the widest curved area of the hair mass.
- Draw a light band across that area, following the guide curves.
- Shade the hair above and below the band more darkly.
- Soften the band edges with short strokes that follow strand direction.
- Check that the band crosses at least three strands and stays parallel to them.
Close-Up Practice Boxes for Strand and Highlight Studies
Divide a practice sheet into four boxes, each about 8 cm by 8 cm as a hypothetical example; measure your own paper. In box one, draw only strand direction from a single origin. In box two, draw a shine band over existing strands. In box three, combine both with a layer change. In box four, draw a small section of hair with a part line and a shine band, then self-check using the rubric.
Keep each box self-contained. Do not rely on an absent image; instead, describe the imagined hair mass in words before drawing. For example, write 'hair falls from a left part, curves over the ear, and ends in a soft layer' and then draw that description.
- Label each box with its focus: strands, shine, layer change, or combined study.
- Write a one-sentence description of the imagined hair mass above each box.
- Draw the guide curves first, then the shine band, then the finer strands.
- Use the rubric to score each box before moving to the next.
Worked example
A practice box is 10 cm wide. You place five guide curves including the edges, spaced evenly. You then add one intermediate strand between each pair of guides. How many strands are in the box, and what is the new average spacing?
Worked answer
Five guides create four gaps, so the original guide spacing is 10 cm divided by four gaps, which equals 2.5 cm. Adding one intermediate strand per gap adds four strands, for a total of nine strands. Nine strands create eight gaps, so the new average spacing is 10 cm divided by eight gaps, which equals 1.25 cm.
Four practice exercises
Exercise 1
A practice box is 12 cm wide. You draw four guide curves from a left part to the lower edge, spaced evenly. What is the spacing between adjacent guides?
Show answer and check
4 cm.
Why: Four guides create three gaps. 12 cm divided by three gaps equals 4 cm per gap, which is the spacing between adjacent guides.
Check: Count the gaps between guides and divide the box width by that number. Verify that the number of gaps is one less than the number of guides.
Exercise 2
You draw a shine band that crosses five strands. You then add two more strands inside the band. How many strands does the band cross now?
Show answer and check
Seven strands.
Why: The original count is five. Adding two strands inside the band increases the count by two, giving seven.
Check: Recount the strands inside the band after adding the new lines. Confirm the count matches the original plus the added number.
Exercise 3
A hair mass is 8 cm wide at its widest curve. You want a shine band that is one quarter of that width. How wide is the band in centimeters?
Show answer and check
2 cm.
Why: One quarter of 8 cm is 8 divided by four, which equals 2 cm.
Check: Multiply the band width by four and confirm it equals the mass width. Use the same unit throughout.
Exercise 4
You have three guide curves and you add two intermediate strands between each pair of guides. How many strands are there in total?
Show answer and check
Seven strands.
Why: Three guides create two gaps. Adding two intermediate strands per gap adds four strands. Three guides plus four intermediate strands equals seven strands.
Check: Count the gaps, multiply by the number of intermediate strands per gap, then add the original guide count. Confirm the total matches your drawn lines.
Common mistakes
- Drawing strands as straight parallel lines from top to bottom. Bend each guide curve over the imagined skull and let strands follow that bend.
- Placing shine as a single white spot or streak. Draw a soft band that crosses several strands and follows their direction.
- Making all strand spacing equal across the whole head. Narrow the spacing near curves and layer changes, and widen it on flat areas.
- Crossing strands randomly without a layer reason. Only cross strands where a layer overlaps or hair changes direction sharply.
Self-check rubric
- Strand direction: guide curves bend over the imagined skull and strands stay parallel to their nearest guide.
- Shine placement: the band follows strand flow, crosses at least three strands, and is softened at the edges.
- Layer changes: direction shifts gradually and crossings occur only for visible layer overlaps.
- Spacing: guide spacing narrows near curves and widens on flat areas, using a consistent measuring unit and showing the arithmetic.
- Self-check: arithmetic for spacing and strand counts is shown and consistent in units.
Questions and answers
How do I know if my shine band is in the right place?
Check that the band follows the same curve as the guide strands and crosses at least three strands. If it cuts across at a sharp angle, move it until it runs parallel to the local strand flow.
What measuring convention should I use for spacing and band width?
Choose a consistent unit such as centimeters or a grid unit, measure your actual paper, and label any chosen numerical values as hypothetical examples. The checkable relationship between guides, gaps, and band width matters more than a fixed number.
Can I use any paper size for the practice boxes?
Yes. Measure your actual paper and label any chosen numerical values as hypothetical examples. The checkable relationship matters more than a fixed size.
How many guide curves should I start with?
Three to five guide curves are enough to establish direction. Add more only after the guides are consistent.