Free original lessons
Drawing a Grandmother Portrait: Face, Hair, and Posture
Learn to draw a grandmother portrait by building face proportions, shaping hair, and capturing posture with clear, checkable steps and practice tasks.
Free lesson
Four exercises
Worked answers
Object Drawing Lessons
A grandmother portrait is not a generic face with gray hair added. It is a construction problem: place the head, divide the face into reliable proportions, build a hair shape that frames the features, and set a posture that reads as settled and personal. This lesson teaches a repeatable method using simple measurements and a defined drawing convention. You will work from a described reference or from life, using pencil and paper. The goal is a recognizable, respectful portrait sketch, not a photorealistic likeness. All measurements are relative to the head height you draw, so the method scales to any paper size. Use light construction lines, then darken only the final contours. Keep your pencil sharp and your eraser clean. The convention for this lesson: the face oval runs from the top of the skull to the chin; the eye line sits halfway down that oval; the nose base sits halfway between the eye line and the chin; the mouth line sits one third of the way from the nose base to the chin. Hair is drawn as a single outer silhouette first, then divided into strand groups. Posture is described by the angle of the shoulders and the tilt of the head, not by full-body anatomy. Check each stage before moving on.
Practice materials: Printable downloads are not available for this lesson yet. Use the instructions and four exercises below.
Reference illustration
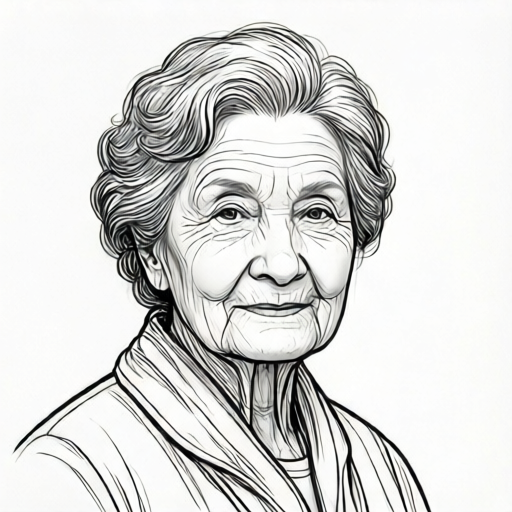
Use the stated measurements and conventions for each exercise.
Blocking the Head and Face Proportions
Begin with a light oval for the skull and jaw. Mark the top of the head and the chin. The vertical distance between them is the head height. Divide this height in half to find the eye line. Divide the lower half again to find the nose base. Divide the space between the nose base and the chin into thirds; the mouth line sits at the first third below the nose. These divisions are a convention, not a universal truth, but they give a consistent starting point.
Place the eyes on the eye line with one eye-width between them. The nose width is roughly the inner corners of the eyes. The mouth width is roughly the distance between the pupils. Draw these as light marks, not final features. Check that the face is symmetrical enough for your purpose; small asymmetries are natural and can be kept.
- Draw a light oval and mark top and chin.
- Halve the height for the eye line.
- Halve the lower half for the nose base.
- Divide nose-to-chin into thirds for the mouth line.
- Mark eye, nose, and mouth widths with light ticks.
Building the Hair Silhouette
Hair changes the outer shape of the head. Draw the hair as one closed silhouette around the skull before adding any strands. Decide whether the hair is close to the head, swept back, or fuller at the sides. The silhouette should touch the top of the skull and frame the face without covering the eye line unless you intend it to.
After the silhouette is stable, divide it into three to five strand groups. Each group should follow a direction, such as back from the forehead or down toward the shoulders. Keep the hairline visible at the forehead and temples. Gray or white hair is shown by leaving more paper white and using fewer dark lines, not by drawing individual white strands.
- Draw one outer hair silhouette around the skull.
- Check that the eye line remains visible.
- Divide the silhouette into three to five strand groups.
- Draw strand direction lines from the hairline outward.
- Leave white paper for light hair; add only a few dark accents.
Setting Posture with Shoulders and Head Tilt
Posture in a portrait is mostly the relationship between the head and the shoulders. Draw a shoulder line that is not perfectly horizontal; a slight slope reads as relaxed. The neck connects the head to the shoulder line. A grandmother portrait often reads well with a gentle forward lean and rounded shoulders, but avoid exaggerating this into a stereotype.
Mark the head tilt by drawing a line through the eye line and comparing it to the shoulder line. A small tilt of five to ten degrees is enough to suggest ease. Keep the chin from pressing into the neck. Check that the neck width is roughly one third of the head width. These are hypothetical example values; measure your own drawing and adjust.
- Draw a slightly sloped shoulder line.
- Place the neck between head and shoulders.
- Mark the eye-line angle against the shoulder line.
- Keep chin clear of the neck.
- Check neck width against head width.
Refining Features and Final Checks
With proportions and silhouette stable, refine the features. Draw the eyes as lids and irises rather than dots. Add the nose as a soft wedge and the mouth as a curved line with a slight lower lip. Wrinkles are optional; if used, place them along expression lines such as the outer eyes and mouth corners, and keep them light.
Final checks: the eye line is halfway down the face oval; the nose base is halfway between eye line and chin; the mouth line is one third below the nose; the hair silhouette frames the face; the shoulder line is sloped and the head tilt is small. Erase construction lines gently and darken only the contours you want to keep.
- Refine eyes, nose, and mouth from light marks.
- Add optional expression lines lightly.
- Recheck the three proportion divisions.
- Confirm hair silhouette and posture cues.
- Erase construction lines and darken final contours.
Worked example
A described reference shows a head height of 12 cm. The top of the head is at 0 cm and the chin at 12 cm. Find the eye line, nose base, and mouth line using the lesson convention.
Worked answer
Eye line at 6 cm (half of 12). Nose base at 9 cm (halfway between 6 and 12). Mouth line at 10 cm (one third of the 3 cm from nose base to chin is 1 cm below 9).
Four practice exercises
Exercise 1
A head oval is 10 cm tall from top to chin. Using the lesson convention, state the eye line, nose base, and mouth line positions measured from the top.
Show answer and check
Eye line at 5 cm; nose base at 7.5 cm; mouth line at 8.33 cm (approximately 8.3 cm).
Why: Half of 10 is 5. Halfway between 5 and 10 is 7.5. The distance from nose base to chin is 2.5 cm; one third is about 0.83 cm, so the mouth line is 7.5 + 0.83 = 8.33 cm.
Check: Re-add the divisions: 5 + 2.5 + 0.83 + 1.67 = 10 cm, matching the head height.
Exercise 2
A described reference has a shoulder line that slopes down 2 cm over a 12 cm width. The eye line tilts 1 cm over the same 12 cm width. Which line is more tilted, and by how much per 12 cm?
Show answer and check
The shoulder line is more tilted by 1 cm per 12 cm.
Why: Compare the vertical change over the same horizontal width: shoulder 2 cm, eye line 1 cm. The difference is 1 cm.
Check: Subtract the smaller change from the larger: 2 - 1 = 1 cm.
Exercise 3
A hair silhouette is drawn as a closed shape around a head oval. The silhouette touches the top of the skull and extends 3 cm below the chin at the sides. The eye line is 6 cm from the top on a 12 cm head. Does the hair cover the eye line at the sides if the silhouette side edge is 4 cm from the face oval? Explain using the given numbers.
Show answer and check
No, the hair does not cover the eye line at the sides because the side edge is outside the face oval; the eye line is on the face, not on the side hair.
Why: The eye line is a horizontal level on the face oval. The side hair edge is 4 cm away from the face oval, so it frames the face rather than crossing the eye level on the face.
Check: Mark the eye line on the face oval and confirm the hair silhouette side edge sits outside the oval at that level.
Exercise 4
A neck is drawn 3 cm wide under a head that is 9 cm wide. Using the lesson check that neck width is roughly one third of head width, is the neck within the suggested range? Show the arithmetic.
Show answer and check
Yes. One third of 9 cm is 3 cm, so the neck width matches the suggested check exactly.
Why: Divide head width by 3: 9 / 3 = 3 cm. The drawn neck is 3 cm.
Check: Multiply the neck width by 3: 3 x 3 = 9 cm, which equals the head width.
Common mistakes
- Drawing the eyes too high on the face oval. Measure the full head height and place the eye line at the halfway mark before drawing any features.
- Treating hair as many separate strands from the start. Draw one outer hair silhouette first, then divide it into a few strand groups.
- Making the shoulders perfectly horizontal and the head perfectly upright. Use a slight shoulder slope and a small head tilt, then check the angle against the eye line.
- Using heavy dark lines for gray or white hair. Leave more paper white and add only a few dark accents to suggest light hair.
Self-check rubric
- Face oval is drawn with a clear top and chin, and the eye line is at the halfway mark.
- Nose base is halfway between eye line and chin; mouth line is one third below the nose base.
- Hair is built as one outer silhouette before strand groups are added.
- Hairline remains visible at forehead and temples unless intentionally covered.
- Shoulder line is slightly sloped and head tilt is small and checked against the eye line.
- Neck width is checked against head width and chin is clear of the neck.
- Construction lines are light and final contours are darkened selectively.
- Valid alternatives are accepted: different hair silhouettes, small asymmetries, and optional expression lines are allowed if the proportion checks hold.
Questions and answers
Do I need a live model to use this method?
No. You can use a described reference or draw from imagination as long as you apply the same proportion checks. The method is a construction guide, not a likeness guarantee.
Are the proportion divisions universal?
No. They are a defined convention for this lesson. Real faces vary, so treat the divisions as a starting point and adjust after checking your own drawing.
How do I show gray hair without drawing every strand?
Build the hair silhouette first, then leave most of the area white and add a few dark strand-group lines. This reads as light hair more clearly than many thin lines.
What posture cues matter most in a portrait?
The slope of the shoulder line, the head tilt, and the neck width. These three cues carry most of the posture information in a head-and-shoulders portrait.