Free original lessons
Pencil Moon Drawing: Crater Shading and Phase Steps
Learn to draw the moon in pencil with crater shading and phase variation. Covers disc shading, crater placement, and full, crescent, and gibbous phases.
Free lesson
Four exercises
Worked answers
Object Drawing Lessons
Drawing the moon in pencil combines smooth tonal shading with the crisp edges of craters and the changing shape of lunar phases. This guide walks through shading a full disc, placing craters with believable depth, and adapting both to crescent and gibbous phases. All measurements are hypothetical examples; measure your own paper and pencil grades before setting values. The planned resources are described at the end and are not yet built.
Practice materials: Printable downloads are not available for this lesson yet. Use the instructions and four exercises below.
Reference illustration
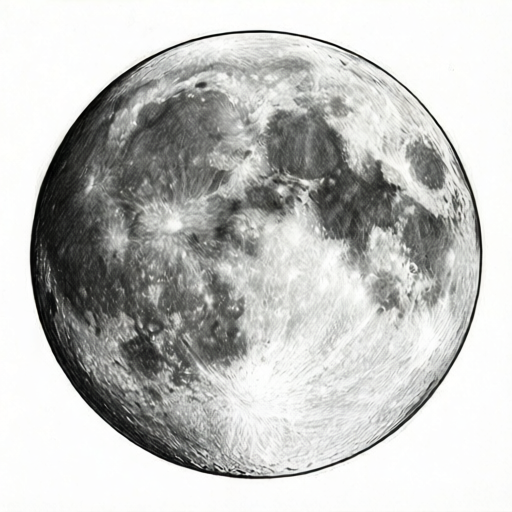
Use the stated measurements and conventions for each exercise.
Setting Up and Defining the Shading Convention
Work on smooth paper with a graphite range from 2H to 4B. Define a tonal scale of five steps: 1 is the lightest (2H, light pressure), 3 is mid-grey (HB, moderate pressure), and 5 is the darkest (4B, firm pressure). Keep the pencil sharp for crater rims and slightly blunt for broad disc shading.
Keep a fixed light direction for the whole study and note it with a small arrow at the edge of the page. When you label phases or tonal steps, write the label beside the disc and keep the same label position on every disc so the set is easy to compare.
- Draw a circle for the moon disc using a light 2H line; a hypothetical diameter of 10 cm fits a standard sheet.
- Mark the terminator (the day-night boundary) as a soft curve for the chosen phase.
- Test your five tonal steps on a scrap area and label them 1 to 5.
- Measure and note your actual paper size and pencil grades before drawing.
Shading the Disc and Placing Craters
Shade the lit portion with tonal steps 1 to 3, keeping the darkest shadow near the terminator. Craters read as depressions when the shadow sits on the side away from the light source and a thin bright rim faces the light. Vary crater size and spacing; avoid a uniform grid.
For a full moon, the terminator is at the disc edge, so shading is gentle and craters are distributed across the face. For a crescent, only a thin lit sliver remains; craters near the terminator show strong contrast. For a gibbous phase, most of the disc is lit but one edge is shadowed.
- Block in the lit area with step 2, then deepen toward the terminator with step 3.
- Draw three to five craters: an ellipse for the rim, a darker crescent inside on the shadow side, and a light rim on the lit side.
- Add a soft step 4 shadow just inside the terminator to suggest depth.
- Check that every crater shadow points consistently away from the light direction.
Adapting Craters to Phase Changes
Phase changes alter which craters are visible and how strong their shadows appear. Near the terminator, crater shadows lengthen and darken; on the fully lit side, they flatten to subtle tonal marks. Keep the light direction fixed across all phase drawings so the set reads as one consistent study.
Use the same crater positions across full, crescent, and gibbous discs to show how shading shifts with the phase. This makes the phase steps directly comparable.
- Draw the same crater layout on three blank discs.
- For the full moon, shade craters lightly with steps 2 and 3.
- For the crescent, darken craters near the terminator to step 4 and leave the sliver bright.
- For the gibbous, keep most craters at step 2 and deepen only those near the shadowed edge.
Worked example
Draw a gibbous moon with three craters, using a fixed light direction from the left. Shade the disc with tonal steps 1 to 3 and deepen craters near the shadowed right edge to step 4.
Worked answer
A gibbous disc with most of the face lit from the left, a soft terminator near the right edge, three craters whose shadows point right, and the rightmost crater deepened to step 4. Each label sits in the same position beside the disc and uses the same wording as the other phase discs.
Four practice exercises
Exercise 1
Draw a full moon disc with four craters. Use a light direction from the upper left. Shade the disc with steps 1 to 3 and give each crater a shadow on its lower-right side.
Show answer and check
A circular disc evenly lit with gentle shading, four craters with dark lower-right interiors and light upper-left rims, and no hard terminator at the edge.
Why: A full moon has the terminator at the disc edge, so shading stays soft. Crater shadows must point away from the upper-left light, which means lower-right.
Check: Confirm every crater shadow points lower-right and that the disc has no strong dark band at the edge.
Exercise 2
Draw a crescent moon with the lit sliver on the left. Place two craters near the terminator and shade them to step 4. Keep the sliver at step 1.
Show answer and check
A thin lit crescent on the left, a soft terminator on the right side of the sliver, and two craters near that terminator with dark step 4 shadows pointing right.
Why: Near the terminator, crater shadows lengthen and darken. The lit sliver stays bright, so contrast is high.
Check: Check that the sliver is the lightest area and that both crater shadows point away from the left light source.
Exercise 3
Draw a gibbous moon with light from the right. Use three craters in the same positions as your full moon drawing. Deepen only the crater nearest the shadowed left edge to step 4.
Show answer and check
A mostly lit disc with a soft shadowed edge on the left, three craters with shadows pointing left, and only the leftmost crater at step 4.
Why: In a gibbous phase most craters are on the lit side and stay subtle; only those near the terminator darken.
Check: Verify that crater positions match the full moon layout and that only the crater near the shadowed edge reaches step 4.
Exercise 4
Create a three-disc phase strip: full, crescent, and gibbous. Use the same crater layout on each disc and a fixed light direction from the top. Label each disc with its phase name in the same position beside the disc.
Show answer and check
Three discs in a row with identical crater positions, shadows pointing downward, and each phase name written in the same position beside its disc.
Why: A fixed light direction and shared crater layout make phase differences directly comparable. Consistent label placement keeps the strip easy to check.
Check: Compare crater positions across discs, confirm all shadows point down, and check that each phase label sits in the same position beside its disc.
Common mistakes
- Shading craters with a dark ring all around, making them look like bumps rather than depressions. Place the dark shadow only on the side away from the light and keep a thin light rim on the lit side.
- Using the same crater shadow direction on every phase drawing. Fix one light direction and adjust each crater shadow to point away from it, even as the terminator moves.
- Making the terminator a hard straight line. Soften the terminator with a gradual tonal transition from step 3 to step 4.
- Labeling phases or tonal steps in different places on each disc, making the set hard to compare. Put each label in the same position beside its disc and use the same wording for the same phase or step.
Self-check rubric
- Disc shape is circular and the terminator matches the chosen phase.
- Tonal steps 1 to 5 are distinguishable and used consistently.
- Crater shadows point away from the fixed light direction.
- Crater rims show a light edge on the lit side and a dark edge on the shadow side.
- Phase variation is visible across full, crescent, and gibbous discs.
- Labels for phases and tonal steps sit in the same position beside each disc and use consistent wording.
Questions and answers
Do I need special pencils?
No. A 2H, HB, and 4B cover the five-step tonal scale described here. Measure your own pencil grades and adjust pressure to match the steps.
How many craters should I draw?
Three to five well-placed craters are enough to show depth and phase variation without clutter.
How should I label the phases and tonal steps?
Write each label in the same position beside its disc and use the same wording for the same phase or step, so the discs can be compared at a glance.
Are the numerical values fixed?
No. The 10 cm diameter and pencil grades are hypothetical examples. Measure your actual paper and tools before setting values.