Free original lessons
Rainforest Drawing Plants: Leaves, Ferns and Vines
Learn to draw rainforest leaves, fern fronds and hanging vines using shape breakdowns, vein guides and a clear line convention.
Free lesson
Four exercises
Worked answers
Object Drawing Lessons
This lesson teaches you to draw three rainforest plant forms: broad leaves, fern fronds and hanging vines. You will use a simple line convention: all construction lines are light and removable, while final contour lines are firm and continuous. X-height means the distance from baseline to midline in lettering; letter styles vary, so use your own consistent handwriting for labels. Measure your actual paper and pencil before starting, and treat any numbers here as hypothetical examples. The goal is recognizable plant structure, not a single universal answer.
Practice materials: Printable downloads are not available for this lesson yet. Use the instructions and four exercises below.
Reference illustration
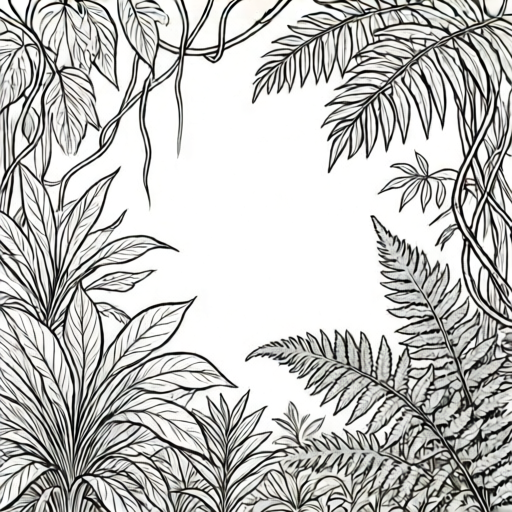
Use the stated measurements and conventions for each exercise.
Broad Leaf Shape Breakdown
A rainforest broad leaf usually has a central midrib, a rounded or pointed tip, and a wide blade that tapers toward the stem. Start with a light oval or teardrop outline, then add the midrib as a gentle curve. Keep the two sides unequal if the leaf droops; symmetry is not required.
Veins branch from the midrib toward the edge. Draw them as thin lines that stop short of the contour, leaving a small margin. This margin helps the leaf read as a flat surface rather than a spiky shape.
- Draw a light teardrop outline about 8 cm long on your paper; measure your own paper first.
- Add a curved midrib from stem to tip, slightly off-center.
- Draw 5 to 7 side veins per side, angled toward the tip.
- Firm the contour line and erase construction marks.
Fern Frond Structure
A fern frond is a stem with repeated leaflets. Begin with a long central rachis, then place leaflet pairs at decreasing size toward the tip. Leaflets can be rounded, pointed or lobed; choose one style and repeat it consistently.
Leave a small gap between leaflets and the rachis so the frond does not look like a solid comb. The lowest leaflets are usually the largest, and the tip tapers to a single small leaflet.
- Draw a light curved line for the rachis, about 12 cm long.
- Mark 6 to 8 leaflet positions per side, closer together near the tip.
- Draw each leaflet as a small oval or pointed shape, largest at the bottom.
- Firm the rachis and leaflet outlines, then erase guides.
Hanging Vine Curves
A hanging vine is a long, loose curve with small leaves attached at intervals. Start with a single sweeping line that droops downward, then add side branches. Avoid perfectly straight lines; vines sag and twist.
Attach leaves in alternating pairs or single leaves along the vine. Keep leaf size small relative to the vine length so the plant reads as trailing rather than bushy.
- Draw a light S-curve or drooping arc about 15 cm long.
- Add 2 or 3 short side branches branching off the main vine.
- Place small leaves at 2 cm intervals along the vine and branches.
- Firm the vine line and leaf outlines, then erase construction marks.
Combining the Three Forms
Place a broad leaf at the top, a fern frond beside it, and a vine hanging below. Overlap them slightly so the composition feels connected. Use the same line weight for all final contours.
Check that each plant form keeps its own structure: the leaf has a midrib, the fern has repeated leaflets, and the vine has a continuous trailing line. Label each part using your normal handwriting; x-height is baseline to midline, and letter styles vary.
- Sketch light placement boxes for each plant form.
- Draw the broad leaf first, then the fern, then the vine.
- Adjust overlaps so no form hides another completely.
- Firm all contours and erase guides.
Worked example
Draw a single broad leaf about 8 cm long with a curved midrib and 6 side veins per side, then firm the contour and erase guides.
Worked answer
A teardrop outline with a gently curved midrib slightly off-center, 6 thin veins per side stopping short of the edge, and a firm continuous contour with no visible construction lines.
Four practice exercises
Exercise 1
Draw a broad leaf 10 cm long with a midrib curved to the left and 5 veins per side. Describe the shape you produce.
Show answer and check
A teardrop or oval blade with a left-curving midrib, 5 veins per side angled toward the tip, and veins stopping about 5 mm short of the edge.
Why: The midrib curve sets the leaf droop, and the vein count and margin keep the blade readable as a flat surface.
Check: Measure the leaf length on your paper; count 5 veins per side; confirm each vein stops before the contour.
Exercise 2
Draw a fern frond 12 cm long with 7 leaflet pairs, largest at the bottom and smallest at the tip. Describe the spacing.
Show answer and check
A curved rachis with 7 leaflet pairs per side, each pair smaller than the one below, and a small gap between each leaflet and the rachis.
Why: Repeated leaflets of decreasing size create the fern rhythm, and gaps prevent a solid comb look.
Check: Count 7 pairs per side; compare the bottom pair to the top pair to confirm size decrease; check for visible gaps at the rachis.
Exercise 3
Draw a hanging vine 15 cm long with an S-curve, 2 side branches and 8 small leaves. Describe where the leaves sit.
Show answer and check
A drooping S-curve with 2 short side branches and 8 small leaves spaced about 2 cm apart along the vine and branches.
Why: The S-curve suggests sag, and small leaves at intervals keep the vine reading as trailing rather than bushy.
Check: Measure the vine length; count 2 side branches and 8 leaves; confirm leaves are small relative to vine length.
Exercise 4
Combine one broad leaf, one fern frond and one hanging vine in a single composition with slight overlaps. Describe the overlap order.
Show answer and check
The broad leaf sits at the top, the fern frond beside it, and the vine hangs below; overlaps are slight so each form keeps its key structure visible.
Why: Slight overlaps connect the composition without hiding the midrib, leaflets or trailing vine line.
Check: Check that each form still shows its key structure; confirm no form is completely hidden; verify final contours are firm and guides erased.
Common mistakes
- Making both sides of a broad leaf perfectly symmetrical. Let one side curve more than the other to suggest droop or perspective.
- Drawing fern leaflets as a solid comb touching the rachis. Leave a small gap between each leaflet and the central stem.
- Using the same leaf size along an entire vine. Vary leaf size slightly and keep leaves small relative to vine length.
- Drawing veins all the way to the leaf edge. Stop veins short of the contour to keep the blade reading as a surface.
Self-check rubric
- Broad leaf has a visible midrib and side veins that stop short of the contour.
- Fern frond shows repeated leaflets of decreasing size toward the tip with small gaps at the rachis.
- Vine is a continuous drooping line with small leaves at intervals and at least one side branch.
- Final contour lines are firm and continuous; construction lines are erased or very light.
- Labels use consistent handwriting; x-height is baseline to midline and letter style may vary.
Questions and answers
Do I need to measure my paper before drawing?
Yes. Measure your actual paper and pencil, and treat any centimeter values in this lesson as hypothetical examples only.
Can I use different leaf shapes?
Yes. The convention allows rounded, pointed or lobed leaflets as long as you repeat one style consistently within a frond.
How do I know my drawing is correct?
Check that each form has its key structure: midrib and veins for leaves, repeated leaflets for ferns, and a continuous trailing line for vines.
Should construction lines be visible in the final drawing?
No. Construction lines are light and removable; final contour lines are firm and continuous.